Key Takeaways
- Use stone-ground yellow cornmeal, buttermilk, and eggs at room temperature for authentic Southern cornbread with proper texture and binding.
- Preheat a seasoned cast-iron skillet to 425°F with butter or bacon grease to achieve the signature golden, crispy crust.
- Combine dry ingredients separately, gently fold in wet ingredients, then pour batter into sizzling skillet for immediate crust formation.
- Serve alongside collard greens, black-eyed peas, or chili with sweet tea, buttermilk, or cold lemonade for traditional Southern pairings.
- Store at room temperature for two days or freeze individual squares for up to three months in freezer bags.
Ingredients You’ll Need
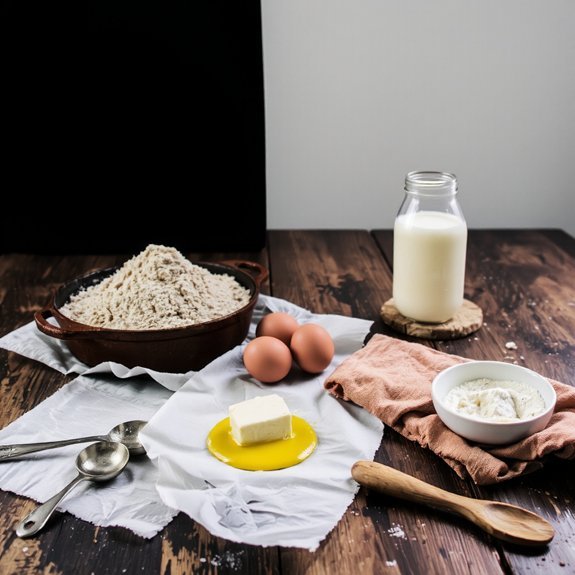
You’ll need just a handful of pantry staples to craft authentic Southern cornbread, a tradition rooted in Native American cooking techniques and refined through generations of American home cooks.
Start with cornmeal—your ingredient sourcing matters here, as cornmeal varieties markedly impact flavor and texture. Choose stone-ground yellow cornmeal for authentic results, avoiding overly processed options that lack character.
Gather all-purpose flour, buttermilk, eggs, butter, and salt. Some recipes call for a touch of sugar, though purists skip it.
Baking soda serves as your leavening agent, creating that signature tender crumb.
Quality ingredient sourcing elevates your final product. Source local cornmeal when possible; regional producers often maintain traditional grinding methods.
Fresh buttermilk and room-temperature eggs guarantee proper binding. These simple, freedom-respecting ingredients combine into Southern cornbread’s distinctive taste and rustic appeal.
Why Cast Iron Matters
You’ll find that cast iron’s superior heat distribution and retention create the golden, evenly-cooked crust that defines authentic Southern cornbread.
When you season your skillet over time, you’re building layers of polymerized oil that not only prevent rust but infuse your cornbread with a subtle, irreplaceable depth of flavor.
Cast iron cookware has endured as a kitchen staple for generations precisely because it improves with use rather than deteriorates, making it a practical investment for any cook serious about their craft.
Heat Distribution and Retention
Because cast iron heats slowly and holds that warmth with remarkable tenacity, it’s become the traditional vessel for Southern cornbread since the 18th century. You’ll appreciate how this property liberates you from constant temperature monitoring.
Cast iron’s thermal mass creates consistent heat zoning throughout your skillet, eliminating hot spots that plague conventional pans. When you preheat properly, the iron radiates steady, even warmth that cooks your cornbread uniformly without burning edges or leaving a pale center.
Oven calibration becomes secondary because cast iron compensates for minor temperature fluctuations. This reliability meant early cooks could produce predictable results with wood-fired ovens, and it means you can today. Your cast iron skillet isn’t merely cookware—it’s thermal insurance against cornbread disappointment.
Seasoning Builds Flavor
Layering fat into cast iron’s porous surface creates a natural nonstick coating that fundamentally transforms how cornbread tastes.
You’re not just cooking—you’re engaging chemistry that’s been perfected over centuries.
When you preheat your seasoned skillet, the fat undergoes chemical reactions that enhance flavor compounds in your batter.
This Maillard reaction generates complex aromas that can’t develop in conventional pans.
You’ll notice the difference immediately: deeper golden crust, richer taste.
The cast iron’s thermal mass distributes heat evenly, allowing sodium, cornmeal, and butter to interact more thoroughly.
Your cornbread absorbs these flavors deeply rather than sitting passively in a pan.
Aroma development intensifies as the crust forms, signaling that your seasoning is working precisely as intended.
This isn’t nostalgia—it’s pure physics and chemistry working in your favor.
Durability Across Generations
While modern nonstick cookware promises convenience, cast iron delivers something far more valuable: permanence.
You’re not just cooking cornbread—you’re participating in heirloom preservation that spans generations.
Cast iron skillets pass down family secrets through oral traditions, each seasoning layer telling stories of your ancestors’ kitchens.
Your cast iron investment outlasts trends and fads.
Consider these enduring advantages:
- Multi-generational durability: Cast iron improves with age, never wearing out or needing replacement
- Seasoning inheritance: Each cook adds character, creating unique flavor profiles passed forward
- Independence from manufacturers: You’ll never depend on corporate replacements or obsolete technology
When you bake cornbread in your grandmother’s skillet, you’re reclaiming autonomy over your food and your family’s narrative. That’s freedom worth preserving.
Step-by-Step Instructions
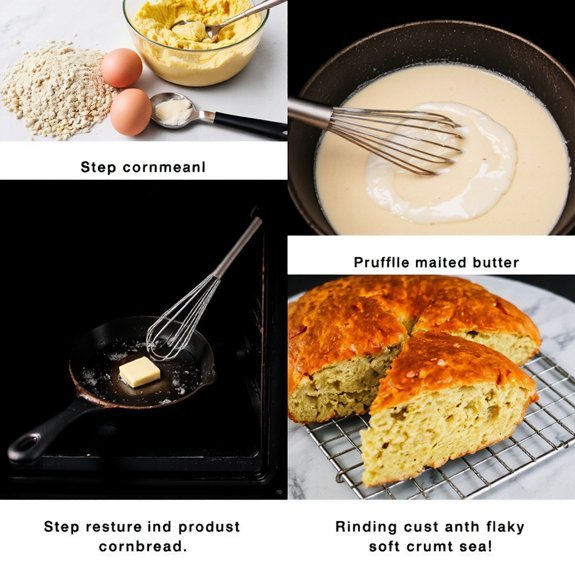
Making authentic Southern cornbread requires you to follow a carefully orchestrated sequence that honors generations of culinary tradition.
You’ll start by preheating your cast-iron skillet to 425 degrees—this vessel’s thermal properties are essential for achieving that coveted golden crust your ancestors perfected.
Combine your dry ingredients first: cornmeal, flour, baking powder, and salt. Your mixing order matters; this prevents clumping and guarantees even leavening.
Whisk your wet ingredients separately—buttermilk, eggs, and melted butter—then fold them together gently.
Pour the batter into your sizzling skillet. The immediate heat creates that signature crispy exterior while keeping the interior tender.
Bake for 20-25 minutes until golden brown.
Your cooling technique determines texture. Let it rest in the skillet for five minutes—this allows carryover cooking and structural setting—before turning it out onto a wire rack.
The Secret to Perfect Crust
What separates mediocre cornbread from the kind that commands a seat at your family table?
The crust. You’ll achieve that coveted golden exterior through Maillard chemistry—the chemical reaction that occurs when you heat your cast-iron skillet properly before pouring in batter.
Here’s what you need to know:
- Preheat your skillet to 425°F with butter or bacon grease for 5 minutes
- Pour batter into the screaming-hot pan immediately for maximum crust development
- Don’t skip the cooling period; let your cornbread rest 10 minutes before slicing
This cooling period allows the crust to set and harden, preserving that satisfying crunch.
Your ancestors understood this principle instinctively. You’re not just following a recipe—you’re reclaiming a tradition of excellence that refuses compromise.
Variations and Add-Ins

Once you’ve mastered the foundational technique, you’ll discover that Southern cornbread has always been a canvas for regional innovation and family preference.
You might add jalapeños and cheddar for a sharp bite, or incorporate crispy bacon bits for smoky depth. Holiday variations flourish across the South—some families mix in creamed corn, while others fold in fresh herbs like thyme.
You’re not bound by tradition; consider diet swaps like Greek yogurt replacing buttermilk or almond flour substituting cornmeal for gluten-free versions. Corn kernels, green chiles, and caramelized onions offer texture and complexity.
Each addition tells a story of adaptation and resourcefulness, reflecting how cooks have historically transformed simple ingredients into expressions of regional identity and personal liberty.
Storage and Reheating Tips
Your carefully crafted cornbread—whether you’ve kept it traditional or embellished it with jalapeños and bacon—deserves proper care to maintain its tender crumb and golden exterior long after it leaves the skillet.
Store your cornbread in airtight containers at room temperature for up to two days.
For extended preservation, you’ll want to employ freezer portioning.
Cut your cornbread into individual squares and wrap each piece in plastic wrap before placing them in freezer bags.
This method prevents freezer burn while allowing you to thaw only what you need.
To reheat:
- Wrap pieces in damp paper towels and microwave for 20-30 seconds
- Place in a 350°F oven for 10 minutes for crispier edges
- Toast individual squares for quick breakfast servings
Properly stored cornbread maintains its quality for three months in the freezer.
Serving Suggestions
Southern cornbread’s versatility shines when you pair it thoughtfully with complementary dishes and occasions.
For traditional side pairings, serve it alongside slow-cooked collard greens, black-eyed peas, or hearty chili—classic combinations rooted in Southern foodways.
You’ll find cornbread equally at home at casual weeknight suppers or formal holiday tables.
Beverage matches matter too.
Sweet tea remains the quintessential pairing, though unsweetened versions work beautifully for those preferring less sugar.
Buttermilk complements cornbread’s richness, while cold lemonade cuts through heavier meat dishes.
For evening gatherings, bourbon or whiskey honors cornbread’s folk heritage.
Don’t overlook breakfast possibilities either.
Crumbled cornbread transforms morning dishes, from savory scrambled eggs to creamy corn chowder.
Its neutral flavor profile grants you freedom to experiment across any meal, making it genuinely indispensable to your table.
Frequently Asked Questions
Can I Make Southern Cornbread Without Buttermilk, and What’s a Good Substitute?
You can definitely make southern cornbread without buttermilk. Your best bets are yogurt substitute or acidified milk—both’ll give you that tangy depth cornbread’s traditionally relied on.
Mix regular milk with lemon juice or vinegar, letting it sit five minutes. Alternatively, Greek yogurt thinned with milk works perfectly.
These substitutes won’t compromise your independence in the kitchen; they’ll deliver authentic flavor and that tender crumb you’re after.
How Do I Know When My Cornbread Is Fully Baked and Done Cooking?
You’ll know your cornbread’s done when you’ve got a golden-brown crust and a toothpick inserted into the center comes out clean or with just a few moist crumbs.
An internal temperature of 205-210°F signals you’ve reached doneness.
Don’t overbake it—that’s where liberty lies in the kitchen. Trust your instincts, check early, and you’ll master this American staple every time.
Why Does My Cornbread Turn Out Dry, and How Can I Fix It?
You’re likely overbaking or using too little fat. Traditional Southern cornbread relies on a proper fat ratio—typically one part fat to three parts cornmeal—to achieve that characteristic moist crumb.
Your mixing technique matters too; don’t overwork the batter, as this develops gluten and toughens the bread. Keep your oven temperature steady, and pull that skillet out when a toothpick shows just a few moist crumbs.
Trust your instincts over exact timing.
Can I Freeze Southern Cornbread, and How Long Does It Stay Fresh?
You can absolutely freeze your cornbread for up to three months. Store it in airtight storage containers or wrap it tightly in foil to prevent freezer burn.
When you’re ready to enjoy it, you’ve got thawing tips worth knowing: let it sit at room temperature for two hours, or reheat it wrapped in foil at 350°F for fifteen minutes. This preserves that authentic, moist texture your ancestors perfected.
What’s the Difference Between Southern Cornbread and Northern Cornbread Recipes?
You’ll find that Southern and Northern cornbread recipes diverge markedly based on their Historical Origins and ingredient choices.
Southern versions traditionally use a finer Cornmeal Grind and incorporate buttermilk, creating a tender, slightly sweet crumb.
Northern recipes favor coarser meal and add sugar and eggs, yielding denser, sweeter bread.
These regional distinctions reflect each area’s agricultural heritage and cultural preferences, giving you authentic options for your kitchen independence.
Leave a Comment