Key Takeaways
- Combine flour, warm water, yeast, salt, butter, and sugar; knead 8–10 minutes until smooth and elastic.
- Let dough rise in an oiled bowl for 90 minutes at 75°F until it doubles in size.
- Roll dough into eight equal ropes, shape into twists, then submerge in hot baking soda bath 30–45 seconds per side.
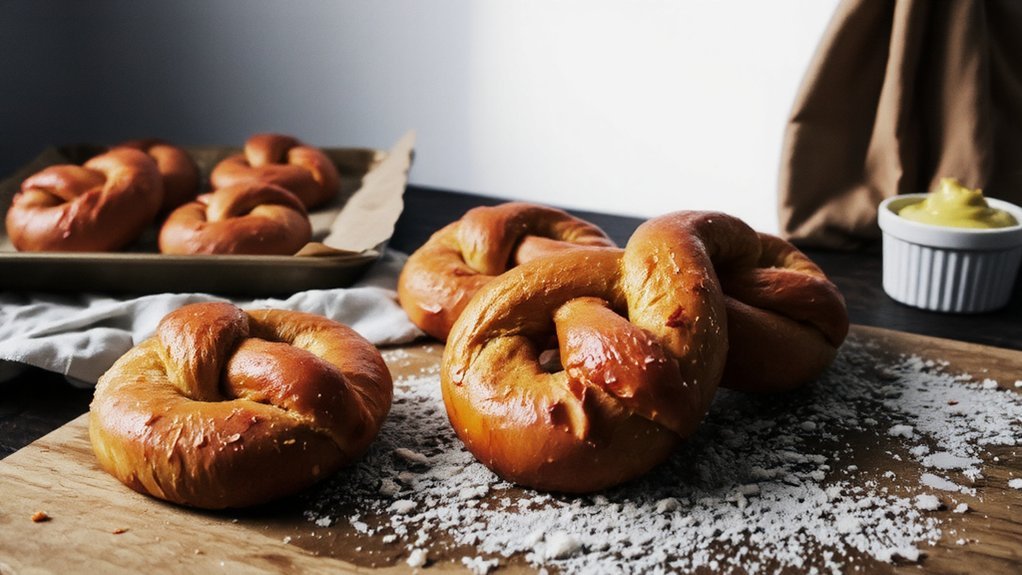
- Bake pretzels at 425°F for 12–15 minutes until mahogany brown with a firm, crispy exterior and chewy interior.
- Serve warm with mustard or cheese sauce; store in airtight containers up to two days or freeze for three months.
Ingredients You’ll Need
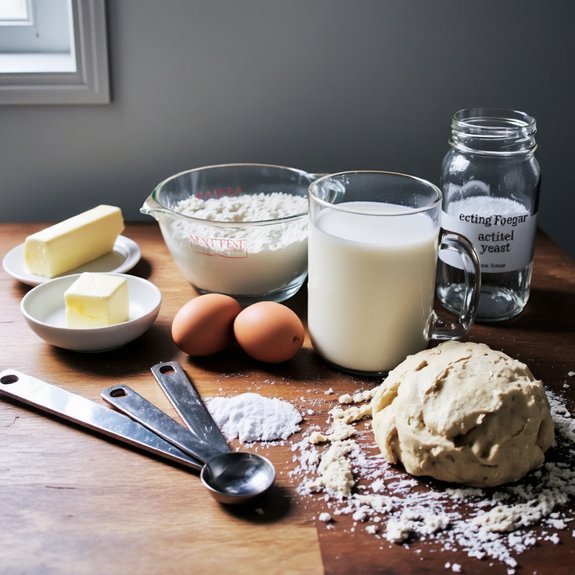
You’ll need all-purpose flour (about 3 cups), warm water (1 cup), active dry yeast (2¼ teaspoons), salt (1½ teaspoons), granulated sugar (2 tablespoons), unsalted butter (2 tablespoons melted), baking soda (¼ cup for the water bath), coarse salt (for topping), and an egg (1 large for the egg wash).
For flour selection, choose unbleached all-purpose flour for superior texture and flavor development.
Don’t settle for lower-quality brands that compromise your results.
Regarding yeast varieties, active dry yeast works perfectly here, though you can substitute instant yeast at the same measurement if preferred.
Make sure your yeast hasn’t expired—check the package date before starting.
Gather all ingredients before mixing to streamline your process.
Room temperature ingredients blend more efficiently, so remove butter and eggs from refrigeration beforehand.
This preparation prevents delays and guarantees consistent, reliable outcomes for your homemade pretzels.
Equipment and Tools
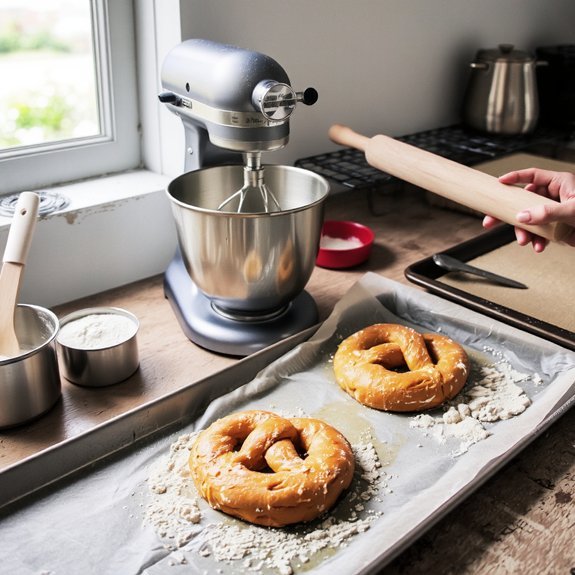
You’ll need essential baking equipment like a stand mixer, measuring cups, and a kitchen scale to prepare your dough accurately.
For shaping and twisting, gather a bench scraper, parchment paper, and a work surface where you can comfortably form your pretzel shapes.
You’ll also require boiling and baking supplies including a large pot for the water bath, baking soda, and sheet pans lined with parchment to bake your pretzels to golden perfection.
Essential Baking Equipment
Success in soft pretzel baking hinges on having the right tools at your disposal.
You’ll need a sturdy stand mixer or food processor for dough preparation, which saves you time and effort.
Invest in quality baking sheets and parchment paper to prevent sticking and promote even browning.
A Dutch oven or covered baking vessel traps steam, creating that signature chewy crust you’re after.
For appliance maintenance, clean your mixer immediately after use to extend its lifespan.
You’ll want a reliable oven thermometer to guarantee accurate temperatures—critical for perfect results every time.
A kitchen scale provides precision for ingredient measurements, while a bench scraper handles dough with ease.
Consider energy efficiency by using convection settings when available, reducing baking time considerably.
These essential tools empower you to create bakery-quality pretzels at home consistently.
Shaping and Twisting Tools
Mastering the classic pretzel twist requires specialized tools that make shaping dough easier and more consistent. You’ll want to invest in quality equipment that honors both artisan training and the cultural symbolism embedded in pretzel-making traditions.
| Tool | Purpose |
|---|---|
| Bench scraper | Dividing dough into uniform portions |
| Wooden dowel | Rolling and shaping rope thickness |
| Work surface mat | Preventing sticking while twisting |
You’ll find that a bench scraper gives you precise control over dough portions, ensuring every pretzel matches perfectly. A wooden dowel helps you achieve consistent rope diameter—critical for even baking. Your work surface mat prevents frustration by keeping dough manageable throughout the shaping process.
These tools liberate you from guesswork, letting you focus on developing your technique and creating authentic, beautifully-shaped pretzels that reflect traditional craftsmanship.
Boiling and Baking Supplies
Once your dough’s shaped into perfect twists, the next phase demands equally specialized equipment for boiling and baking.
You’ll need a large stainless steel pot for boiling—at least six quarts—since pretzels require plenty of water and baking soda solution.
A slotted spoon or skimmer lets you handle pretzels without damaging them.
Consider investing in sheet pans with raised edges to catch drippings and prevent sticking.
For baking, you’ll want an oven thermometer ensuring precise temperature control.
A wire cooling rack prevents soggy bottoms after baking.
Stock your supplies strategically—order baking soda and salt from bulk suppliers to maximize savings and minimize packaging waste.
Use reusable packaging containers for storage, reducing environmental impact while maintaining ingredient freshness.
These tools transform your pretzel-making process from complicated to streamlined.
How to Make the Dough

Creating the perfect soft pretzel dough requires attention to ingredient ratios and mixing technique.
You’ll combine warm water, yeast, flour, salt, and butter in a large bowl, mixing until a shaggy dough forms.
Your kneading technique matters substantially—work the dough for eight to ten minutes until it’s smooth and elastic, giving you full control over texture and consistency.
Fermentation control determines your pretzel’s final quality.
You’ll let the dough rise in an oiled bowl for approximately ninety minutes until it doubles in size.
This first rise develops flavor and structure without rushing the process.
Don’t skip this step; proper fermentation guarantees you achieve that authentic chewy interior and tender crumb you’re after.
Temperature matters—keep your workspace around seventy-five degrees for ideal results.
Shaping Your Pretzels
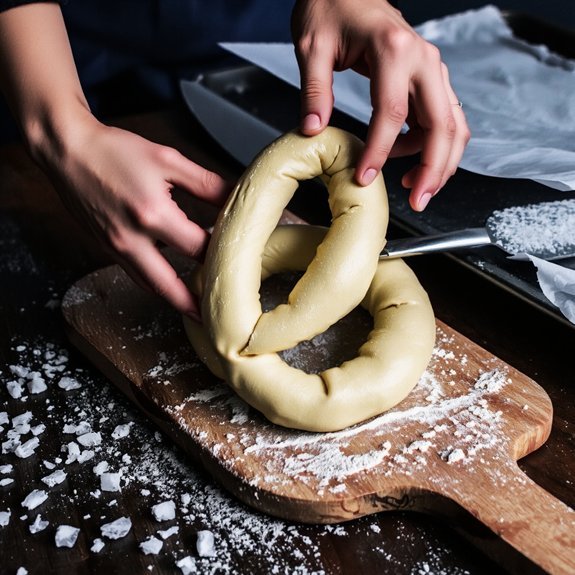
After your dough has doubled in size, you’ll punch it down and divide it into eight equal portions, each weighing roughly two ounces. Roll each portion into a 24-inch rope, keeping tension consistent for uniform thickness.
| Shaping Technique | Regional Styles |
|---|---|
| Classic twist | Philadelphia traditional |
| Knot formation | Bavarian method |
| Loop-and-cross | NYC street vendor |
Form your pretzel by creating a U-shape, then crossing the rope ends and pressing them firmly into the base. You’re not bound by one approach—experiment with regional styles that resonate with your preferences.
Pay attention to finishing aesthetics; uniform shapes guarantee even baking and professional presentation. Your shaping directly impacts how your pretzels bake and how they’ll be received. Work deliberately, maintaining consistent tension throughout each rope for superior results.
The Baking Soda Bath
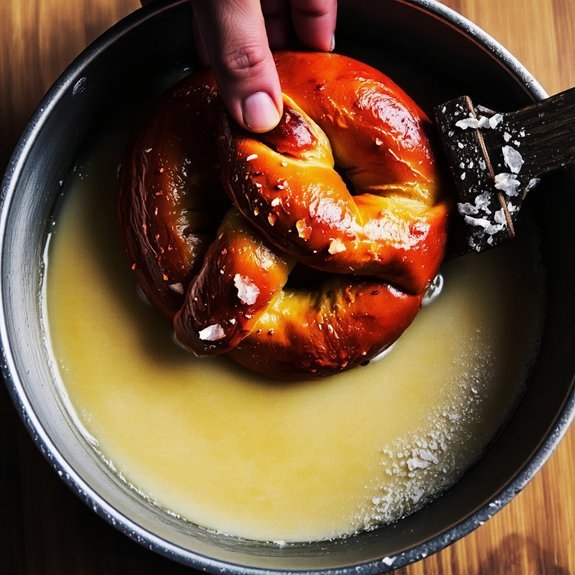
You’ll dip your shaped pretzels into a baking soda bath to develop that signature dark, chewy crust that distinguishes homemade soft pretzels from ordinary bread. The alkaline environment created by the baking soda solution causes the pretzel’s exterior to caramelize rapidly during baking, giving you that distinctive mahogany color and tender texture.
Getting your timing and temperature right—typically a quick 30-second submersion in a hot baking soda solution—ensures you achieve the perfect crust without compromising the soft interior.
Why Baking Soda Matters
The baking soda bath is what transforms ordinary bread dough into an authentic soft pretzel with its distinctive chewy exterior and deep mahogany color.
You’ll discover that this critical step isn’t optional—it’s fundamental to achieving that signature pretzel texture and appearance.
Here’s why you can’t skip this process:
- Browning acceleration: The alkaline environment causes rapid Maillard reactions, creating that beautiful mahogany crust you’re after
- pH regulation: Baking soda raises dough alkalinity, developing the pretzel’s characteristic chewy texture and distinctive flavor
- Crust development: The bath creates a unique surface that yields when you bite into it
When you submerge your shaped dough for just 30 seconds per side, you’re effectively unleashing the pretzel’s true potential.
This chemical transformation separates authentic pretzels from imitations, giving you complete control over your final product’s quality and authenticity.
Achieving the Perfect Crust
Now that you understand why the baking soda bath matters, let’s walk through executing it perfectly to lock in that coveted crust.
Heat your water to 212°F and dissolve baking soda at a 1:16 ratio. This alkaline solution kickstarts the Maillard reaction, creating that signature dark brown exterior.
Boil each pretzel for 30-45 seconds per side. Watch for visual indicators: your dough should darken slightly and develop a subtle sheen.
Use your touch technique to confirm readiness—the surface firms up noticeably when properly treated.
Transfer pretzels immediately to a lined baking sheet. Don’t let them sit in the bath too long, or they’ll become rubbery.
Your timing directly determines whether you’ll achieve that perfect chewy-yet-crispy texture that defines authentic soft pretzels.
Temperature and Timing Tips
Because precision separates excellent pretzels from mediocre ones, mastering your baking soda bath’s temperature and timing is non-negotiable.
You’ll want to maintain your bath at 210°F for ideal browning and that signature pretzel texture.
Submerge each shaped dough for 30-45 seconds, flipping halfway through.
Don’t rush this step—it’s what creates your distinctive crust.
Consider these critical adjustments:
- Seasonal adjustments: In humid months, reduce bath time by 10 seconds to prevent excessive browning
- Altitude adaptations: At higher elevations, increase bath temperature by 5°F to compensate for lower boiling points
- Testing consistency: Use a reliable thermometer to verify temperature; calibrate it monthly
You’ll achieve superior results by respecting these parameters.
Your freedom to experiment comes after you’ve mastered the fundamentals.
This bath stage determines whether you’re baking world-class pretzels or settling for mediocre results.
Baking to Golden Perfection
Once you’ve shaped and proofed your pretzels, you’re ready for the oven—where proper technique transforms them into golden, crispy-exterior treats with soft, chewy centers. Preheat to 425°F and position your rack in the middle position for even heat distribution.
Place pretzels on a lined baking sheet, spacing them two inches apart. Bake for 12-15 minutes until they’ve achieved that perfect mahogany brown. Understanding Color Science helps you recognize doneness—you’re targeting rich golden tones, not pale or burnt results.
Use Photography Techniques to document your progress; the visual cues matter. Look for steam rising initially, then watch as moisture evaporates and browning intensifies. Remove them when the crust firms but before over-darkening occurs. This precision guarantees you’ll master pretzel-baking every time.
Serving and Storage Tips
Your freshly baked pretzels deserve proper handling to maintain their quality.
You’ll want to enjoy them at peak freshness while preserving their soft texture for days afterward.
For immediate serving, pair your pretzels with mustard, cheese sauce, or cinnamon sugar—whatever satisfies your taste preferences.
You control the experience.
Storage guidelines:
- Keep pretzels in airtight storage containers at room temperature for up to two days
- Freeze wrapped pretzels for extended storage up to three months
- Reheat frozen pretzels at 350°F for five minutes until warm throughout
Store containers away from direct sunlight and moisture.
Before serving leftovers, refresh them briefly in the oven to restore their original texture. This approach gives you maximum flexibility while preserving your baking investment.
Frequently Asked Questions
Can I Make Soft Pretzel Dough Ahead of Time and Refrigerate It Overnight?
You can absolutely refrigerate your pretzel dough overnight. Cold fermentation’ll develop superior flavor complexity while you sleep.
Simply prepare your dough, seal it in an airtight container, and let it rest 8-16 hours in the fridge.
This overnight flavor development creates a more authentic, nuanced taste than same-day preparation. When you’re ready, let the dough warm to room temperature before shaping and boiling.
You’ve got total control over your timeline and taste.
Why Did My Pretzels Turn Out Dense and Chewy Instead of Soft and Fluffy?
Your pretzels turned dense and chewy because you’re likely using the wrong flour choice and over-kneading.
You’ve gotta use bread flour or all-purpose flour—not whole wheat or low-protein varieties. Don’t overwork your dough; knead it just until smooth, about 8-10 minutes.
Over-kneading develops excessive gluten, creating that tough texture. Additionally, you’re probably boiling them too long. Keep it brief—30 seconds per side—to maintain that desirable soft, fluffy interior you’re after.
What’s the Purpose of the Baking Soda Bath and Can I Skip It?
You can’t skip the baking soda bath—it’s essential.
The alkaline solution triggers browning chemistry, creating that signature pretzel crust formation you’re after.
Without it, you’ll get ordinary bread, not authentic pretzels.
The bath chemically transforms your dough’s surface, developing the distinctive mahogany color and chewy-outside, soft-inside texture. Skip this step, and you’ve lost what makes pretzels uniquely satisfying. Don’t compromise your freedom to make genuine pretzels.
How Do I Prevent My Pretzels From Becoming Hard After They Cool Down?
You’ll keep your pretzels soft by storing them in an airtight container at room temperature—they’ll stay fresh for two days.
For storage tips beyond that, freeze them individually wrapped.
When you’re ready to enjoy them, use reheating methods like wrapping them in damp paper towels and microwaving for 20-30 seconds, or steaming them briefly.
This restores that desirable chewy texture you’ve worked hard to achieve.
Can I Freeze Unbaked Pretzel Dough for Later Use?
Yes, you can freeze unbaked pretzel dough effectively.
Wrap your dough tightly using proper packaging methods—plastic wrap and freezer bags work best to prevent freezer burn.
You’ll enjoy extended shelf longevity of up to three months.
When you’re ready to bake, thaw it overnight in your refrigerator, then shape and boil your pretzels as usual.
This approach gives you complete control over your baking schedule without compromising dough quality.
Leave a Comment