Key Takeaways
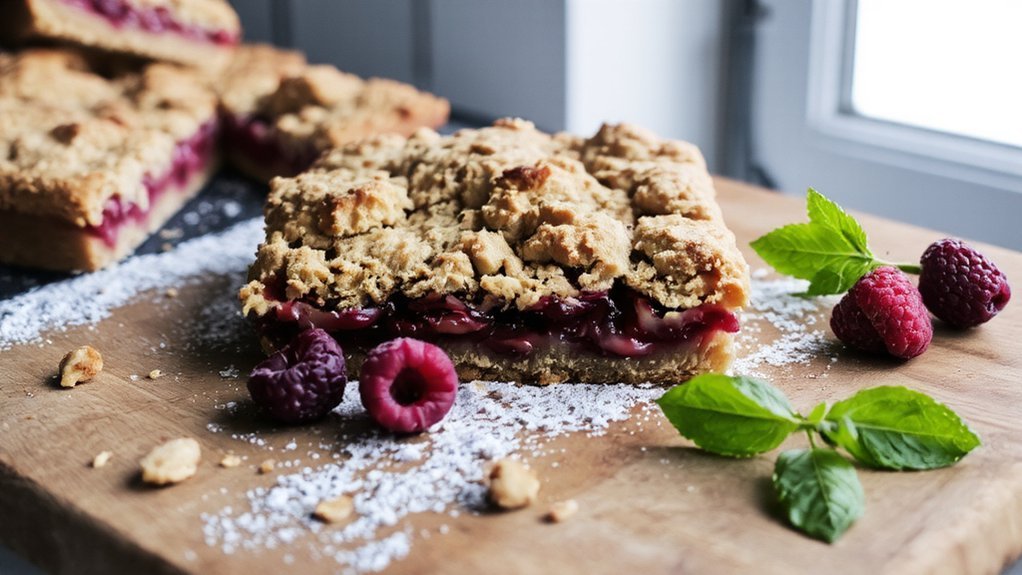
- Layer a buttery shortbread base, raspberry filling thickened with cornstarch, and a crispy oat crumble topping in a 9×13-inch pan.
- Bake the shortbread base at 350°F for 12–15 minutes until lightly golden, then cool slightly before spreading the raspberry layer.
- Simmer fresh or frozen raspberries with sugar and lemon juice for 8–10 minutes, stirring until thick and spreadable like jam.
- Bake assembled bars at 350°F for 25–30 minutes until the crumble topping is golden brown and filling bubbles at edges.
- Cool completely in the pan for at least two hours before cutting with a warm knife for clean, professional-looking edges.
Ingredients You’ll Need
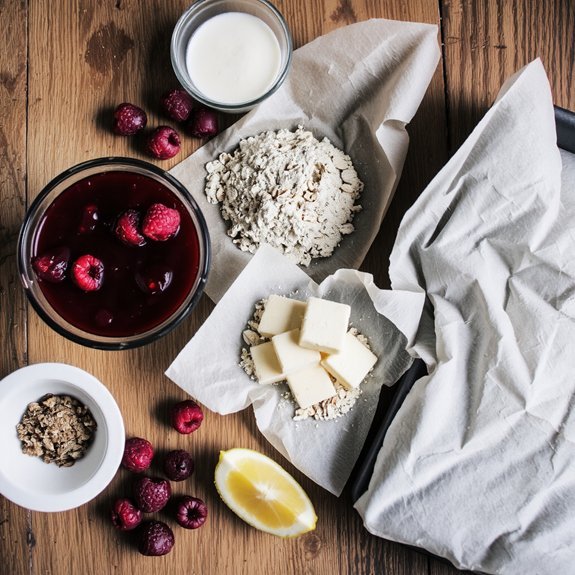
You’ll need just a handful of components to assemble these bars: 1½ cups all-purpose flour, ¾ cup granulated sugar, ½ cup cold unsalted butter (cut into cubes), 1 large egg yolk, ½ teaspoon vanilla extract, ¼ teaspoon salt, 1½ cups fresh or frozen raspberries, and 2 tablespoons cornstarch.
These pantry staples combine to create a buttery base and crumbly topping.
The cornstarch thickens the raspberry filling, preventing excess moisture from seeping through your bars.
You’re free to make dietary swaps based on your preferences. Substitute all-purpose flour with whole wheat or gluten-free blends.
Replace granulated sugar with coconut sugar or monk fruit sweetener. Use salted butter if you prefer, adjusting the salt accordingly. Fresh raspberries deliver the best flavor, though frozen varieties work equally well—there’s no need to thaw them before using.
Equipment and Tools
You’ll need a 9×13-inch baking pan to make sure your bars bake evenly and achieve the proper thickness.
Select a medium-sized mixing bowl that accommodates your dry ingredients without crowding, allowing you to blend them thoroughly without spillage.
Having these specific pieces on hand before you begin mixing guarantees an efficient, seamless preparation process.
Essential Baking Pans
A 9×13-inch rectangular baking pan serves as the foundation for these raspberry crumble bars, and it’s the only pan you’ll need for this recipe.
You’ll want to choose between metal or glass pan materials—metal conducts heat efficiently for even baking, while glass allows you to monitor browning from below.
For best results, make sure your pan has a light-colored surface to prevent over-browning.
Before you begin, spray it with non-stick cooking spray or line it with parchment paper for easy removal.
Maintenance tips are straightforward: hand-wash your pan with warm soapy water immediately after use to prevent stubborn residue buildup.
Avoid abrasive scrubbers that’ll damage the surface.
Store it dry in a cool location.
With proper care, your pan’ll deliver perfect bars batch after batch.
Mixing Bowl Selection
Once you’ve prepared your baking pan, you’ll need mixing bowls to combine your dry and wet ingredients separately.
Selecting the right bowls empowers you to work efficiently and maintain ingredient integrity throughout your preparation process.
Choose bowls that serve your needs:
- Glass bowls – Durable, heat-resistant, and enhance kitchen aesthetics while offering visibility of ingredient mixing
- Stainless steel bowls – Professional-grade options with excellent brand reputation for durability and temperature control
- Ceramic bowls – Lightweight alternatives that combine functionality with visual appeal
Select appropriately sized bowls—one roughly two-quarts for dry ingredients and another for wet components.
Make sure they’re clean and dry before starting.
Quality bowls from reputable brands won’t degrade or transfer unwanted flavors to your raspberry filling or crumble topping, guaranteeing precise results every time.
Preparing the Shortbread Base
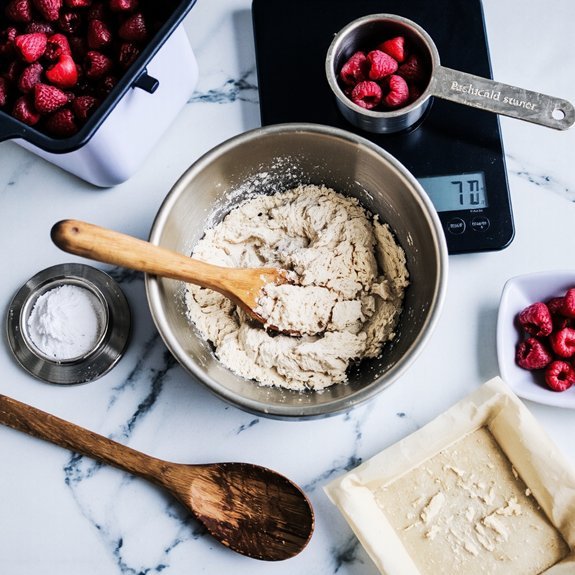
Combine 2 cups all-purpose flour, ¾ cup granulated sugar, and ½ teaspoon salt in a large mixing bowl.
Cut 1 cup cold butter into small cubes and add to the dry ingredients.
Using a pastry cutter or your fingertips, work the butter into the flour mixture until it resembles coarse breadcrumbs.
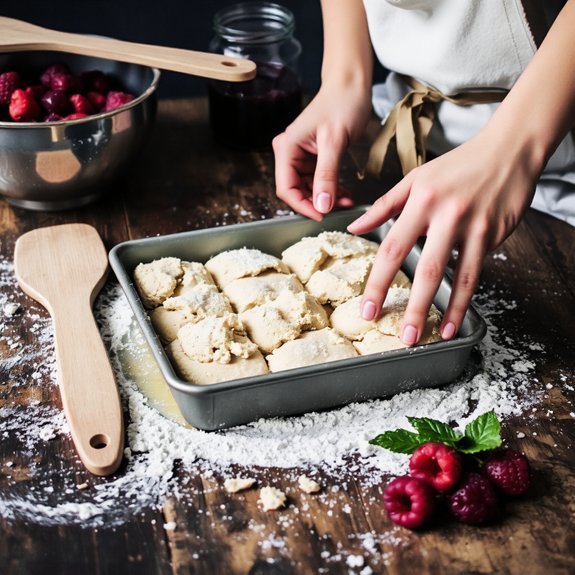
Press this shortbread base firmly into a 9×13-inch baking pan, ensuring even distribution across the bottom.
Create a docking pattern by piercing the surface with a fork at regular intervals—this prevents the base from puffing during baking.
Apply edge crimping along the pan’s perimeter using your thumb and forefinger, creating a finished border that’ll hold your toppings securely.
Bake at 350°F for 12-15 minutes until lightly golden.
Remove and let cool slightly before adding your raspberry layer.
Making the Raspberry Filling
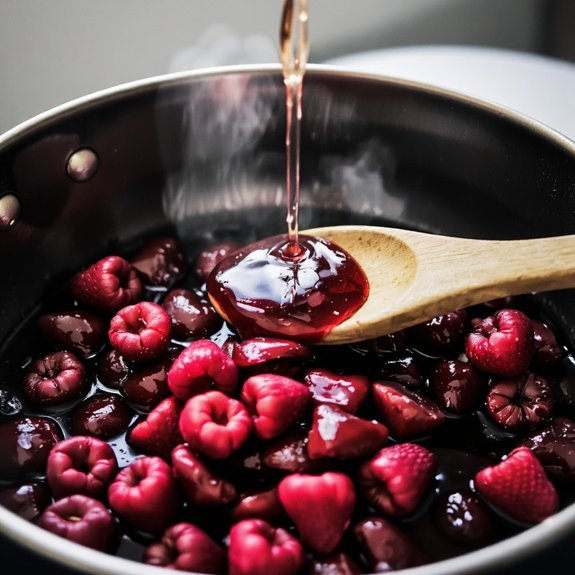
You’ll want to select fresh, ripe raspberries with deep color and firm texture, as they’ll provide the best flavor and structure for your filling.
Combine your raspberries with sugar and lemon juice in a saucepan, then simmer over medium heat for 8-10 minutes, stirring occasionally until you’ve achieved a thick, spreadable consistency that holds its shape on a spoon.
Strain the mixture through a fine-mesh sieve if you prefer a seedless filling, or skip this step to maintain the full berry texture.
Selecting Quality Raspberries
The foundation of exceptional raspberry crumble bars rests entirely on choosing fresh, ripe raspberries that’ll deliver vibrant flavor.
You’ll want to inspect berries carefully for ripeness indicators before committing to your purchase.
- Look for deep crimson or burgundy coloring—avoid pale or dull berries indicating underripeness
- Check for firm texture without mushiness, ensuring they’ll hold their shape during baking
- Source local varieties from farmers’ markets when possible, as they’re typically fresher than supermarket options
You’ve got the freedom to select berries at peak ripeness.
Gently squeeze a sample—it should yield slightly without collapsing. Reject any showing mold or excessive softness. Purchase berries within 24 hours of baking for peak flavor and structural integrity in your filling.
Achieving Perfect Consistency
Since achieving the ideal filling consistency depends on balancing fruit juice with structural support, you’ll need to combine your fresh raspberries with cornstarch, sugar, and lemon juice in a medium saucepan over medium heat.
Stir constantly for five to seven minutes until the mixture thickens noticeably. Use sensory calibration to assess doneness—the filling should coat your spoon and flow slowly when dripped.
Perform statistical sampling by testing multiple spoonfuls to verify uniform consistency throughout. The berries will break down while retaining their shape, creating a jammy texture without excess moisture.
Remove from heat once you’ve achieved this balance. Pour the filling onto your prepared crust and cool completely before crumbling your topping over it.
Creating the Crumble Topping
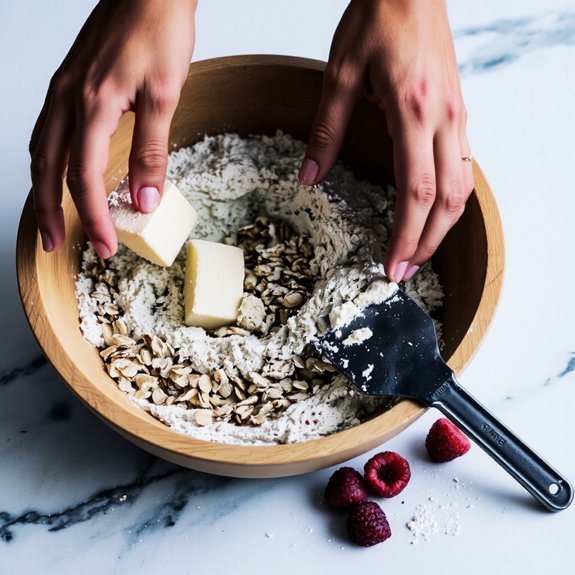
Combining your dry ingredients is where the crumble’s texture begins to develop.
You’ll want to mix these components with precision:
- Blend one cup rolled oats, three-quarters cup flour, and half a cup brown sugar together
- Cut in six tablespoons cold butter until the mixture resembles coarse breadcrumbs
- Add a quarter teaspoon salt and optional vanilla extract for depth
This crumble topping delivers the textural contrast that defines these bars.
The butter creates pockets that’ll crisp beautifully during baking, giving you that satisfying crunch against the soft raspberry filling.
Consider your presentation styling—a golden-brown topping enhances visual appeal.
For seasonal pairings, this topping works beautifully over summer raspberries or frozen berries year-round.
Don’t overwork the mixture; you’re aiming for loose, chunky pieces that stay distinct rather than forming a dense cake layer.
Assembling Your Bars
Now that you’ve got your crumble topping ready, it’s time to build your bars layer by layer.
Start by pressing your prepared crust firmly into the bottom of your baking pan, guaranteeing even coverage and density.
This foundation prevents soggy bars and provides structural integrity.
Next, distribute your raspberry filling evenly across the crust layer.
Spread it uniformly to avoid thick or thin spots that’d compromise consistency.
Finally, sprinkle your crumble topping generously over the raspberries, breaking up any large clumps as you go.
Pay particular attention to edge pressing—gently press the mixture against the pan’s sides to create clean, defined edges.
This technique guarantees your finished bars cut neatly without crumbling apart.
You’re now ready to bake.
Baking Instructions
Preheat your oven to 350°F and position your rack in the center before placing your assembled bars inside.
Preheat your oven to 350°F and position the rack in the center for even heat distribution during baking.
This oven positioning provides even heat distribution throughout your baking process.
Follow these steps for best results:
- Bake for 25-30 minutes until the crumble topping turns golden brown and the raspberry filling bubbles slightly at the edges
- Monitor for convection effects if using a convection oven, which may reduce baking time by 5 minutes due to accelerated air circulation
- Remove bars when a toothpick inserted into the filling comes out clean with minimal filling residue
Allow your bars to cool completely in the pan for at least two hours before cutting.
This cooling period lets the filling set properly, helping to produce clean, professional-looking bars.
Don’t rush this step—it’s essential for the perfect texture and presentation you deserve.
Cooling and Cutting Tips
After you’ve removed your bars from the oven, let them cool in the pan for the full two hours—this isn’t optional if you want clean cuts.
| Cooling Stage | Duration | Action |
|---|---|---|
| Initial cooling | 2 hours | Leave in pan at room temperature |
| Refrigerator chilling | 30 minutes | Transfer to fridge for firmness |
| Cutting | As needed | Use warm knife for precision |
Once cooled completely, refrigerator chilling for thirty minutes firms up the crumble topping and raspberry filling, preventing smudging. Dip your warm knife in hot water between cuts, wiping it clean each time. This technique guarantees you’ll achieve those sharp, professional-looking edges you’re after. Work methodically—rushing compromises your results. Store remaining bars in an airtight container in the refrigerator for up to five days.
Storage and Serving Suggestions
Your raspberry crumble bars’ll stay fresh and delicious when you store them properly in an airtight container on the refrigerator shelf, where they’ll keep for up to five days.
For ideal presentation tips and serving, consider these approaches:
- Cut bars into uniform squares using a sharp knife dipped in hot water between each slice
- Dust lightly with powdered sugar before serving for an elegant finish
- Arrange on a white ceramic plate to showcase the vibrant raspberry layer
Pairing suggestions enhance your enjoyment considerably.
Serve bars alongside vanilla ice cream or Greek yogurt for contrasting temperatures and textures.
A cup of black coffee or chamomile tea complements the tartness beautifully.
You’ll find these combinations elevate your dessert experience greatly, making each bite more satisfying and memorable.
Frequently Asked Questions
Can I Substitute Frozen Raspberries for Fresh Raspberries in This Recipe?
Yes, you can substitute frozen raspberries for fresh ones in your crumble bar recipe.
You’ll need to thaw them completely and drain excess liquid to prevent a soggy base.
Be aware that frozen berries won’t retain vibrant color as effectively as fresh fruit, and you might notice slight taste differences due to ice crystal formation during freezing.
Use the same quantity specified for fresh raspberries, adjusting baking time if needed.
How Do I Prevent the Shortbread Base From Becoming Too Soggy?
You’ll prevent sogginess through two essential techniques.
First, employ blind baking—pre-bake your shortbread base at 350°F for 10-12 minutes until lightly golden.
This creates a moisture barrier.
Second, manage fruit drainage by patting frozen raspberries dry before spreading them over the cooled base.
You can also brush a thin layer of melted white chocolate across the prebaked shortbread, which seals it effectively.
These methods guarantee you maintain that crisp, crumbly texture throughout.
Can I Make These Bars Ahead of Time and Freeze Them?
You can absolutely freeze these bars.
Bake them completely, cool them entirely, then cut into individual portions.
Use airtight packaging methods like freezer-safe containers or heavy-duty foil wrapping to prevent freezer burn.
You’ve got the freedom to store them up to three months.
For thawing tips, simply transfer them to your countertop for two hours or refrigerate overnight.
They’ll taste just as delicious.
What’s the Best Way to Achieve an Even Crumble Topping Texture?
You’ll achieve an even crumble topping by keeping your butter temperature cold—around 65°F—and maintaining precise ingredient ratios of one part butter to two parts dry ingredients.
Cut the cold butter into small cubes, then work it in using your fingertips until you’ve got uniform pea-sized pieces.
Don’t overwork the mixture; you’re after distinct, consistent texture throughout, not a homogeneous paste.
How Do I Know When the Bars Are Fully Baked Through?
You’ll know your bars are fully baked when you perform the toothpick test—insert one into the center, and it should come out clean or with just a few moist crumbs.
Watch for visual cues: the edges should pull slightly from the pan’s sides, and the filling won’t jiggle when you gently shake the pan.
The crumble topping develops a light golden-brown color.
Don’t overbake; you’re after that perfect tender crumb.
Leave a Comment