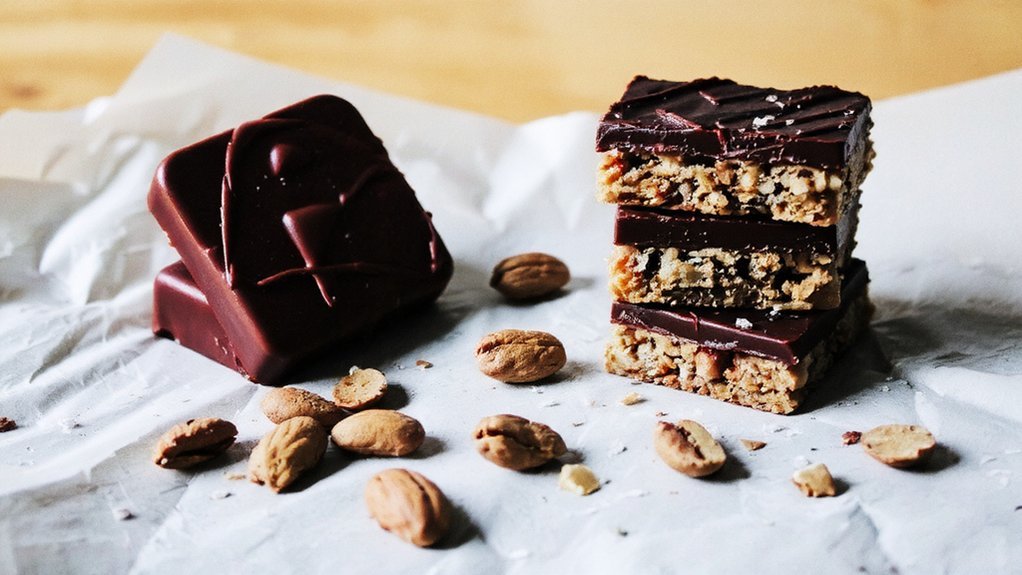
Key Takeaways
- Combine two cups peanut butter with one cup softened butter and two cups powdered sugar until creamy, then spread into a 9×13 pan.
- Bake at 350°F for 25–30 minutes until edges turn golden brown, then cool completely before adding chocolate topping.
- Melt twelve ounces semi-sweet chocolate chips with two tablespoons coconut oil, pour over cooled base, and refrigerate for two hours.
- Store finished bars in an airtight container at room temperature for five days or freeze individually wrapped for three months.
- Customize with mix-ins like crushed pretzels, coconut flakes, cinnamon, or savory options like bacon bits and sriracha for unique variations.
Ingredients You’ll Need

You’ll want to gather a few simple pantry staples before you begin.
Gather a few simple pantry staples before you begin making these delicious homemade bars.
Start with two cups of peanut butter—creamy or chunky, your choice.
You’ll need one cup of softened butter, two cups of powdered sugar, and one cup of graham cracker crumbs.
For the chocolate topping, grab twelve ounces of semi-sweet chocolate chips and two tablespoons of coconut oil.
Consider exploring allergen alternatives if you’ve got dietary restrictions.
Sunflower seed butter works beautifully as a peanut substitute.
Coconut sugar can replace powdered sugar for those watching refined ingredients.
Local sourcing elevates your bars notably.
Hunt down butter from nearby dairies and chocolate from regional confectioners.
These choices support your community while improving flavor quality.
Grab organic peanut butter from local producers when possible—you’ll taste the difference immediately.
Equipment and Tools
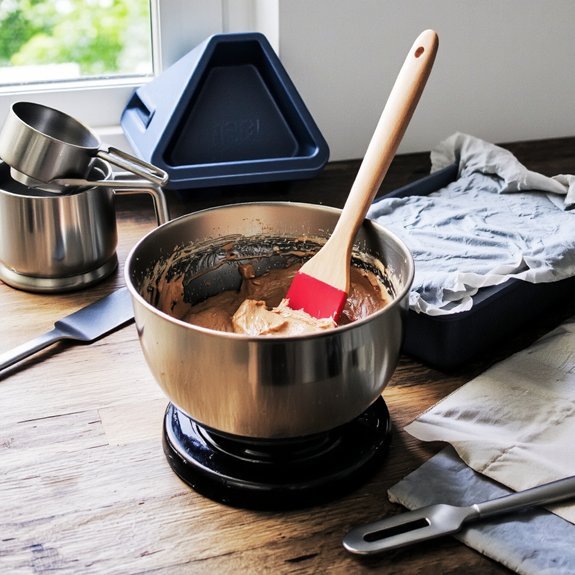
Gathering the right tools makes assembling these peanut butter bars surprisingly straightforward. You’ll want a sturdy 9×13 baking pan—I’ve learned the hard way that flimsy pans cause uneven baking. Grab a mixing bowl, electric mixer, and wooden spoon for combining ingredients without unnecessary effort.
A spatula with ergonomic design saves your wrist during spreading. You’ll appreciate its comfort when layering thick peanut butter mixture. A measuring cup, dry measuring spoons, and a sharp knife complete your setup.
Here’s my tip: proper tool maintenance keeps everything functioning perfectly. Wash your mixer immediately after use to prevent peanut butter buildup. Store your spatula in a cool place to preserve its shape.
These basic tools give you complete control over your baking process, letting you create restaurant-quality bars at home without fuss.
Step-by-Step Instructions
You’ll start by mixing your dry ingredients—flour, baking soda, and salt—in one bowl while combining softened butter, peanut butter, and sugars in another until you’ve got a creamy base.
Once you’ve folded the dry mixture into your wet ingredients and spread everything into your prepared pan, you’re ready to pop it into a preheated 350°F oven for about 25-30 minutes until the edges turn golden brown.
After you pull them out, you’ll let the bars cool completely in the pan before cutting—this patience step’s essential because cutting them warm will turn your beautiful bars into crumbly disappointment.
Preparing Your Ingredients
Before you mix anything together, lay out all your ingredients on the counter so nothing gets forgotten midway through.
This practice, called mise en place, keeps you organized and prevents frustrating interruptions.
I’ve learned the hard way that rushing this step leads to disasters.
Grab your peanut butter, butter, powdered sugar, graham crackers, and chocolate.
Check allergen labeling carefully if you’re cooking for others—peanut allergies are serious business.
Measure everything first.
You’ll need two cups of peanut butter, one cup softened butter, two cups powdered sugar, two cups crushed graham crackers, and two cups chocolate chips.
Having everything prepped means you’re free to focus on the actual mixing and baking without scrambling for ingredients.
You’ve got this.
Baking and Cooling Process
Once your mixture’s pressed firmly into the prepared pan, it’s time to pop it into a preheated 350°F oven for about 10-12 minutes—just until the edges turn golden brown.
You’re watching for those Maillard reactions that create that irresistible toasted flavor.
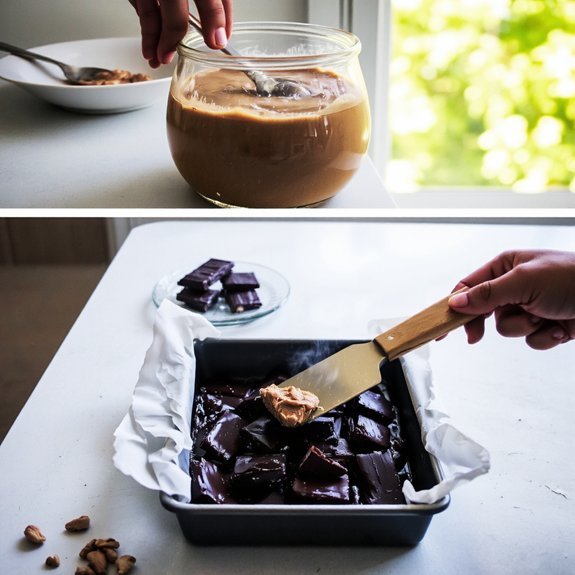
Once baked, remove your pan and let it cool completely on the counter.
This cooling period prevents moisture migration between layers, which keeps your bars structurally sound.
Don’t rush this step—I learned that the hard way when I cut into warm bars and watched them crumble.
After reaching room temperature, refrigerate for at least two hours.
This chill time solidifies everything, making clean cuts possible.
You’ll end up with perfectly uniform, professional-looking bars that hold their shape beautifully.
Tips for Perfect Bars Every Time

You’ll want to keep your chocolate and peanut butter layers at the right temperature—too hot and they’ll separate, too cool and they won’t spread smoothly.
I learned this the hard way after my first batch cracked when I rushed the cooling process, so invest in a good thermometer and work at around 110°F for melting.
Using real butter, natural peanut butter, and quality chocolate makes a noticeable difference in texture and flavor, and honestly, skimping on ingredients is where most homemade bars fall short.
Temperature Control Matters
Since temperature dramatically affects how your peanut butter bars set and hold their shape, getting this right makes all the difference between a fudgy disaster and perfectly structured treats.
You’ll want to control heat transfer carefully—don’t rush the cooling process. I learned this the hard way when I pulled my bars out too early and watched them collapse into a greasy mess.
Here’s what works: chill your chocolate layer at room temperature first, then refrigerate for at least two hours.
This prevents thermal gradients that cause cracking. You’re aiming for gradual temperature changes, not shocking your bars with extreme cold.
Keep your kitchen cool while working, and if you’re adding a peanut butter topping, let it set before adding chocolate.
Your patience pays off in perfectly fudgy, structurally sound bars you’ll actually enjoy.
Ingredient Quality Counts
The difference between mediocre and exceptional peanut butter bars boils down to what you’re putting into them.
You’ll notice the quality leap immediately when you choose natural peanut butter—no hydrogenated oils muddying your flavor profile.
I’ve learned that sourcing ethics matters too; knowing where your ingredients come from gives you confidence in what you’re baking.
Don’t overlook seasonal freshness.
When you grab butter and chocolate at peak seasons, you’re getting superior texture and taste.
Your cocoa powder shouldn’t sit in the pantry for years either—replace it regularly for richer results.
You’ve got the freedom to choose quality over convenience.
That commitment transforms your bars from forgettable to unforgettable.
You’ll taste the difference in every bite.
Storage and Shelf Life

Properly storing your peanut butter bars will keep them fresh and delicious for days. I’ve found that an airtight container at room temperature works best for up to five days.
An airtight container at room temperature keeps your peanut butter bars fresh and delicious for up to five days.
If you’re planning ahead, you’ve got serious freezer longevity—your bars’ll stay perfect for three months when wrapped individually and sealed tight.
Here’s my trick: prevent moisture migration by placing parchment between layers. This stops that annoying sogginess that ruins texture.
Keep them away from direct sunlight and heat sources, which’ll cause the chocolate coating to bloom and crack.
For quick access, store a week’s worth in your fridge while freezing the rest. When you’re ready to eat frozen bars, let them thaw at room temperature for about thirty minutes. You’ll maintain that ideal balance between chewy centers and snappy chocolate coating every single time.
Variations and Flavor Ideas
Once you’ve mastered the basic recipe, you’ll discover that peanut butter bars are incredibly versatile—I’ve experimented with everything from swapping the peanut butter for almond or cashew butter.
I’ve also added a hint of sea salt that cuts through the sweetness beautifully.
You’re free to get creative and make these bars uniquely yours.
- Savory twists – Try incorporating crispy bacon bits or sriracha into the filling for unexpected depth
- Tropical additions – Mix in coconut flakes or drizzle with white chocolate and mango extract
- Spice it up – Add cinnamon, cayenne pepper, or espresso powder for complexity
- Texture upgrades – Fold in crushed pretzels, granola, or dark chocolate chunks for contrast
Each variation transforms the classic into something fresh and exciting.
Why These Bars Are So Popular
Beyond all those creative variations lies something even more compelling—these bars have earned their place as a beloved dessert staple for reasons that go way beyond simple taste.
You’ll find peanut butter bars dominating social media feeds because they deliver that nostalgic appeal we all crave. They remind you of childhood, simpler times, and genuine comfort. What makes them unstoppable is their perfect balance—you get rich chocolate meeting creamy peanut butter without pretense or complexity.
| Reason | Impact |
|---|---|
| Easy to make | Democratizes baking |
| Instagram-worthy | Viral potential |
| Crowd-pleasing | Universal appeal |
You can customize them freely, share them without guilt, and they’re genuinely affordable. No fancy equipment required. No exclusivity nonsense. They’re democratic desserts that bring people together, which explains why you see them everywhere—from potlucks to viral TikTok videos.
Serving Suggestions and Pairings
Since you’ve gone through the effort of making these bars, you’ll want to serve them in ways that maximize their appeal.
- Party presentations – Cut bars into bite-sized squares and arrange on a platter with contrasting colors like fresh berries or dark chocolate drizzle
- Picnic ideas – Wrap individually for easy transport and mess-free eating outdoors
- Beverage pairings – Serve with cold milk, strong coffee, or bold craft beers that complement the rich peanut flavor
- Temperature variations – Chill bars for firm texture or serve slightly warm for gooey indulgence
I’ve found that setting up a self-serve station lets guests customize their experience—some prefer theirs straight, while others enjoy adding toppings.
Your homemade bars deserve presentation that matches their quality.
Frequently Asked Questions
Can I Make Peanut Butter Bars Without Using a Mixer?
You’ve absolutely got this without a mixer.
Hand stirring works perfectly fine for peanut butter bars—you’re not bound by kitchen gadgets.
Just combine your peanut butter, butter, and powdered sugar with a sturdy spoon, putting some elbow grease into it.
For no bake varieties, you’ll simply mix everything together, press into your pan, and refrigerate.
It takes a bit more effort, but you’ll gain full control over your creation’s texture and consistency.
What’s the Nutritional Information per Bar Serving?
You’ll find each bar packs roughly 250-300 calories, depending on your portion size. The calorie breakdown leans heavily toward fat, which isn’t surprising given peanut butter’s nature.
Your macronutrient ratios typically break down to about 60% fat, 25% carbs, and 15% protein per serving. I’ve noticed that ratio keeps you satisfied longer, so you’re not constantly reaching for more.
Adjust your ingredient quantities if you’re watching specific macro targets.
Are These Bars Suitable for People With Nut Allergies?
You’ll want to skip these bars if you’ve got nut allergies—they’re loaded with peanut butter.
But here’s your workaround: you can reclaim your freedom in the kitchen by swapping in alternative spreads like sunflower seed butter or tahini.
Just watch out for cross contamination if you’re sharing equipment or workspace.
I’ve seen folks successfully remake these using allergen-free spreads, getting that same satisfying taste without the worry.
Can I Freeze Peanut Butter Bars for Later Consumption?
You can absolutely freeze those bars!
I’d recommend wrapping each one individually in parchment paper, then stashing them in an airtight container or freezer bag. They’ll keep for three months easily.
When you’re ready to eat them, you’ve got flexibility—thaw them on the counter for 30 minutes or enjoy them frozen. Proper packaging methods prevent freezer burn, keeping your treats fresh and delicious whenever cravings hit.
How Do I Prevent My Bars From Becoming Too Hard?
You’ll want to nail your fat ratio—don’t skimp on butter or peanut butter.
I learned this the hard way when my bars turned rock-solid.
Keep your moisture content up by adding a tablespoon of honey or corn syrup to the filling.
Store them in an airtight container at room temperature rather than the fridge.
You’ve got the freedom to customize; I sometimes add a touch of coconut oil for that perfect chewy texture that won’t betray you.


Leave a Comment