Key Takeaways
- Cream softened butter and both sugars for 2–3 minutes until pale and fluffy to incorporate air and ensure proper texture.
- Whisk dry ingredients (flour, oats, baking soda, salt, cinnamon) thoroughly or sift twice to prevent dense, uneven cookies and promote even rise.
- Fold sifted dry mixture into creamed butter and eggs, then add oats and chocolate chips last to avoid overworking.
- Bake at 350°F for 11–13 minutes with cookies spaced 2 inches apart until golden-brown edges form with slightly underbaked centers.
- Use quality ingredients including European-style butter, pasture-raised eggs, and dairy-free chocolate chip alternatives if needed for improved flavor and texture.
Ingredients You’ll Need

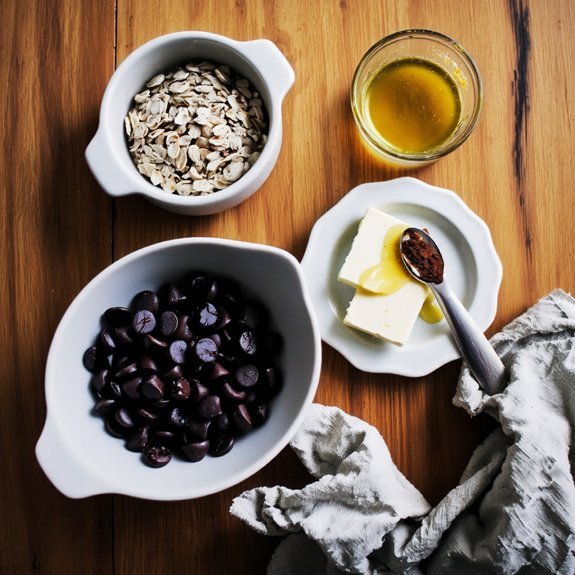
You’ll need two cups of rolled oats, one and three-quarter cups of all-purpose flour, one teaspoon of baking soda, one teaspoon of salt, one cup of unsalted butter (softened), three-quarter cup of granulated sugar, three-quarter cup of packed brown sugar, two large eggs, two teaspoons of vanilla extract, and two cups of chocolate chips.
Two cups rolled oats, one and three-quarter cups flour, baking soda, salt, softened butter, both sugars, eggs, vanilla, chocolate chips.
When sourcing your ingredients, prioritize quality suppliers offering organic options.
For allergen alternatives, substitute all-purpose flour with gluten-free blends or almond flour, adjusting ratios accordingly. Replace traditional chocolate chips with dairy-free varieties if needed. Select European-style butter for superior fat content, enhancing texture and flavor complexity.
Source eggs from pasture-raised chickens and vanilla from reputable purveyors. This approach grants you complete control over your baking ingredients, ensuring they align with your dietary preferences and values while maintaining ideal cookie structure and taste.
2. Essential Equipment and Tools
Baking these cookies successfully hinges on having the right tools at your disposal.
You’ll need a sturdy mixing bowl, electric mixer, and measuring cups for precise ingredients.
A baking sheet with even heat distribution prevents burning, while parchment paper eliminates sticking without restricting your baking freedom.
Use a cookie scoop for uniform portions—consistency matters for even baking.
A wire cooling rack allows proper air circulation, essential for texture.
Regarding safety precautions, keep oven mitts accessible and maintain clear counter space to avoid accidents.
Use cleaning techniques between batches: wipe your mixing bowl and beaters to prevent chocolate buildup that affects consistency.
A kitchen thermometer guarantees your oven runs at accurate temperatures.
These tools work together, giving you complete control over your baking results and final product quality.
3. Preparing Your Ingredients
You’ll want to measure your dry ingredients—oats, flour, baking soda, and salt—using the spoon-and-level method to guarantee accuracy and prevent dense cookies.
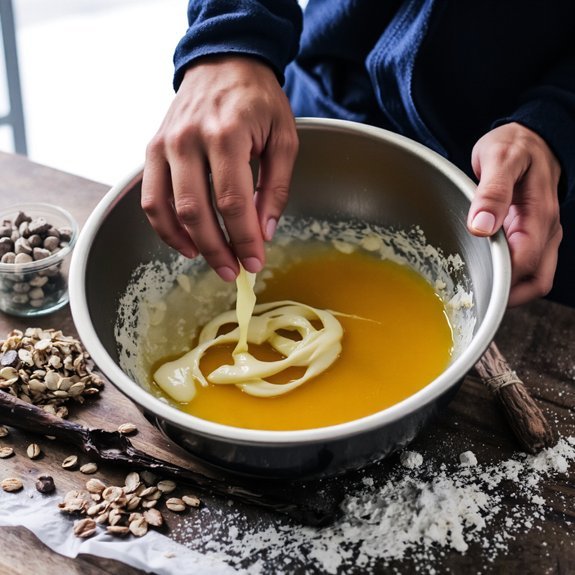
Meanwhile, remove your butter from the refrigerator about 15-20 minutes before mixing so it reaches room temperature and becomes malleable enough to cream with sugar.
This dual preparation streamlines your workflow and guarantees both precise proportions and proper emulsification when you combine your wet and dry components.
Measuring Dry Ingredients
Gathering your dry ingredients on the counter before you begin mixing guarantees you won’t scramble mid-recipe to locate that container of oats or baking soda.
You’ll need one and a half cups of rolled oats, one cup of all-purpose flour, one teaspoon of baking soda, and half a teaspoon of salt.
Use a dry measuring cup for accuracy, leveling off excess with a knife’s edge. Consider humidity effects on your ingredients—moisture can compact flour, altering ratios substantially. Consult conversion charts if you’re adjusting batch sizes or switching measurement systems.
Whisk your dry ingredients together in a medium bowl, breaking up any clumps. This pre-mixing distributes the leavening agents evenly throughout, ensuring consistent rise and texture in every cookie.
You’re establishing the foundation for success.
Softening the Butter
With your dry ingredients whisked and ready, it’s time to prepare the butter that’ll bind everything together. You’ve got options for softening—choose what works best for your schedule and kitchen setup.
| Method | Time | Result |
|---|---|---|
| Room Temperature | 30-45 minutes | Ideal consistency |
| Grating Technique | 10 minutes | Quick softening |
| Microwave Cautions | 10-20 seconds | Risk of melting |
| Oven Heat | 5 minutes | Variable results |
The grating technique gives you real control—use a box grater to shred cold butter into small pieces that soften rapidly without losing structure. If you’re using microwave cautions, pulse in 5-second intervals, checking constantly. You’re aiming for butter that’s soft enough to cream with sugar but still holds its shape. This texture promotes proper incorporation and ideal cookie texture.
4. Creaming Butter and Sugars
You’ll cream your softened butter and sugars together until the mixture reaches a pale, fluffy consistency—this typically takes 2–3 minutes with an electric mixer on medium speed.
Proper creaming incorporates air into the dough, which helps your cookies rise and develop the right texture during baking. Monitor the temperature throughout this process; if your butter’s too warm, it’ll turn greasy rather than fluffy, so make sure it’s softened but still cool to the touch before you begin.
Achieving the Perfect Consistency
Beating softened butter with granulated and brown sugar is where your cookie dough transforms from separate ingredients into a cohesive, airy base.
You’re not just mixing—you’re aerating, incorporating tiny air pockets that’ll give your cookies lift and structure.
Watch for the texture profiling as you beat: the mixture’ll pale and fluff within 2-3 minutes.
This visible change signals proper incorporation of air.
You’ll notice the consistency shift from dense to light and creamy—that’s your moisture mapping at work, as the sugar crystals break down and distribute evenly throughout the butter.
Don’t rush this step.
Under-creaming results in dense, flat cookies.
Over-creaming risks incorporating too much air, causing them to spread excessively.
You’re aiming for that sweet spot: light, fluffy, and utterly ready for your next ingredients.
Temperature and Timing Tips
Getting the butter temperature right makes the difference between nailing that perfect pale, fluffy consistency and fighting a greasy, separated mess. You’ll want your butter at 65-70°F—soft enough to indent with your finger but still holding its shape.
| Temperature | Texture | Result |
|---|---|---|
| Too Cold | Dense, lumpy | Tough cookies |
| Ideal | Creamy, pale | Perfect rise |
| Too Warm | Greasy, separated | Flat spread |
Cream butter and sugars for 3-4 minutes until you’ve achieved that light, airy foundation. Don’t rush this phase. Your oven calibration matters too—verify with an oven thermometer before baking. If you’re at higher altitude, adjust your oven temperature upward by 15-25°F to compensate for faster moisture evaporation. Time your mixing precisely: undermixed dough yields dense results; overmixed creates tough cookies.
5. Incorporating Eggs and Vanilla
Incorporating eggs and vanilla into your creamed butter and sugar mixture requires careful attention to temperature and timing.
You’ll add eggs one at a time, allowing each to fully emulsify before introducing the next.
This process strengthens protein structure, creating a stable emulsion that traps air and produces even texture throughout your cookies.
Strengthening protein structure through proper mixing creates stable emulsions that trap air and produce beautifully even cookie texture.
When you pour in vanilla extract, you’re releasing volatile compounds that’ll interact with your dry ingredients during baking.
The aroma chemistry intensifies as heat activates these flavor molecules, creating that signature warmth bakers crave.
Keep your mixture at room temperature—cold eggs won’t incorporate smoothly, while warm ones risk curdling.
Scrape your bowl’s sides frequently to guarantee thorough blending.
This meticulous approach gives you complete control over your dough’s final consistency and your cookies’ ultimate success.
6. Mixing Dry Ingredients
You’ll whisk together your flour and baking soda to distribute the leavening agent evenly throughout the dry mixture.
Next, you’ll combine your salt and cinnamon, ensuring these flavor and texture-modifying ingredients won’t clump in isolated spots.
Finally, you’ll sift the entire dry blend to achieve a uniform texture that’ll integrate seamlessly with your wet ingredients.
Whisk Flour and Baking Soda
Whisking together your dry ingredients guarantees even distribution of leavening agents throughout the dough.
You’ll combine your flour and baking soda in a medium bowl, then whisk vigorously for about thirty seconds.
This action serves dual purposes in your leavening chemistry—it breaks up any clumps while dispersing the baking soda uniformly so your cookies rise evenly without dense pockets.
The whisking motion also initiates minimal gluten development, which you’ll want to control carefully.
Oatmeal cookies benefit from a tender crumb, not chewy density.
By whisking rather than stirring, you’re aerating the mixture without overworking the flour.
This technique gives you precise control over your final texture, ensuring each cookie bakes with consistent rise and structure.
Don’t skip this step—it’s foundational to mastering the recipe.
Combine Salt and Cinnamon
After you’ve whisked your flour and baking soda, add salt and cinnamon to the same bowl.
You’re now engaging in culinary history—spice combinations that’ve defined baking for centuries. The salt enhances flavor development and controls gluten formation, giving you structural integrity without compromise. Cinnamon brings warmth and depth, creating an aromatic synergy that transforms ordinary cookies into something memorable.
Measure precisely: one teaspoon of salt and one and a half teaspoons of ground cinnamon.
Don’t estimate here—accuracy matters. Whisk these additions thoroughly into your dry mixture, ensuring even distribution. You’ll notice the cinnamon’s rich aroma intensifying as you blend. This step takes less than a minute, but it’s essential for balanced flavor throughout every bite. You’re building complexity that’ll shine once your cookies bake.
Sift for Uniform Texture
Sifting your dry ingredients together creates the foundation for uniformly textured cookies that bake evenly and rise consistently.
You’ll want to combine your flour, oats, salt, and cinnamon in a fine-mesh sifter, then work through the mixture twice. This double-sift approach promotes proper particle sizing, breaking down compacted flour that’s accumulated during storage.
You’re actively preventing clump formation that’d result in dense, uneven cookies.
As you sift, you’re aerating the ingredients, which allows your leavening agents to distribute evenly throughout the dough.
The mechanical action separates individual particles, guaranteeing your batter achieves the ideal consistency. Don’t rush this step—methodical sifting takes roughly two minutes.
You’ll notice the mixture becomes noticeably lighter and fluffier as air incorporates. This technical precision directly impacts your final product’s texture and rise, giving you control over cookie quality every single time.
7. Combining Wet and Dry Mixtures
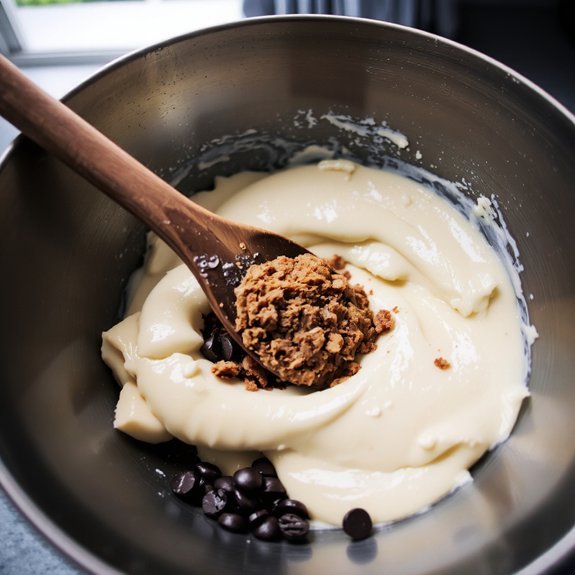
Once you’ve prepared your wet ingredients—the creamed butter and sugar along with beaten eggs—you’re ready to bring everything together.
Add your sifted dry mixture to the wet ingredients using a deliberate incorporation speed that prevents overmixing. Fold gently with a spatula, rotating the bowl as you work. This controlled technique preserves dough aeration developed during creaming, which yields lighter, fluffier cookies.
Fold gently with a spatula to preserve dough aeration, yielding lighter, fluffier cookies while preventing overmixing.
Stop folding the moment you see no flour streaks. Overworking the dough develops gluten, creating tough, dense cookies—the opposite of what you’re after. The dough should appear cohesive yet slightly loose.
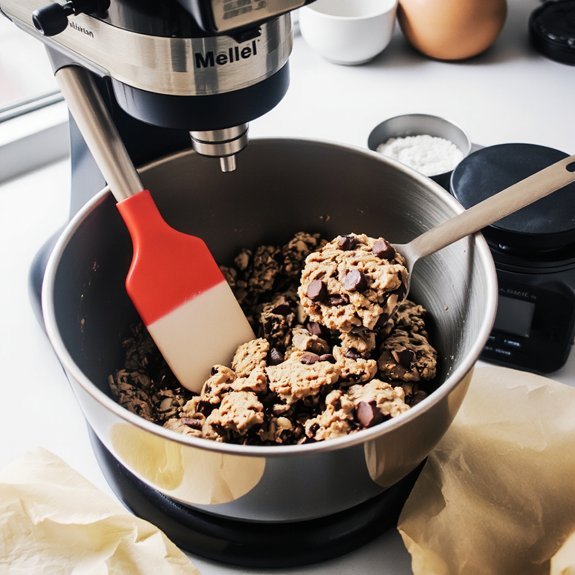
Now fold in your oats and chocolate chips with minimal strokes. You’ve earned your independence in the kitchen by mastering this critical step where restraint trumps enthusiasm.
8. Adding Oats and Chocolate Chips
Folding in your oats and chocolate chips demands the same restraint you’ve just exercised with your dry ingredients. Overmixing destroys the texture contrast that makes these cookies exceptional.
Here’s your approach:
- Add rolled oats gradually, folding gently until distributed evenly throughout the batter
- Introduce chocolate chips last, using a spatula to incorporate them without crushing or melting
- Stop mixing immediately once everything’s combined—no extra strokes
This deliberate technique preserves the oats’ structural integrity while maintaining flavor balance.
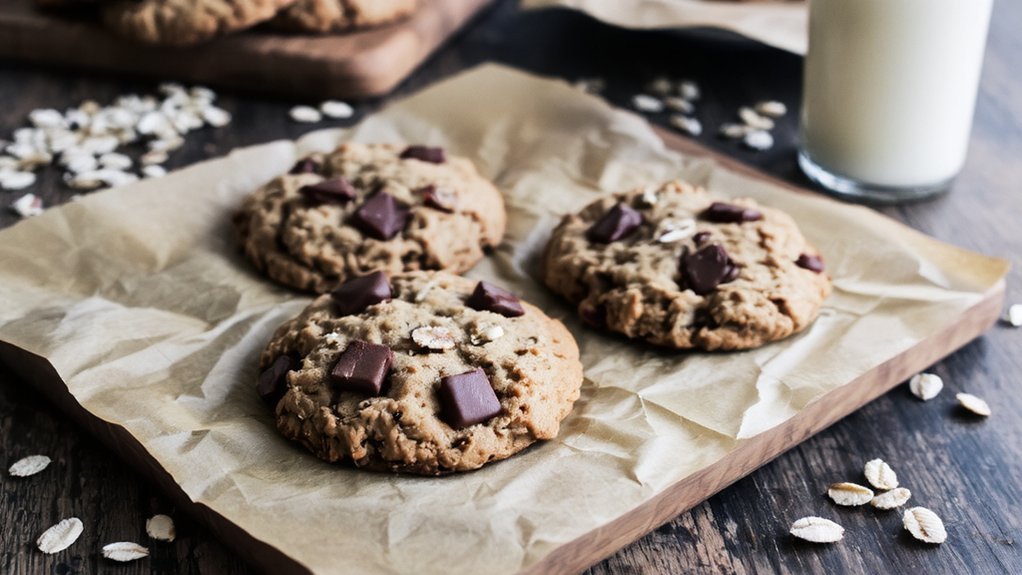
The oats deliver nutty complexity and chewiness, while chocolate chips provide bursts of richness. You’re creating distinct textural zones that resist uniformity, giving you cookies with character.
The result? Dough that’s ready for portioning, with every component exactly where you want it.
9. Baking to Perfection
Your oven’s temperature accuracy determines everything from this point forward—preheat to 350°F and allow at least fifteen minutes for stabilization, as most home ovens fluctuate during the initial heating phase. You’ll want to monitor your baking environment closely, since humidity effects substantially impact your final crumb structure. Place cookies on parchment paper, spacing them two inches apart for efficient heat circulation.
| Factor | Ideal Range | Impact |
|---|---|---|
| Temperature | 350°F | Even browning |
| Bake Time | 11-13 minutes | Chewy interior |
| Humidity | Below 50% | Crisp edges |
You’re aiming for golden-brown edges with slightly underbaked centers. This technique guarantees a tender crumb structure that resists becoming brittle. Pull them out when they’ll firm up during cooling—you’ve got this.
10. Creative Variations to Try
Since you’ve mastered the foundational recipe, experimenting with flavor additions and textural modifications opens up countless possibilities without compromising the cookie’s structural integrity.
Master the basics, then transform your cookies with bold flavors and textures while keeping structure perfectly intact.
Consider these innovative directions:
- Savory twist: Incorporate sea salt, rosemary, or crispy bacon bits to balance chocolate’s sweetness and create sophisticated complexity.
- Seasonal toppings: Layer pumpkin spice during fall, crushed peppermint in winter, or candied citrus zest for spring batches.
- Texture enhancement: Add toasted nuts, coconut flakes, or pretzel pieces for contrasting crunch against chewy oats.
You’ll discover that substituting brown butter intensifies nutty notes, while swapping milk chocolate for dark varieties deepens richness.
White chocolate and macadamia combinations deliver tropical undertones.
Each variation maintains structural integrity while expanding your creative freedom in the kitchen.
Frequently Asked Questions
Can I Make This Recipe Without Eggs for Vegan Oatmeal Chocolate Chip Cookies?
You’ll absolutely craft vegan oatmeal chocolate chip cookies by substituting eggs with a flax egg—mix ground flaxseed with water and let it sit.
Alternatively, you’re liberated to use aquafaba binder, that chickpea liquid that binds beautifully.
Both methods deliver moisture and structure you need.
The flax egg adds earthiness while aquafaba keeps things neutral.
You’re empowered to experiment with either option, achieving identical texture and rise without compromising your values or taste.
How Long Will These Cookies Stay Fresh in an Airtight Container?
You’ll find your vegan oatmeal chocolate chip cookies maintain peak quality for up to seven days in an airtight container. Their shelf life depends on your storage conditions—keep them cool and dry to prevent texture changes.
You’ll notice they gradually soften as moisture migrates, but they’ll remain edible for up to ten days. For extended freshness without compromising that satisfying crunch, freeze them up to three months.
Control your cookie destiny completely.
Can I Freeze the Dough and Bake Cookies Later?
You can absolutely freeze your dough for later baking.
Here’s what you’ll do: portion your dough into balls, freeze them on a baking sheet for two hours, then transfer to freezer bags—they’ll keep for three months.
When you’re ready, you’ve got freezing tips to follow: thaw at room temperature for thirty minutes or bake directly from frozen, adding two extra minutes to your bake time.
You’ve got total control over your cookie schedule.
What Type of Oats Work Best: Rolled, Steel-Cut, or Instant?
Rolled oats work best for your cookies—they’ll give you that chewy, substantial bite you’re after.
Steel-cut oats won’t break down properly, leaving you with an unpleasant grittiness. Instant oats’ll turn mushy and won’t hold their structure. You’ve got freedom to customize your texture comparison here: use rolled exclusively for chewiness, or blend in a quarter steel-cut for complexity.
The flavor profiles stay neutral and let your chocolate shine through magnificently.
How Do I Prevent Cookies From Spreading Too Much While Baking?
You’ll prevent excessive spreading by chilling your dough for at least two hours before baking. Keep your butter temperature cool—use softened, not melted, butter in your mixture.
Cold dough resists heat longer, giving structure time to set before spreading occurs. You’ve got the freedom to chill overnight if you prefer.
This technique guarantees thicker, chewier cookies with defined edges that won’t flatten into thin wafers on your baking sheet.


Leave a Comment