Key Takeaways
- Use room-temperature egg whites and superfine sugar in a precise 1:2 ratio for optimal meringue structure and volume.
- Beat egg whites at medium speed until foamy, then high speed, adding sugar gradually one tablespoon at a time.
- Pipe 1-inch mounds using a star or round tip, spacing them 2 inches apart on parchment paper.
- Bake at 200°F for 60–90 minutes until crisp and hollow, then cool in the oven for 30 minutes.
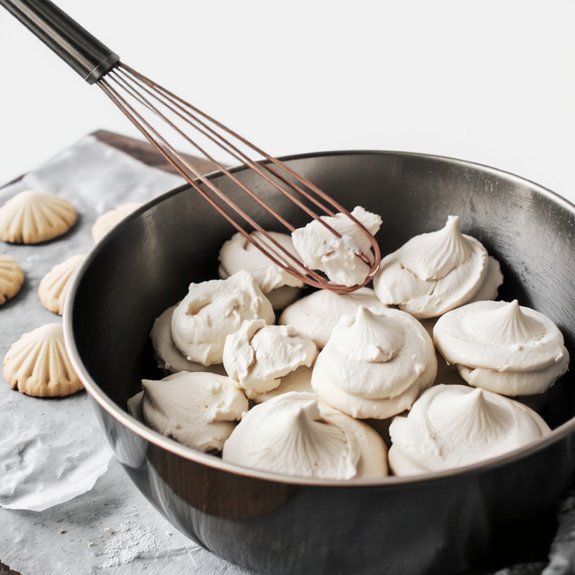
- Apply decorative toppings immediately after piping while surfaces remain tacky for maximum adhesion and visual appeal.
Ingredients You’ll Need
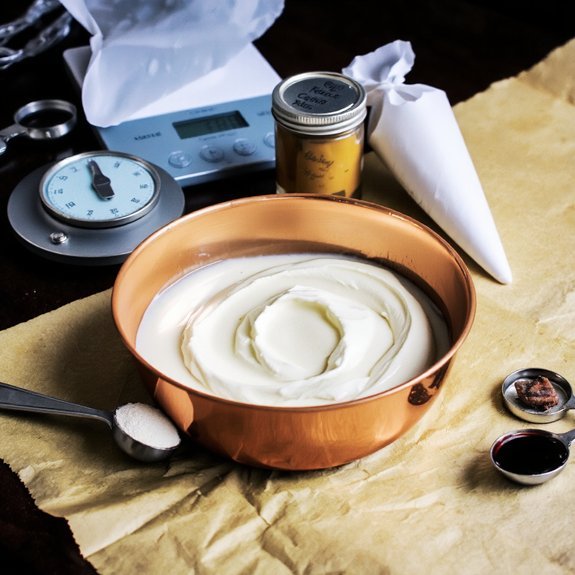
You’ll need just three simple ingredients to make these crispy meringue cookies: three large egg whites (room temperature), 150 grams of superfine granulated sugar, and one teaspoon of vanilla extract.
Three large egg whites, 150 grams superfine sugar, one teaspoon vanilla extract—everything required for crispy meringue perfection.
Sourcing quality ingredients matters.
Your egg whites should come from fresh, large eggs—ideally from pasture-raised chickens if you’re prioritizing ingredient origins and ethical sourcing.
Room temperature eggs incorporate air more efficiently during whipping, essential for achieving ideal volume.
Superfine granulated sugar dissolves rapidly, creating that signature glossy meringue texture.
You’ll find seasonal availability peaks during baking season, though quality brands stock it year-round.
Vanilla extract—use pure, not imitation—provides depth without overpowering delicate sweetness.
That’s it.
Three ingredients, zero compromise on results.
Your freedom to create begins with precision fundamentals.
Essential Equipment and Tools
Success with meringue cookies hinges on having the right mixer and bowl setup.
You’ll want a stand mixer or hand mixer that delivers consistent, reliable performance—your tool selection directly impacts meringue stability and volume.
Choose a grease-free metal or glass bowl; even trace amounts of fat sabotage stiff peaks.
You’ll need a whisk attachment, rubber spatula, and piping bag with round or star tips.
For utensil storage, designate a dedicated drawer to keep equipment separate from oily cookware.
Grab measuring spoons for precise ingredient ratios and parchment paper for baking sheets.
A cookie scoop ensures uniform sizing.
Don’t skip proper preparation—clean equipment means successful meringues every time.
Your freedom to create perfect cookies depends on strategic equipment choices.
Preparing Your Ingredients
You’ll need to source high-quality ingredients: large room-temperature egg whites, superfine granulated sugar, and pure vanilla extract or cream of tartar as stabilizers.
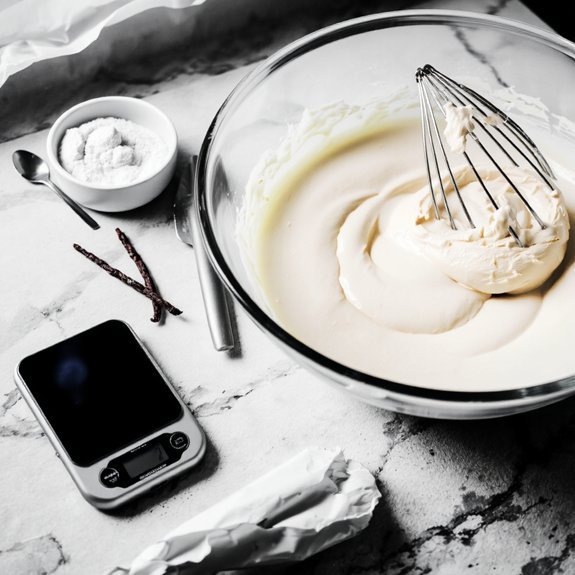
Weigh your egg whites and sugar on a digital scale to achieve the precise 1:2 ratio required for stable peaks and ideal meringue structure.
Before mixing, make sure your bowl and whisk attachments are completely grease-free, as even trace amounts of fat will prevent proper volume development.
Gathering Quality Ingredients
Before you begin mixing, assemble three essential components: large egg whites (room temperature, separated from yolks without any trace of yolk or fat), superfine granulated sugar, and vanilla extract or another flavoring agent of choice.
Source your eggs from ethical suppliers who prioritize animal welfare and sustainable practices.
Consider seasonal sourcing when selecting your ingredients—spring and early summer typically yield the freshest eggs from pasture-raised hens.
Invest in superfine granulated sugar rather than standard granulated; its smaller crystals dissolve more efficiently during whipping, creating ideal meringue structure.
Verify your vanilla extract’s purity label to confirm you’re purchasing genuine product, not imitation compounds.
Measure all ingredients precisely using a kitchen scale for accuracy.
Store egg whites at room temperature for thirty minutes before beating to achieve maximum volume and stability during incorporation.
Measuring for Success
Once you’ve gathered your ingredients, precision becomes paramount—meringues won’t tolerate guesswork.
You’ll need to master precision ratios: four egg whites to one cup of granulated sugar creates the ideal foundation. Use a digital scale for accuracy, measuring egg whites to the nearest gram. Room temperature eggs separate more cleanly, yielding maximum volume during beating.
Environmental monitoring matters critically. Check your kitchen’s humidity level—aim for below 50% relative humidity. High moisture sabotages meringue structure. Temperature should stay between 68-72°F for best beating conditions.
Measure vanilla extract precisely at one-quarter teaspoon. Cornstarch or cream of tartar requires one-eighth teaspoon each.
These small quantities substantially impact texture and stability. Don’t eyeball amounts; each ingredient demands exact measurement.
Your meringues’ success depends on this foundational accuracy.
Whipping the Perfect Meringue
Creating stable meringue requires precision and proper technique.
You’ll need room-temperature egg whites and a pristine, grease-free bowl—any fat compromises air incorporation.
Room-temperature egg whites and a grease-free bowl are essential—any fat compromises your meringue’s ability to incorporate air.
Start beating at medium speed for about one minute until you’ve achieved foamy consistency.
Gradually increase to high speed, adding sugar one tablespoon at a time.
This controlled incorporation prevents deflation.
Continue beating until you reach stiff peaks—the meringue should stand upright without drooping.
You’ve achieved proper peak identification when peaks hold their shape indefinitely.
The mixture should appear glossy and white, never grainy or separated.
Don’t overbeat beyond this point; excess mixing breaks down air bubbles you’ve worked to establish.
Your perfectly whipped meringue is now ready for piping and baking into delicate, crispy cookies.
Piping and Shaping Your Cookies
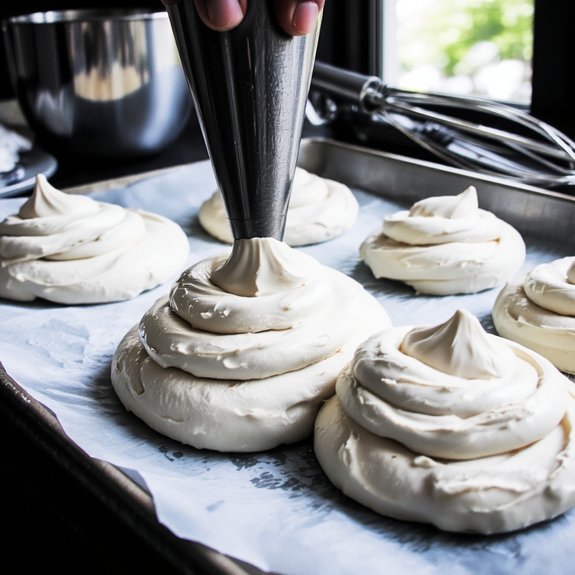
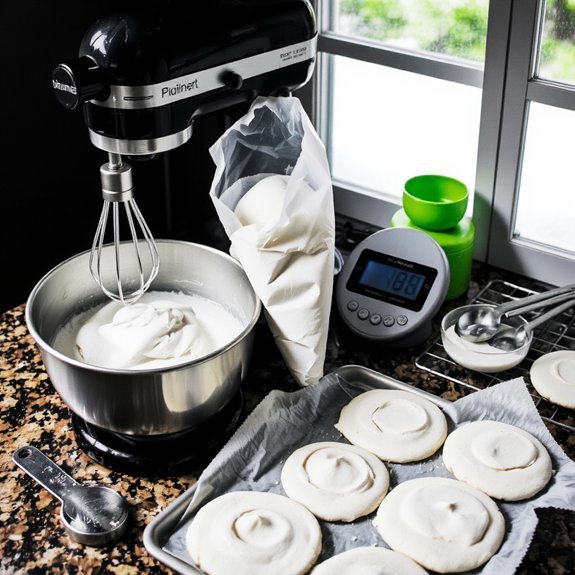
Transfer your meringue to a pastry bag fitted with a medium star or round tip, filling it only halfway to maintain control.
Position the bag at a 45-degree angle technique to your baking sheet. Apply consistent pressure control with your dominant hand while guiding the bag’s direction with your other hand.
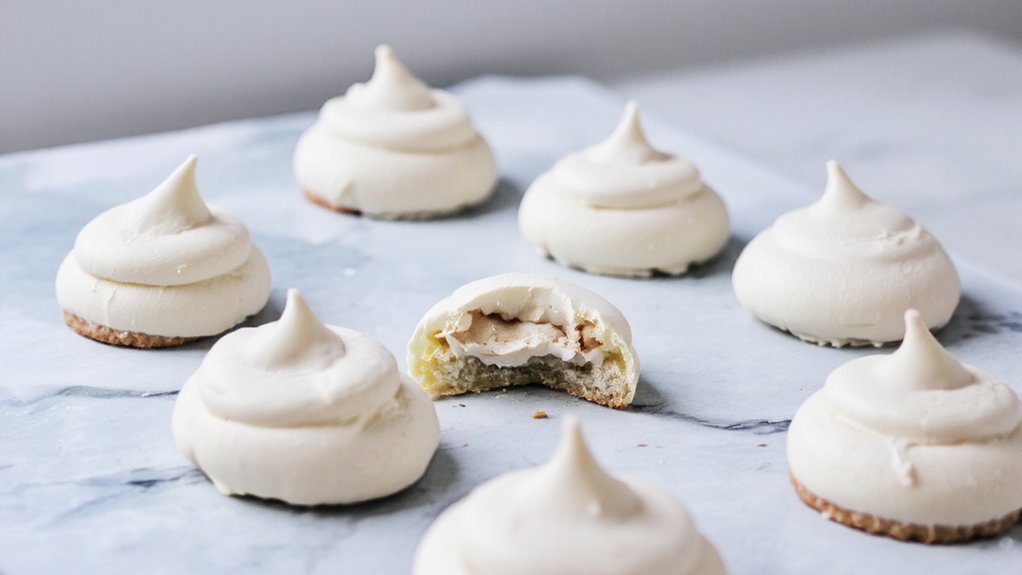
Pipe 1-inch mounds in uniform spacing, leaving approximately 2 inches between each cookie.
For uniform results, you’ll want to maintain steady, even pressure throughout each motion. Release pressure before withdrawing the bag to create clean peaks.
If you’re using a star tip, you’ll achieve ridged surfaces that caramelize beautifully. Round tips produce smoother, more delicate appearances.
Practice your angle technique on parchment paper first if you’re new to piping. This approach builds muscle memory and confidence. Your pressure control directly determines cookie consistency and professional appearance.
Baking and Cooling Process
After you’ve piped your meringue onto the baking sheet, preheat your oven to 200°F and position the rack in the middle.
This low temperature prevents browning and guarantees even dehydration.
Bake for 60-90 minutes until cookies achieve a crisp, hollow texture.
Don’t open the oven door during baking—temperature fluctuations compromise results.
Humidity effects substantially impact your meringue’s success.
High humidity environments extend baking time and may prevent proper drying.
Consider running your oven with the door slightly ajar during the final 15 minutes for moisture escape.
After baking, turn off the oven and allow cookies to cool completely inside for 30 minutes.
This gradual temperature reduction prevents cracking.
Transfer cooled meringues to an airtight container immediately—they’re hygroscopic and’ll absorb ambient moisture quickly.
Flavor Variations and Decorating Ideas
Once you’ve mastered the basic meringue formula, you can customize your cookies by incorporating 1-2 teaspoons of flavor extract (vanilla, almond, or peppermint), food-grade oils, or finely grated citrus zest into your egg white mixture before piping. Fold these additions gently to maintain meringue structure and stability.
For seasonal twists, try pumpkin spice in autumn or peppermint bark during winter. Spring calls for lemon or lavender infusions.
Elevate your presentation through strategic color palettes. Add gel-based food coloring—approximately 2-3 drops per batch—to achieve vibrant hues without compromising meringue integrity. Pipe contrasting colors using dual-chamber piping bags for visual impact.
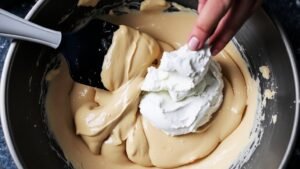
Finish with toppings: crushed freeze-dried berries, chocolate drizzle, or edible glitter applied immediately after piping. These decorative elements adhere best to tacky surfaces before setting. Your customization options remain limitless when you understand foundational technique.
Frequently Asked Questions
How Long Do Homemade Meringue Cookies Stay Fresh, and How Should I Store Them?
Your meringue cookies maintain peak quality for 2-3 weeks at room temperature in an airtight container. You’ll want to keep them in a cool, dry environment away from humidity, which degrades their crisp texture.
For extended shelf life, you can employ freezer storage—they’ll stay fresh up to 3 months when sealed in airtight freezer-safe containers. Thaw them at room temperature for 15 minutes before serving to restore their original crispness and structural integrity.
Can I Make Meringue Cookies on Humid or Rainy Days Successfully?
You shouldn’t attempt meringue cookies on humid or rainy days—humidity control is non-negotiable.
Atmospheric moisture prevents proper meringue formation and drying methods become ineffective. If you’re committed to baking, you’ll need to dehumidify your kitchen using air conditioning or dehumidifiers, maintaining 40-50% relative humidity. Alternatively, you’re free to delay baking until dry conditions return. This technical requirement guarantees your cookies set correctly and achieve ideal crispness.
What Causes Meringue Cookies to Crack or Collapse During Baking?
You’ll crack or collapse your meringue cookies when you don’t maintain precise oven temperature—aim for 200-225°F consistently.
Your sugar ratio matters critically; you’ll need one cup granulated sugar per four egg whites for structural integrity.
Underbaking leaves them too soft; overbaking causes splitting.
You’ll also cause collapse if you open the oven door prematurely, disrupting heat circulation.
Make sure your mixing bowl’s completely grease-free before whipping.
Are Meringue Cookies Safe for People With Egg Allergies or Dietary Restrictions?
You can’t safely consume traditional meringue cookies if you’ve got egg allergies—they’re fundamentally egg-based.
You’ve got freedom to explore egg substitutes like aquafaba (chickpea liquid) or commercial egg replacers, which you’ll whip to stiff peaks using precise measurements and technical beating protocols.
Vegan alternatives deliver comparable results through structured instructions: combine three tablespoons aquafaba with one-quarter teaspoon cream of tartar, then beat until you achieve rigid peaks matching conventional meringue specifications.
How Do I Fix Overbeaten or Underbeaten Egg Whites During Preparation?
You can’t truly rescue overbeaten egg whites—they’re broken.
Start fresh with new eggs at room temperature for maximum volume.
For underbeaten whites, continue whisking until stiff peaks form.
Control your mixing speed: use medium-high for 3-4 minutes initially.
Add stabilizer addition like cream of tartar at the outset—it prevents overbeating and enhances structure.
Temperature control matters: room-temperature whites whip faster, giving you better command over the process.


Leave a Comment