Key Takeaways
- Clean and dry the mixing bowl and attachments immediately after use to prevent mineral buildup and corrosion.
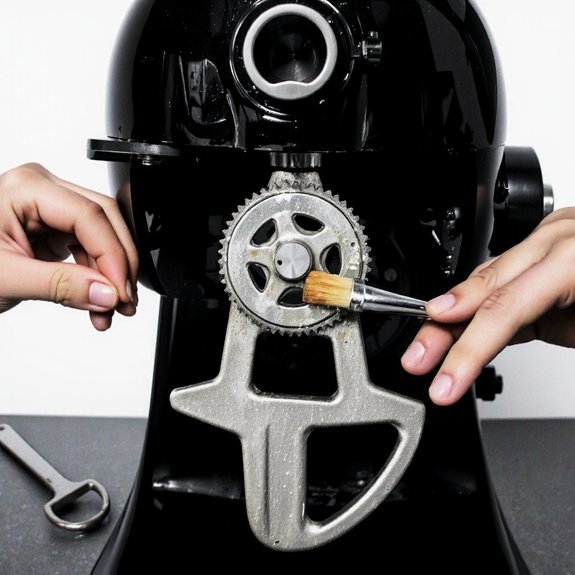
- Lubricate the gear assembly every six months with food-grade grease using a small brush for even coating.
- Listen for unusual grinding or squealing sounds and inspect the motor housing regularly for signs of wear.
- Store the mixer in a cool, dry location away from humidity; keep the power cord loosely coiled.
- Check the power cord for damage before each use and document all maintenance, issues, and solutions for reference.
Daily Cleaning and Care

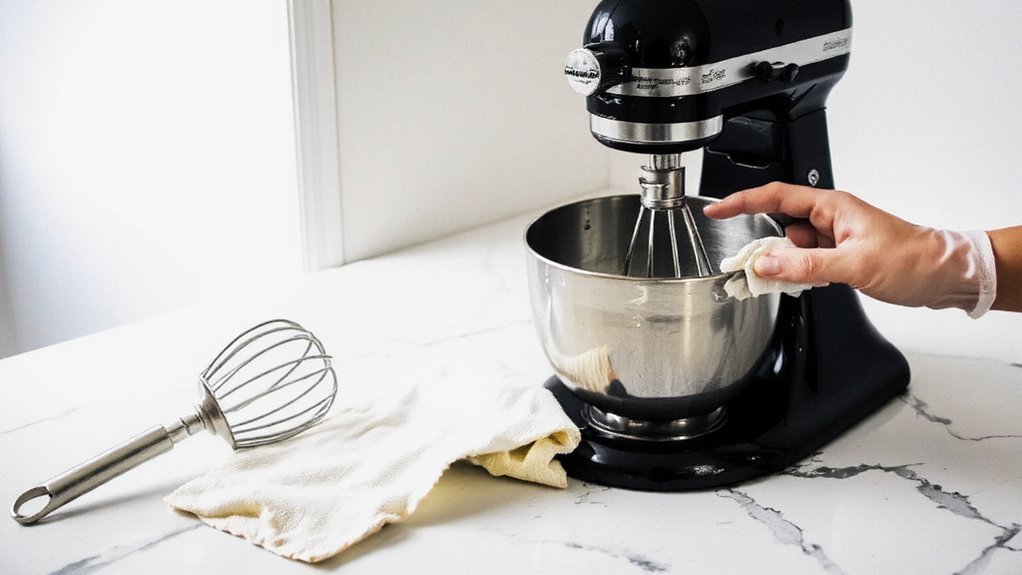
After each use, you’ll want to unplug the mixer and let it cool for 10-15 minutes before disassembling components.
Unplug your mixer after each use and allow 10-15 minutes for cooling before disassembling any components.
Once cooled, remove the bowl, whip, hook, and paddle—all detachable parts are dishwasher-safe.
Wipe the mixer’s head and base with a damp cloth to eliminate flour dust and batter residue.
For counter protection, place a mat underneath to catch drips and prevent spill prevention issues that could damage your surface.
Never submerge the motor housing in water.
Inspect the power cord for damage before each use.
Make sure all attachments click securely into place.
Store the mixer in a dry location away from moisture and heat sources.
This maintenance routine keeps your equipment functioning efficiently and extends its operational lifespan substantially.
Inspecting the Motor and Gears

You’ll want to listen closely for unusual grinding or squealing sounds that indicate motor wear, as these often signal damaged bearings or worn brushes requiring professional service.
Check your gears regularly by rotating the mixer head by hand (with the unit unplugged) to detect grinding, resistance, or play that suggests internal damage.
Keep gears properly lubricated according to your manual’s specifications, typically using food-grade lubricant on accessible joints to prevent friction and extend component lifespan.
Signs of Motor Wear
Regular motor inspections help you catch wear before it compromises your mixer’s performance.
You’ll notice several telltale signs indicating motor deterioration.
Listen for unusual grinding or squealing sounds during operation—these suggest internal friction or bearing wear.
You might detect a burning smell, which signals overheating components or insulation breakdown.
Vibration that intensifies beyond normal operation indicates misaligned gears or motor imbalance.
Check your usage history against warranty coverage terms.
Excessive heat around the motor housing means cooling systems aren’t functioning properly.
Decreased mixing power or stalling mid-cycle reveals weakening motor capacity.
Pay attention to electrical anomalies: flickering lights when your mixer runs or tripping circuit breakers suggest electrical strain.
Document these symptoms with dates and operating conditions.
This information proves invaluable for warranty claims and helps you determine whether repair or replacement is necessary.
Gear Lubrication Best Practices
Maintaining proper gear lubrication prevents the motor wear symptoms you’ve just learned to identify.
You’ll want to use only food safe grease specifically designed for kitchen appliances—never substitute with household oils or multipurpose lubricants.
Apply grease sparingly to the gear assembly every six months or after 100 hours of mixing.
Use a small brush to coat the teeth evenly, avoiding oversaturation that attracts debris.
Check your mixer’s manual for exact lubrication points and recommended intervals.
When replacing old lubricant, properly dispose of used grease according to local regulations; never pour it down drains.
Store your food safe grease in a cool, dry location.
Regular lubrication keeps your gears functioning smoothly and extends your mixer’s operational lifespan considerably.
Maintaining the Mixing Bowl and Attachments

You’ll want to clean your mixing bowl immediately after each use by hand-washing it with warm soapy water and drying it thoroughly to prevent mineral buildup and corrosion.
Your attachments—the whip, hook, and paddle—require similar care, though you should inspect them regularly for cracks or worn edges that could compromise mixing performance.
Store both the bowl and attachments in a dry location, ensuring they’re completely moisture-free before putting them away to avoid rust and degradation.
Cleaning Your Mixing Bowl
Because food residue can harden and become difficult to remove, you’ll want to clean your mixing bowl promptly after each use.
Rinse the bowl immediately with warm water to prevent buildup.
For stubborn residue, soak it briefly before scrubbing with a soft brush or sponge.
Dispel common cleaning myths—your bowl doesn’t require special treatments.
Use mild dish soap and warm water for standard cleaning.
Pay special attention to allergen removal if you’re switching between ingredients; thoroughly wash the bowl between recipes containing nuts, dairy, or gluten to prevent cross-contamination.
Dry your bowl completely before storage to prevent rust or mineral deposits.
For stainless steel, a microfiber cloth works well.
This straightforward maintenance keeps your equipment hygienic and functional, giving you complete control over your baking independence.
Caring for Attachments
While your mixing bowl demands regular attention, the attachments—the flat beater, dough hook, and wire whip—require equally diligent care to function effectively. You’ll maximize performance by understanding attachment compatibility with your mixer model and mastering proper usage techniques.
| Attachment | Cleaning Method | Drying | Storage |
|---|---|---|---|
| Flat Beater | Warm soapy water, soft brush | Air dry completely | Designated rack |
| Dough Hook | Hand wash immediately | Towel dry | Separate container |
| Wire Whip | Soak if needed, soft cloth | Hang-dry | Wall mount |
You must detach components after each use, preventing residue buildup that causes corrosion. Hand-wash all attachments—don’t use your dishwasher. Dry them thoroughly before storing to prevent rust and mold. Inspect regularly for wear or damage. Proper maintenance helps your attachments remain reliable, extending your mixer’s operational lifespan and guaranteeing your independence in the kitchen.
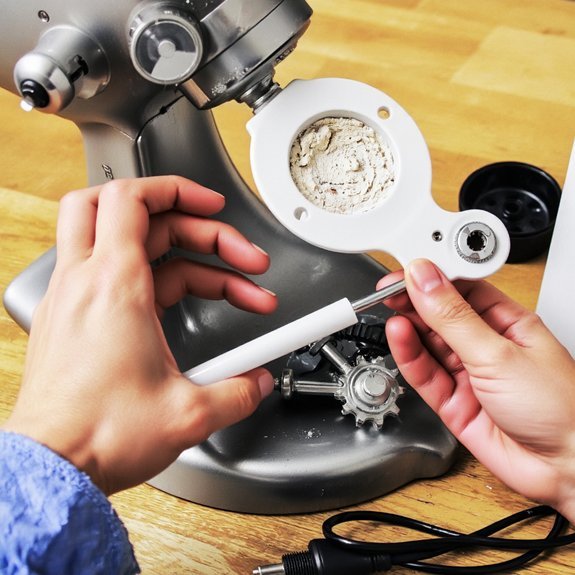
Lubricating Moving Parts
To keep your stand mixer operating smoothly, you’ll need to lubricate its internal moving parts at regular intervals.
Start by unplugging the unit and consulting your manual for specific lubrication points, typically found where the motor connects to the transmission and gear assembly.
Use food-grade lubricant only—never standard oil, which contaminates your food.
Apply lubricant sparingly with precision application tools like small brushes or syringes to avoid oversaturation.
Work the mixer through its full range without attachments for several minutes to distribute the lubricant evenly.
Dispose of used lubricant responsibly; check local regulations for proper lubricant disposal methods.
Perform this maintenance annually or as specified in your manual.
Regular lubrication prevents grinding sounds, reduces wear, and extends your mixer’s lifespan considerably.
Troubleshooting Common Issues
Even with proper maintenance, your stand mixer can develop issues that affect its performance.
If your mixer won’t start, check the power outlet and inspect the cord for damage. Power surges can damage internal components, so consider using a surge protector to prevent future problems.
Check power outlets and inspect cords for damage. Use a surge protector to safeguard internal components from power surges.
When mixing inconsistently, you may need Control Calibration adjustment.
Consult your manual for the specific procedure for your model. Tighten the bowl’s locking mechanism if it’s loose, as this affects mixing quality.
For unusual noises, stop operation immediately and inspect the gear assembly for debris.
Clean thoroughly before restarting. If the motor runs but the attachments don’t rotate, the drive socket may need replacement.
Always disconnect power before troubleshooting.
Document all issues and solutions for reference.
Seasonal Deep Cleaning and Storage
Beyond routine maintenance, your stand mixer requires thorough seasonal cleaning to preserve its longevity and performance.
Before storing your mixer, you’ll want to complete this seasonal checklist:
- Disassemble all removable components and clean crevices with compressed air to eliminate flour dust and debris
- Inspect the motor housing for wear and apply food-grade lubricant to pivot points
- Wipe down the exterior with a slightly damp microfiber cloth, then dry completely
For climate proof storage, you’ll need a cool, dry location away from humidity and temperature fluctuations.
Store your mixer in its original box if available, or use a fitted dust cover.
Keep the power cord loosely coiled—don’t wrap it tightly around the body.
Position the mixer where it won’t be jostled or exposed to moisture.
This approach guarantees your equipment remains in peak condition for the next baking season.
Frequently Asked Questions
How Often Should I Replace the Carbon Brushes in My Stand Mixer Motor?
You’ll typically replace your stand mixer’s carbon brushes every 500-1000 hours of use, though brush lifespan varies by model and frequency.
Establish an inspection schedule every six months to monitor wear.
Don’t wait for motor failure—check brushes when you notice reduced mixing power or sparking.
Remove the motor housing, examine brush length, and swap them out if they’re worn below a quarter-inch.
Taking control of maintenance prevents costly repairs and keeps your mixer running strong.
Can I Use My Stand Mixer With Different Voltage Power Sources Internationally?
You shouldn’t use your stand mixer across different voltage sources without proper equipment. Check your mixer’s voltage rating first—most operate at 120V or 240V exclusively. If you’re traveling internationally, you’ll need voltage converters to match your destination’s power supply, plus plug adapters for outlet compatibility.
Improper voltage usage’ll damage your motor irreparably. Invest in a quality converter rated for your mixer’s wattage to maintain your freedom to bake anywhere.
What Warranty Coverage Does My Stand Mixer Have and How Do I Claim It?
Your stand mixer’s warranty duration typically covers defects for one to three years from purchase, depending on your model.
To initiate the claim process, you’ll need your proof of purchase and documentation of the defect.
Contact the manufacturer’s customer service directly with your serial number.
They’ll guide you through submission requirements, inspection procedures, and repair or replacement options.
Act promptly—most warranties have strict filing deadlines you shouldn’t miss.
Is It Safe to Repair My Stand Mixer Myself or Should I Use Professional Services?
You shouldn’t attempt DIY repairs on your stand mixer.
Professional servicing protects your warranty implications and promotes safety.
Before attempting any work, you’d need to complete a thorough safety checklist covering electrical hazards and mechanical risks.
Authorized technicians possess specialized knowledge for complex internal components.
You’re better served trusting professionals who guarantee proper diagnostics and repairs, maintaining your machine’s integrity and your coverage.
How Can I Identify if My Stand Mixer Model Is Discontinued for Replacement Parts?
You’ll want to start with serial verification by checking your mixer’s serial number against the manufacturer’s current model listings.
Contact the company’s parts department directly to confirm discontinuation status.
Search online parts retailers for your specific model—limited availability indicates discontinuation.
Check independent repair shops; they often stock obsolete components.
Visit enthusiast forums where you’ll find fellow owners sharing parts sourcing strategies and workarounds for discontinued models.
Leave a Comment