
Key Takeaways
- Measure your pan’s interior dimensions and add 2–3 inches per side for overhang and handling.
- Cut parchment to size using sharp scissors, then lay flat and smooth from center outward.
- Press paper firmly into corners and edges, creating diagonal pleats to eliminate bunching and stabilize.
- Secure with light cooking oil spray, water, or butter dabs at corners for adhesion.
- Leave 2-inch overhang on opposite sides to create handles for easy removal after baking.
Why Parchment Paper Matters

Whether you’re a novice baker or an experienced pastry chef, you’ll find that parchment paper serves as an essential tool in your kitchen arsenal.
Parchment paper is an essential kitchen tool for bakers of all skill levels, from novices to experienced pastry chefs.
This silicone-coated paper prevents your baked goods from sticking, eliminating the need for excessive greasing or flouring.
You’ll appreciate how it streamlines cleanup, saving you considerable time and effort after baking.
Parchment paper also enhances food safety by creating a barrier between your food and the pan’s surface, reducing potential contamination risks.
Additionally, you’re making a responsible choice regarding environmental impact—reusable parchment paper alternatives minimize waste compared to disposable liners.
You’ll achieve consistent baking results since parchment paper distributes heat evenly and prevents browning issues on pan edges.
Its heat-resistant properties protect your creations up to 420°F, ensuring reliable performance across various recipes.
Investing in quality parchment paper ultimately grants you freedom from baking complications.
Choosing the Right Type of Parchment Paper

What distinguishes quality parchment paper from standard varieties?
You’ll find two primary options: bleached parchment and unbleached parchment.
Bleached parchment undergoes chemical processing that whitens the paper and increases heat resistance, typically handling temperatures up to 420°F.
This option works well for most baking applications and prevents flavor transfer.
Unbleached parchment skips the bleaching process, maintaining a natural brown color.
It’s equally functional and often preferred by those avoiding chemical processing.
Both types resist grease and moisture effectively.
Your choice depends on your priorities.
If you’re concerned about chemical exposure, unbleached parchment serves you well.
For maximum heat tolerance and versatility across diverse recipes, bleached parchment offers superior performance.
Check temperature ratings before purchasing—quality matters for reliable results and safe baking practices.
Lining a Rectangular Baking Pan
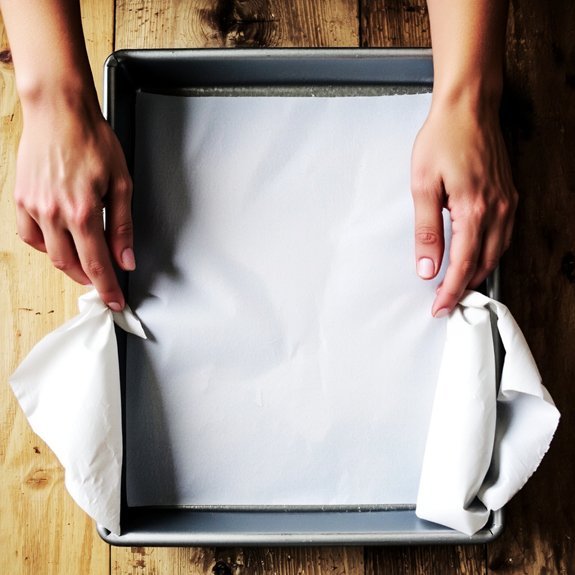
You’ll need to measure your pan’s dimensions and add about two inches to each side to guarantee adequate coverage.
Cut your parchment paper to size, then press it firmly into the pan’s corners and along the edges to eliminate wrinkles and air pockets.
Secure the corners by creasing them sharply against the pan’s interior angles so the paper stays in place during baking.
Measuring Your Pan Dimensions
How do you know what size parchment paper you’ll need?
You’ll measure your rectangular pan’s length, width, and height to determine the proper coverage.
Start by measuring the interior dimensions from edge to edge along the bottom, then measure the sides from bottom to top.
Add extra length and width to your measurements—typically two to three inches per dimension—to account for overhang beyond the pan’s edges.
This overhang gives you freedom to manipulate the paper without it slipping during filling.
For corner radius considerations, round corners require slightly less parchment than sharp corners, allowing for easier paper manipulation.
Your volume estimation should factor in the pan’s total capacity.
Record these measurements before purchasing parchment paper to make sure you’ve got adequate coverage for your specific baking vessel.
Cutting Parchment Paper Properly
Cutting your parchment paper to the correct dimensions guarantees proper pan coverage without excess waste. Start by laying your parchment sheet flat on a clean surface. Using your pan measurements from the previous step, mark cutting lines with a pencil or pen.
For rectangular pans, cut a piece approximately 2 inches longer and wider than your pan’s dimensions. This extra allowance lets the paper drape slightly over the edges for easier removal.
When cutting, observe basic safety precautions by keeping your fingers clear of the blade’s path. Use sharp scissors or a utility knife for clean, precise cuts—dull tools require excessive pressure and increase injury risk.
Smooth, controlled cuts prevent jagged edges that might tear during handling. Properly cut parchment contributes to efficient waste reduction while maintaining complete pan coverage throughout your baking process.
Securing Corners and Edges
Once your parchment paper’s positioned in the pan, you’ll need to secure the corners and edges to prevent shifting during baking.
Corner pleating is essential for maintaining stability.
Fold excess paper at each corner diagonally, creating sharp creases that conform to the pan’s interior angles.
This technique eliminates bunching and provides even coverage.
For additional security, consider adhesive options.
A light spray of cooking oil or water along the pan’s interior helps paper adhere naturally without residue.
Alternatively, small dabs of butter at corners provide temporary hold without affecting your baked goods.
Press the parchment firmly against all surfaces, working from the center outward.
Make sure edges sit flat against the pan’s sides.
This prevents paper from curling upward during heat exposure, guaranteeing ideal results and easy removal once baking completes.
Lining a Round Cake Tin
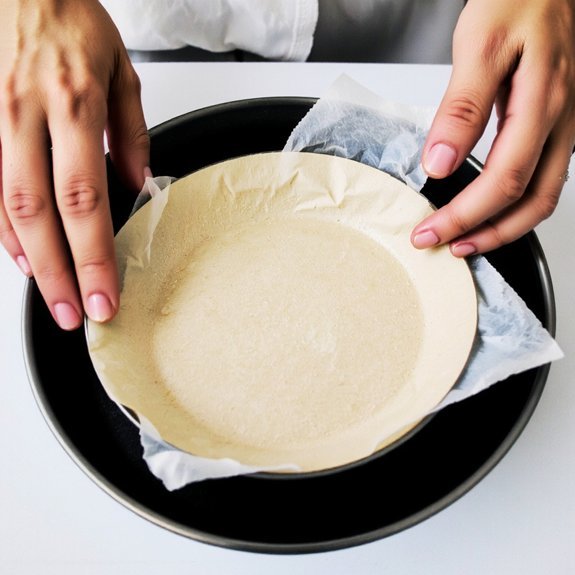
To line a round cake tin effectively, you’ll need to measure and cut your parchment paper to fit the circular shape precisely, which typically involves cutting a circle slightly larger than the tin’s diameter.
Once you’ve cut the paper, you’ll secure the edges properly by pressing it firmly against the bottom and sides of the tin, ensuring it lies flat without wrinkles or gaps that could compromise your baked goods.
These two techniques—accurate cutting and proper edge securement—form the foundation for successful round pan preparation.
Measuring and Cutting Paper
Proper measurement guarantees you’ll have enough parchment paper to cover the bottom and sides of your round cake tin without excess waste.
Start by measuring your tin’s diameter and height, then add two inches to each measurement for overlap and edge alignment.
You’ll cut a square or rectangle based on these dimensions.
Consider creating a template from newspaper first—this lets you test fit before committing to parchment paper.
Once satisfied, trace your template onto the parchment and cut precisely along the lines.
A sharp utility knife or kitchen scissors provides clean, straight edges that won’t fray.
Cut a separate circular piece for the bottom, measuring slightly larger than your tin’s interior diameter.
This two-piece approach gives you better control and guarantees complete coverage with minimal adjustment needed during placement.
Securing Edges Properly
After you’ve positioned your parchment pieces inside the tin, you’ll need to secure the overlapping edges so they don’t shift during baking.
You’ve got two reliable methods to keep everything in place.
Oven safe clips work exceptionally well for round cake tins.
Position them around the rim’s perimeter, spacing them evenly to maintain consistent tension.
They’ll hold your parchment firmly without damaging the paper or pan.
Alternatively, silicone weights offer excellent control and flexibility.
Distribute them strategically along the overlapping edges, ensuring even weight distribution.
This prevents parchment from bunching or lifting during the baking process.
Either approach guarantees your parchment stays precisely positioned throughout baking.
Choose based on your available tools and personal preference.
Both methods prove equally effective for professional results.
Lining Oddly Shaped Pans
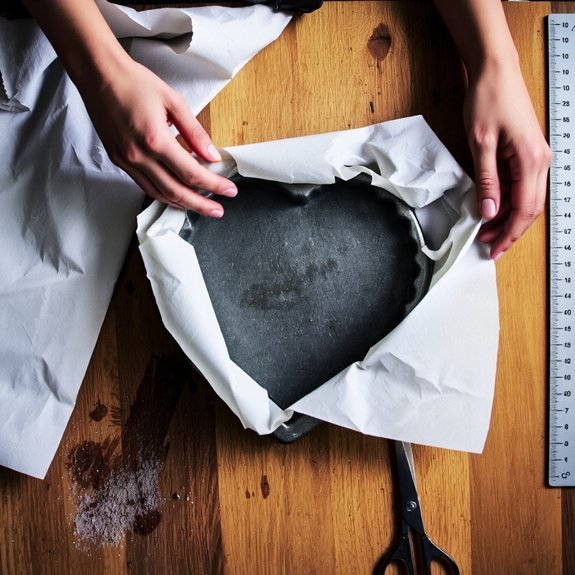
Oddly shaped pans—such as those with fluted edges, scalloped sides, or irregular geometries—call for a different approach than standard rectangular or round vessels. You’ll find that custom templates work exceptionally well for these challenging designs.
Start by creating a template from kraft paper, tracing your pan’s exact contours. Use this template to cut parchment paper precisely, ensuring complete coverage without excessive overlapping.
Trace your pan’s contours onto kraft paper, then use this template to cut parchment with precise coverage and minimal overlap.
For intricate patterns, molded liners offer an efficient alternative. You can purchase pre-formed parchment liners designed for specific pan shapes, eliminating guesswork entirely.
If you’re crafting your own, crumple the parchment slightly before fitting it into crevices and corners—this added flexibility helps it conform to complex surfaces.
Press firmly along all edges and indentations, smoothing out air pockets. You’ve now successfully adapted standard lining techniques to unconventional pan geometries.
The Overhang Method for Easy Removal
Extending parchment paper beyond your pan’s edges creates convenient handles that’ll simplify lifting baked goods out after cooking.
Leave approximately two inches of overhang on opposite sides, ensuring the paper extends past the pan’s rim.
This technique delivers multiple advantages.
You’ll achieve easy serving by grasping the parchment edges to lift entire batches without transferring individual items.
Brownies, bars, and sheet cakes release cleanly in one piece, preserving presentation and structure.
The overhang method also enables quick cleanup.
Once your baked goods cool, simply lift the parchment paper and discard it.
No scrubbing stubborn residue from pan surfaces or dealing with stuck-on batter.
For rectangular pans, create overhangs on the length-wise sides.
For square pans, position overhangs on two adjacent sides for ideal grip and control during removal.
Preventing Wrinkles and Bunching
While parchment paper’s flexibility makes it ideal for lining pans, it can easily wrinkle or bunch during placement, compromising your baking surface.
You’ll achieve ideal results by mastering proper technique and environmental control.
Follow these steps for a flawless finish:
- Apply the tension technique: Smooth the paper firmly from the center outward, working toward edges to eliminate creases without tearing
- Control moisture levels: Keep your kitchen dry, as humidity causes parchment to absorb moisture and wrinkle; store paper in a cool, sealed container
- Use minimal creasing: Cut corners strategically rather than folding, preventing permanent wrinkles that won’t release during baking
You’ll maintain a flat, secure liner by combining deliberate smoothing motions with environmental awareness.
This precision approach guarantees your baked goods sit on an even surface, promoting consistent heat distribution and professional results.
Common Mistakes to Avoid
Even experienced bakers can undermine their parchment lining with preventable errors that compromise baking performance.
Don’t ignore temperature requirements—parchment paper has specific heat limits, typically around 420–450°F depending on the brand. Exceeding these thresholds causes discoloration and deterioration.
You’ll also want to avoid rushing cleanup while the pan’s still hot. Attempting to remove parchment immediately after baking risks tearing and burns. Instead, let your pan cool slightly before peeling away the paper.
Additionally, don’t crumple parchment excessively before using it; excessive wrinkling creates uneven surfaces that affect bake consistency.
Never reuse parchment that’s darkened or damaged—compromised paper won’t protect your baked goods effectively. Finally, resist the temptation to skip anchoring corners; unsecured edges curl upward, interfering with even heat distribution and ruining your results.
Tips for Reusing and Storing Parchment Paper
Maximizing parchment paper’s lifespan requires strategic reuse and proper storage practices.
Strategic reuse and proper storage practices maximize parchment paper’s lifespan while reducing baking expenses.
You’ll discover that many sheets withstand multiple uses when you implement effective reuse techniques.
- Inspect for damage – Examine each sheet after use; discard only those with tears or heavy grease buildup
- Stack strategically – Layer cooled sheets between paper towels to prevent sticking and maintain usability
- Store with humidity protection – Keep your supply in airtight containers or sealed bags away from moisture and heat sources
You’re investing wisely by adopting these practices.
Proper storage prevents deterioration, ensuring your parchment paper remains pliable and functional.
Store containers in cool, dry environments for ideal preservation.
This approach gives you control over your baking expenses while maintaining consistent results.
Frequently Asked Questions
Can Parchment Paper Withstand High Temperatures Without Burning or Smoking?
Yes, parchment paper withstands high temperatures effectively.
You’ll find it typically tolerates heat up to 420-450°F without burning or smoking.
Beyond these temperature thresholds, you’ll risk coating degradation and potential smoke release.
Silicone coating—parchment’s protective layer—breaks down when exposed to excessive heat.
You maintain cooking freedom by respecting these limits, ensuring your paper performs reliably without compromising food safety or taste.
Always verify your specific brand’s heat rating.
Is Parchment Paper Safe to Use With All Types of Food?
You can safely use parchment paper with most foods, but you’ll want to avoid prolonged contact with highly acidic ingredients, which can trigger acidic reactions that compromise the paper’s integrity.
Additionally, fatty migration from oily foods may cause the paper to deteriorate over extended storage.
For standard baking applications with moderate temperatures and typical ingredients, you’ve got freedom to use parchment paper without concern.
What’s the Environmental Impact of Using Parchment Paper Regularly?
Your regular parchment paper use generates substantial waste through disposal and manufacturing’s production footprint.
You’re contributing to landfill accumulation since most parchment isn’t readily biodegradable.
Consider reusable silicone mats as alternatives—you’ll dramatically reduce waste generation while maintaining cooking performance.
You’ve got the power to make environmentally conscious choices by switching to sustainable options that align with your values of independence and responsibility.
Can I Use Parchment Paper in a Convection Oven?
Yes, you can use parchment paper in a convection oven.
However, you’ll want to monitor airflow effects closely since circulating air can cause edges to curl or lift. Position your rack strategically to minimize direct exposure to moving air currents.
Keep parchment paper below 420°F to prevent browning. Secure corners with food-safe weights if needed.
Your independent baking choices remain intact—just stay vigilant about temperature and airflow management.
How Does Parchment Paper Compare to Silicone Baking Mats in Cost?
You’ll find parchment paper cheaper upfront than silicone mats, but you’re paying for replacement frequency.
Parchment’s single-use nature means ongoing expenses that accumulate quickly.
Silicone mats demand higher initial investment yet you’ll reuse them hundreds of times, dramatically reducing long-term costs.
You’re basically choosing between frequent small purchases and one substantial investment.
For budget-conscious bakers prioritizing value, silicone mats ultimately deliver superior economic efficiency despite their steeper entry price.


Leave a Comment