
Key Takeaways
- Mix 500g bread flour, 7g instant yeast, and 10g salt; add 325ml water at 75°F and autolyse for 20–30 minutes.
- Knead dough 8–10 minutes until smooth and elastic, then bulk ferment 4–6 hours at 75–78°F with 30-minute folds.
- Shape dough into 20–24 inch ropes, form pretzel knots, then submerge in 200–212°F alkaline bath for 20–30 seconds.
- Apply coarse salt immediately after boiling while surface is tacky; add herbs mixed 3 parts salt to 1 part herbs.
- Bake at 450°F for 12–15 minutes until deep golden brown; cool on wire rack five minutes, then store in airtight containers.
Gathering Your Ingredients
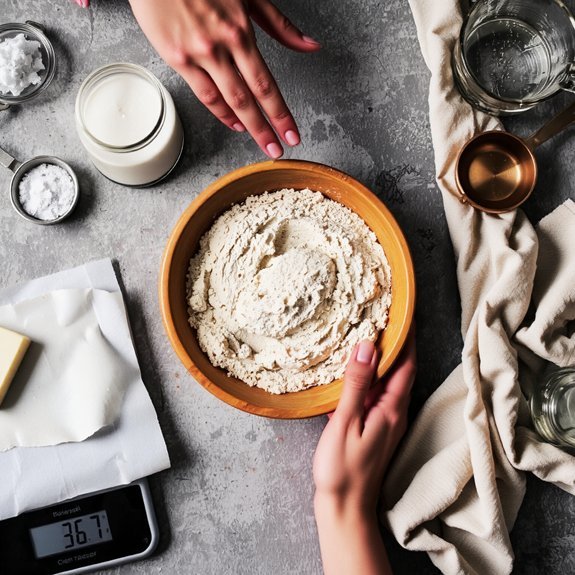
You’ll need 3¾ cups all-purpose flour, 2¼ teaspoons instant yeast, 1¼ teaspoons salt, 1 tablespoon granulated sugar, 2 tablespoons vegetable oil, and 1¼ cups warm water (110°F) for the dough.
Select quality flour as your foundation—it directly impacts texture and rise.
Quality flour forms your dough’s foundation—it directly determines texture, rise, and overall bread success.
These pantry staples form your dough’s backbone.
Confirm your instant yeast hasn’t expired; check the package date for ideal fermentation.
Measure salt and sugar precisely; even slight variations alter flavor balance and gluten development.
For the water, use a thermometer to verify exact temperature.
Water that’s too hot kills yeast; too cold retards activation.
Gather vegetable oil in a separate container for easy incorporation.
Assemble everything before mixing.
This mise en place approach prevents measurement errors and streamlines your workflow, giving you control over the entire baking process.
Preparing Your Dough
Combining your dry ingredients creates the foundation for proper gluten development and fermentation. You’ll mix 500g bread flour, 10g salt, and 7g instant yeast in a bowl. Add 325ml water at 75°F to achieve ideal hydration control of 65%. Stir until shaggy, then implement the autolyse method by resting the dough 20-30 minutes. This allows flour full absorption without mechanical mixing.
| Step | Temperature | Time |
|---|---|---|
| Mix dry ingredients | Room temp | 2 min |
| Autolyse rest | 75°F | 20-30 min |
| Knead | 75°F | 8-10 min |
| Bulk fermentation | 78°F | 90 min |
After resting, knead vigorously for 8-10 minutes until you’ve developed adequate gluten structure. Your dough should feel smooth and elastic. You’re now ready for bulk fermentation, where proper hydration control provides excellent extensibility and strength throughout the proofing phase.
Kneading and Rising
Once kneading’s complete and your dough’s smooth and elastic, it’s time to focus on bulk fermentation—the phase where flavor and structure develop simultaneously.
Bulk fermentation is where your dough develops flavor and structure simultaneously after kneading reaches completion.
You’ll want to perform the windowpane test: stretch a small dough portion until translucent without tearing, confirming adequate gluten development. Place your dough in a lightly oiled bowl, cover it, and let it rest at 75-78°F for 4-6 hours.
During this period, you’re building extensibility and flavor complexity through enzymatic activity. Fold your dough every 30 minutes for the first two hours—this strengthens the gluten network without additional kneading.
You’ll know fermentation’s complete when your dough doubles in volume and jiggles slightly when the bowl’s moved. This controlled rise guarantees superior pretzel texture and taste.
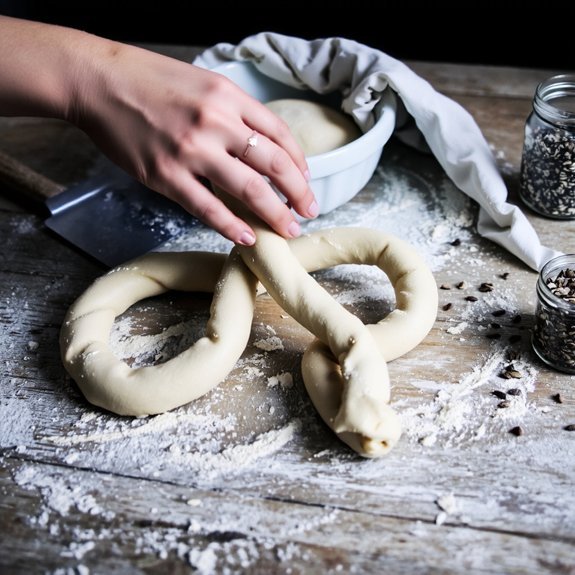
Shaping Your Pretzels

Dividing your fermented dough into uniform portions sets the foundation for consistent baking results. You’ll work with approximately 55-gram pieces for standard-sized pretzels.
Roll each portion into a rope measuring 20-24 inches long, maintaining even thickness throughout. Your hand posture matters—use gentle, consistent pressure from your palms, working outward toward your fingertips.
Once you’ve achieved the proper length, execute the classic pretzel knot techniques. Form a U-shape, then cross one end over the other, creating your signature loop. Tuck both ends through the center opening, securing them against the base.
Place shaped pretzels on parchment paper, allowing 2-3 inches between each piece for expansion. This critical shaping stage determines your final product’s appearance and texture. Precision here yields professional results every time.
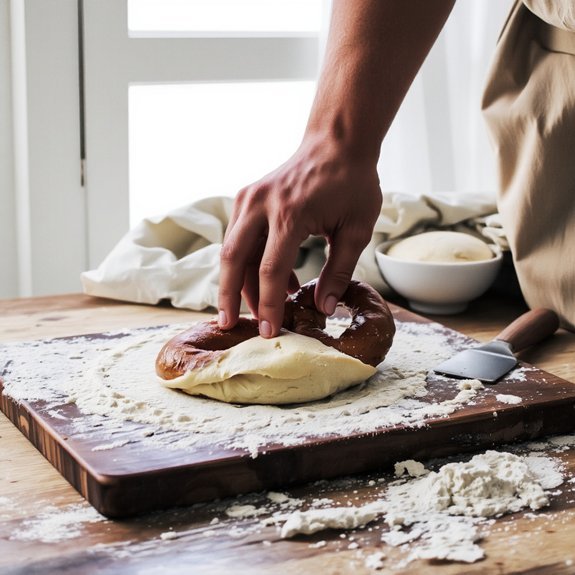
The Boiling Process
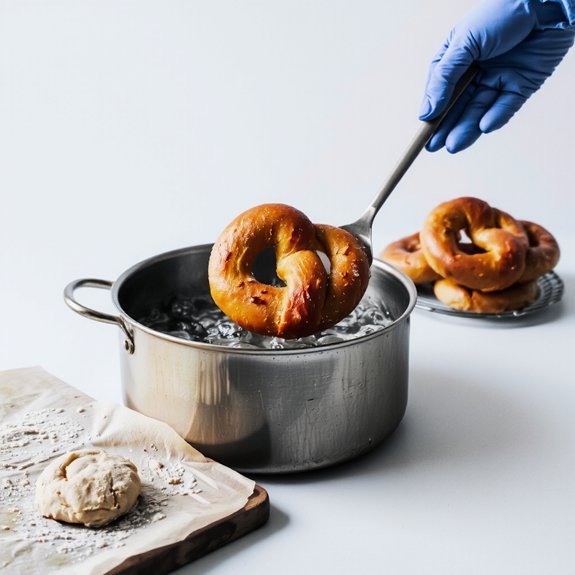
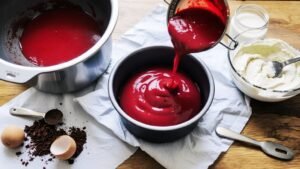
Before your shaped pretzels go into the oven, you’ll need to boil them in a specially prepared alkaline solution—typically a 3% food-grade sodium hydroxide bath or a baking soda alternative heated to 200-212°F. This alkaline chemistry creates the pretzel’s signature dark brown exterior and distinctive flavor.
Maintain precise water temperature throughout the process. Submerge each pretzel for 20-30 seconds, ensuring complete coverage. The alkaline bath initiates the Maillard reaction, developing that characteristic mahogany crust.
Use tongs to remove pretzels carefully, allowing excess liquid to drain. Place them on parchment paper immediately.
Work quickly—you’re in control of timing and results. Proper boiling separates authentic pretzels from ordinary bread. This critical step demands your attention to detail and technical precision for ideal outcomes.
Seasoning and Toppings
You’ll apply your seasoning immediately after boiling, while the pretzel surface remains tacky, ensuring ideal adhesion for classic coarse salt crystals, fine pretzel salt, or specialty blends.
You can brush your pretzels with egg wash and coat them with sweet glazes—such as cinnamon sugar or maple syrup reductions—before baking to develop caramelized finishes.
Alternatively, you’ll toss your warm pretzels with savory herb combinations like garlic powder, dried rosemary, thyme, and nutritional yeast for umami-forward flavor profiles.
Classic Salt Options
The pretzel’s surface demands careful attention to salt application, as coarse pretzel salt—typically ranging from 1/8 to 1/4 inch crystals—creates the signature texture that distinguishes quality baked pretzels from inferior versions.
You’ll want to understand salt history and mineral composition to appreciate why traditional sea salt or mined pretzel salt performs ideally.
Apply salt immediately after the lye bath while the dough’s surface remains tacky; this adhesion guarantees crystals bond permanently during baking.
Use approximately 1/2 teaspoon per pretzel, distributing it evenly across the top and twisted sections. Avoid over-salting, which overwhelms the dough’s subtle flavors.
Your precision here determines whether you’ll achieve that satisfying textural contrast between crunchy salt and chewy interior that defines authentic baked pretzels.
Sweet Glazes and Coatings
Transforming pretzels beyond their savory foundation requires applying glazes while the dough’s surface temperature remains between 160–180°F, typically within 2–3 minutes post-baking when residual heat optimizes adhesion without causing ingredient separation.
| Glaze Type | Base Ingredient | Flavor Pairing | Application Method |
|---|---|---|---|
| Honey butter | Melted butter + honey | Cinnamon sugar | Brush immediately |
| Chocolate | Dark chocolate (70% cocoa) | Sea salt, espresso | Dip or drizzle |
| Maple bourbon | Maple syrup + bourbon | Pecans, vanilla | Spray coating |
| Cream cheese | Softened cream cheese | Lemon zest, poppy seed | Spread thin layer |
| Brown sugar caramel | Caramelized brown sugar | Fleur de sel, bourbon vanilla | Immersion dip |
Glaze chemistry demands precise temperature control—applying cooler glazes risks poor flow and uneven coverage, while overheated formulations separate into distinct layers. You’ll achieve superior flavor pairings by matching viscosity to your pretzel’s texture profile.
Savory Herb Combinations
While sweet glazes capitalize on residual heat for ideal adhesion, savory herb combinations demand a different application strategy—one that leverages the pretzel’s still-warm surface to lock in aromatics and develop layered flavor profiles.
You’ll want to apply herb blends immediately post-bake when surface moisture creates ideal adhesion.
Combine dried rosemary and thyme in a 2:1 ratio, grinding coarsely to release essential oils.
For alternative profiles, try dill and chive at equal measures.
Mix your chosen herbs with sea salt (3 parts salt to 1 part herbs) and distribute evenly across the warm pretzel’s surface.
The heat activates volatile compounds, intensifying flavor penetration.
Allow a 30-second cooling window before packaging to prevent steam condensation, which dilutes seasoning potency.
This timing guarantees maximum flavor retention and textural integrity throughout storage.
Baking to Perfection
Once you’ve shaped and proofed your pretzels, you’ll want to preheat your oven to 450°F (232°C) and position the rack to the middle position.
Verify your oven calibration with a thermometer to confirm accurate temperature maintenance throughout baking.
Place your pretzels on parchment paper, spacing them two inches apart.
Mist the oven’s interior to establish ideal humidity control, which promotes a crispy exterior while keeping the interior tender.
Bake for 12-15 minutes until they’re deep golden brown—the surface should develop a slight sheen.
Remove pretzels when they’ve achieved proper color development.
Don’t rely solely on time; visual assessment matters.
Let them cool on a wire rack for five minutes before applying your herb topping.
This cooling period allows steam to escape while the crust sets, giving you that authentic pretzel texture you’re after.
Achieving the Golden-Brown Finish
You’ll achieve that coveted golden-brown finish by baking your pretzels at 425°F for 12-15 minutes, adjusting time based on pretzel size and your oven’s calibration.
Apply a thin egg wash (one egg beaten with 1 tablespoon water) using a pastry brush before baking to create an even, glossy brown exterior. Monitor your pretzels during the final 3 minutes, as the browning process accelerates rapidly once the Maillard reaction reaches its peak.
Baking Temperature and Time
To develop that signature golden-brown exterior, preheat your oven to 450°F (232°C) and bake your pretzels for 12-15 minutes, depending on their size and thickness. Proper oven calibration guarantees consistent results across batches. You’ll want to monitor internal crumb temperature, targeting 205-210°F for ideal texture.
| Pretzel Size | Baking Time | Internal Temp | Color Target | Rack Position |
|---|---|---|---|---|
| Small (2 oz) | 12 minutes | 205°F | Light amber | Middle |
| Medium (3 oz) | 13 minutes | 207°F | Golden brown | Middle |
| Large (4 oz) | 15 minutes | 210°F | Deep amber | Lower-middle |
| Extra-large (5 oz) | 16 minutes | 210°F | Rich brown | Lower-middle |
| Mini (1 oz) | 10 minutes | 200°F | Light tan | Upper-middle |
Thermal profiling reveals that rotating your pan halfway through baking promotes uniform browning and prevents overdevelopment on one side.
Egg Wash Application Techniques
Before your pretzels enter the oven, an egg wash application creates that coveted golden-brown exterior you’ve been targeting.
Whisk one large egg with one tablespoon water to achieve ideal wash viscosity—neither too thick nor too thin.
This consistency guarantees even coverage without pooling or dripping.
Apply your egg wash using a soft pastry brush, employing deliberate brushing patterns across the pretzel’s surface.
Work systematically from top to bottom, maintaining consistent pressure.
Cover all exposed dough surfaces, including crevices and twisted sections.
Time your application immediately after shaping, before the dough begins drying.
For enhanced browning, apply a second coat after thirty seconds.
Avoid over-saturating; excess wash creates soggy spots rather than uniform color.
Your technical precision here directly determines that professional-quality finish you’re after.
Cooling and Storage
Allowing your pretzels to cool properly on a wire rack prevents moisture from accumulating on their undersides, which’d otherwise soften the crust and compromise texture.
Store completely cooled pretzels in airtight containers at room temperature for up to three days, maintaining ideal crispness. For extended preservation, employ freezing methods by wrapping individual pretzels in parchment paper, then placing them in freezer-safe bags at 0°F for up to three months.
When you’re ready to consume frozen pretzels, thaw them at room temperature for 30 minutes without unwrapping—this prevents condensation from forming. Reheat thawed pretzels at 350°F for five minutes to restore crispness. Never store warm pretzels in sealed containers, as trapped steam accelerates staleness and encourages mold development.
Troubleshooting Common Issues
Even with proper cooling and storage techniques, you’ll sometimes encounter problems during pretzel baking that affect texture, appearance, or flavor.
Equipment failure—such as malfunctioning ovens or broken mixers—compromises your results; verify calibrations and replace faulty components immediately.
Dense pretzels indicate insufficient yeast fermentation or over-mixing; adjust proofing times and mixing speeds accordingly.
Pale surfaces suggest inadequate lye or baking soda concentration; recalibrate your alkaline bath ratios.
For allergy substitutes, swap wheat flour with certified gluten-free blends at a 1:1 ratio, though you’ll need added xanthan gum for structural integrity.
If you’re lactose intolerant, replace milk with almond or oat alternatives.
Brown spots indicate uneven heat distribution; rotate racks mid-bake.
Document deviations and adjust your process systematically to achieve consistent, premium results.
Frequently Asked Questions
Can I Freeze Pretzel Dough Before Shaping, and How Long Will It Last?
You can absolutely freeze your pretzel dough before shaping.
Wrap it tightly in plastic wrap, then place it in an airtight freezer bag to prevent freezer burn. Your freezing duration allows up to three months of storage.
When you’re ready, implement these thawing tips: transfer the dough to your refrigerator for 8-12 hours, enabling gradual temperature equilibration. This method preserves gluten development and fermentation characteristics, ensuring ideal rise and texture in your final product.
What’s the Difference Between Soft and Crispy Pretzels in Texture?
You’ll notice the primary distinction lies in crust formation and surface browning.
Soft pretzels develop a chewy, yielding exterior through steam-injected baking environments that prevent crust hardening.
Crispy pretzels undergo extended baking at higher temperatures, creating rigid crust formation with deeper surface browning.
You control this outcome by adjusting your oven’s humidity level and baking duration.
Steam retention produces tender results; dry heat yields crackling texture.
Your preference determines which technique you’ll master.
How Do I Make Pretzels Without Using Lye for Boiling?
You’ll substitute lye with an alkaline wash using baking soda. Dissolve 2 tablespoons baking soda in 1 cup water, then bake the solution at 300°F for 15 minutes to increase alkalinity.
Cool completely. Dip your pretzel dough for 30 seconds in this homemade alkaline bath before baking at 425°F for 12-15 minutes. This method gives you control over your ingredients while achieving that signature dark, chewy exterior without commercial lye.
Can I Use Whole Wheat Flour Instead of All-Purpose Flour?
You can absolutely substitute whole wheat flour for all-purpose flour in your pretzels.
You’ll need a hydration adjustment—increase water by 5-8% since whole wheat absorbs more moisture.
The flavor comparison reveals a nuttier, earthier taste profile.
Use 70% whole wheat with 30% all-purpose flour for ideal texture and rise.
Knead precisely 8-10 minutes until you achieve smooth, elastic dough.
This blend gives you authentic pretzel structure while maintaining your independence from conventional recipes.
What Causes Pretzels to Have a Chewy Versus Fluffy Interior?
You’ll achieve a chewy interior by maximizing gluten development through vigorous kneading and extended fermentation time—typically 12-24 hours cold fermentation.
This creates a tight crumb structure that holds moisture.
For a fluffier result, you’ll reduce fermentation to 2-4 hours and incorporate more yeast.
Your baking soda bath’s alkalinity also impacts texture; longer immersion times yield chewier exteriors that transfer to interior density.


Leave a Comment