Key Takeaways
- Prepare filling by poaching chicken in seasoned broth until 165°F, then shred and combine with sautéed vegetables and béchamel sauce.
- Use a 3:1 filling-to-crust ratio with blind-baked bottom crust to prevent sogginess and ensure proper balance and structure.
- Bake at 425°F for 20 minutes to set the crust, then reduce to 350°F for 25–35 minutes until filling reaches 165°F.
- Apply egg wash (one yolk plus one tablespoon water) to top crust after reaching room temperature for golden-brown color.
- Cool to room temperature before refrigerating to prevent condensation; store covered for up to three days or freeze for two months.
Gathering Your Ingredients
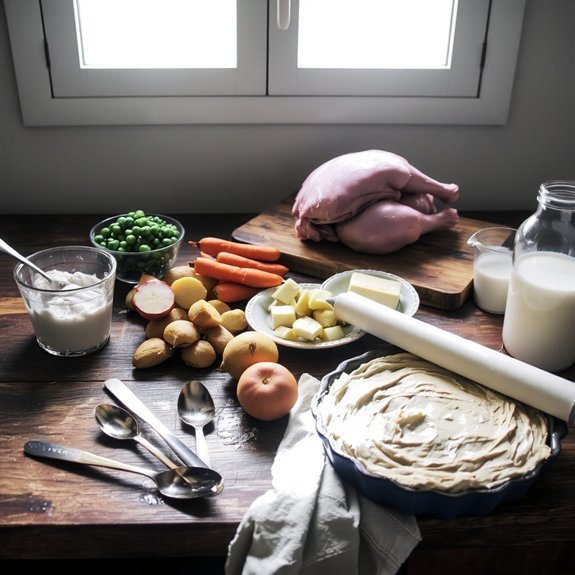
Before you begin assembling your pot pie, you’ll want to gather all components to guarantee smooth preparation.
Gather all pot pie components before assembly to guarantee smooth, streamlined preparation.
Stock your pantry staples: all-purpose flour, butter, and chicken broth—the holy trinity of your filling base.
You’ll need diced chicken (approximately two cups), mixed vegetables like peas and carrots, and onion for aromatic depth.
Budget shopping means purchasing rotisserie chicken rather than whole birds, saving both money and prep time.
Grab eggs for egg wash, salt, and white pepper for seasoning.
A quality pie crust—whether homemade or store-bought—depends on your preference and time constraints.
Measure your ingredients precisely: a 3:1 ratio of filling to crust provides proper proportions.
This methodical approach eliminates guesswork, streamlines your workflow, and guarantees a restaurant-quality result without unnecessary expense.
2. Preparing the Chicken
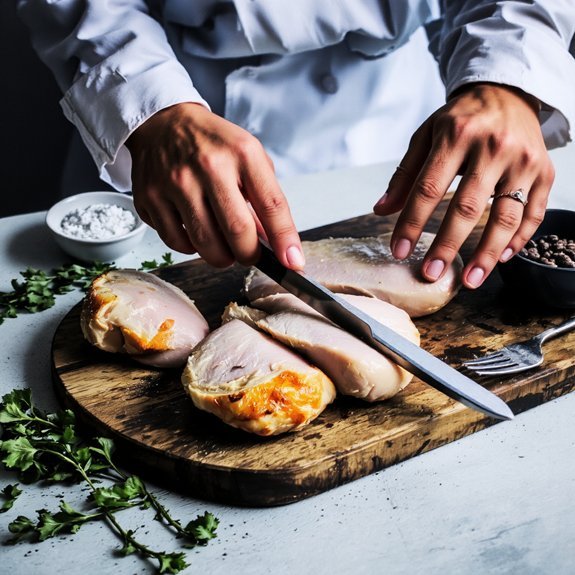
You’ll poach your chicken breasts in a seasoned broth at 165°F until they’re cooked through, which typically takes 12-15 minutes for standard portions.
Once cooled slightly, you’ll shred the meat into bite-sized pieces using two forks, working against the grain to achieve consistent texture.
Season your shredded chicken with kosher salt, cracked pepper, and fresh thyme at a ratio of ¼ teaspoon salt per cup of chicken to guarantee proper seasoning distribution throughout your filling.
Cooking Methods and Temperatures
To build a flavorful foundation for your pot pie, you’ll want to poach or roast your chicken until it reaches an internal temperature of 165°F (74°C).
Poaching yields tender, moist meat—simmer breasts in seasoned broth for 12-15 minutes.
Roasting develops deeper flavor; bake at 425°F for 20-25 minutes.
For adventurous cooks, sous vide offers precise control at 165°F for 1-2 hours, ensuring consistent texture.
Smoking temperatures between 225-250°F impart complexity, though this requires additional time.
Regardless of method, shred your cooled chicken into bite-sized pieces.
Reserve poaching liquid as stock for your filling base.
Don’t overcook—dried-out chicken compromises your final dish’s quality.
Your choice of technique directly influences your pie’s character and moisture content.
Shredding and Seasoning Techniques
Shredding your cooled chicken requires patience and proper technique to achieve uniform, bite-sized pieces that distribute evenly throughout your filling. You’ll use fork mechanics to separate muscle fibers efficiently—position two forks back-to-back and pull outward with steady pressure.
Once shredded, conduct taste calibration by sampling your chicken against your target seasoning profile. You’re not bound by convention; adjust salt, white pepper, and herbs to your preference.
| Seasoning | Ratio per Pound | Application |
|---|---|---|
| Kosher Salt | ½ teaspoon | Distribute during shredding |
| White Pepper | ¼ teaspoon | Blend thoroughly |
| Fresh Thyme | 1 teaspoon | Fold in last |
This methodical approach guarantees your filling achieves balanced, professional-quality flavor that you’ve deliberately calibrated to your specifications.
3. Making the Creamy Filling
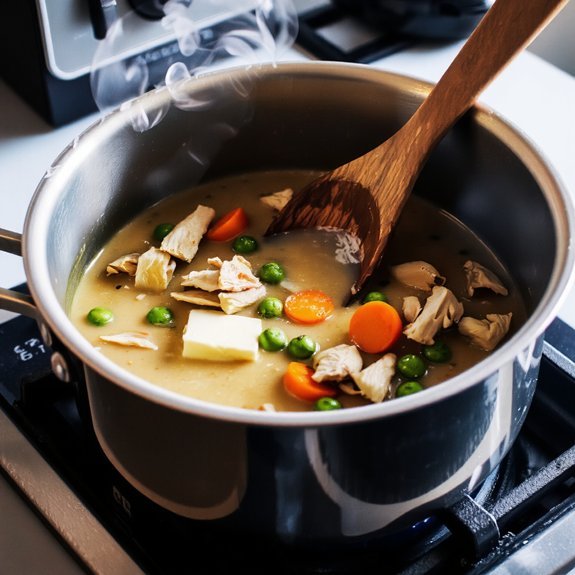
You’ll create your creamy filling by building a roux base—whisking equal parts butter and flour over medium heat until it reaches a light blonde color and loses its raw flour taste.
Next, you’ll gradually incorporate your broth and seasonings, stirring constantly to prevent lumps while achieving a smooth, velvety consistency.
Finally, you’ll fold in your cooked vegetables and shredded chicken, ensuring they’re evenly distributed throughout the filling before pouring it into your pie shell.
Roux Base Foundation
Building a proper roux—the 1:1 ratio of fat to flour—creates the thickening agent that’ll transform your filling into a silky, luxurious sauce.
Melt butter over medium heat, then whisk in flour until fully incorporated.
Watch your color stages carefully: you’ll progress from pale blonde to deeper amber as you cook.
This takes roughly two minutes. Pay attention to smell cues—you’re seeking a nutty, toasted aroma without any burnt notes.
Once you’ve reached the desired color and fragrance, gradually add your warm stock while whisking constantly. This prevents lumps and guarantees a smooth emulsion.
The roux’s starches gelatinize, creating body and viscosity that’ll coat your chicken and vegetables beautifully. Don’t rush this foundation; it’s what separates mediocre from exceptional pot pie.
Broth and Seasoning
Once your roux reaches that nutty perfection, you’re ready to transform it into a velvety sauce by incorporating your warm stock in a steady stream while whisking relentlessly to maintain smoothness.
Use a 1:1 ratio of roux to liquid for ideal consistency.
Your bone simmering stock—crafted from chicken bones, aromatics, and herbs—provides foundational depth that elevates your filling’s complexity.
For clarity methods, strain your stock through cheesecloth to eliminate particulates.
Season methodically: add salt gradually, tasting as you build flavor.
Incorporate fresh thyme, bay leaf, and white pepper.
The sauce should coat the back of a spoon without clumping.
This creamy foundation binds your filling components while delivering rich, savory notes essential to exceptional pot pie.
Vegetables and Protein Mix
Layer your diced vegetables and shredded chicken directly into the warm béchamel sauce.
Maintain a 2:1 ratio of sauce to solids for ideal binding without excess moisture.
This filling composition demands precision:
- Vegetable selection – Combine carrots, peas, and celery for ideal color balance and textural contrast
- Protein proportion – Use 2 cups shredded chicken per 4 cups béchamel for structural integrity
- Incorporation technique – Fold ingredients gently to preserve vegetable integrity and prevent sauce separation
Your filling’s nutritional profile strengthens through this vegetable-protein combination, delivering essential vitamins, minerals, and amino acids.
The béchamel acts as a binding agent, coating each component uniformly.
Make sure even distribution before transferring to your pie shell.
This methodical approach guarantees a cohesive filling that won’t weep or separate during baking, yielding professional results you control completely.
4. Chopping and Cooking Your Vegetables
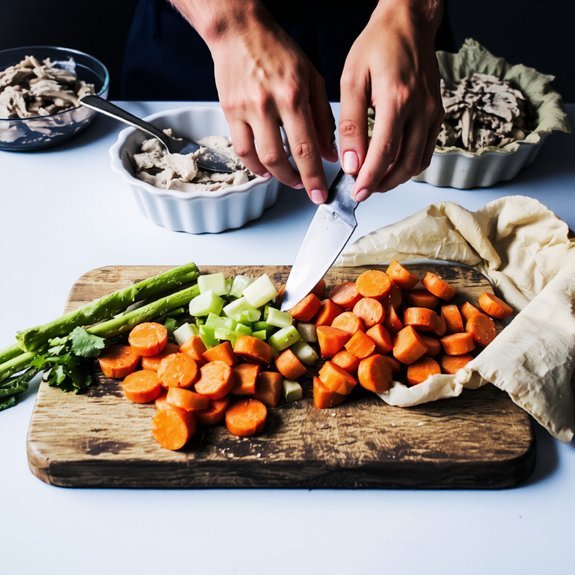
Preparing your vegetables properly guarantees they’ll cook evenly and maintain their texture in your pot pie.
You’ll want to maintain sharp knives for clean cuts and precise knife maintenance throughout your prep work.
Aim for cut uniformity—¾-inch dice for carrots, celery, and potatoes promotes consistent cooking times across all ingredients.
Cut vegetables into uniform ¾-inch dice to ensure carrots, celery, and potatoes cook evenly throughout your pot pie.
Heat two tablespoons of butter in a large saucepan over medium-high heat.
Add your diced onions first, cooking for three minutes until translucent.
Incorporate carrots and celery, sautéing for five minutes.
Add potatoes and peas last, cooking another four minutes.
You’re building flavor through proper layering and timing rather than dumping everything together.
Season with salt and pepper to taste.
Remove from heat and let cool slightly before transferring to your pie shell.
This method gives you complete control over texture and doneness.
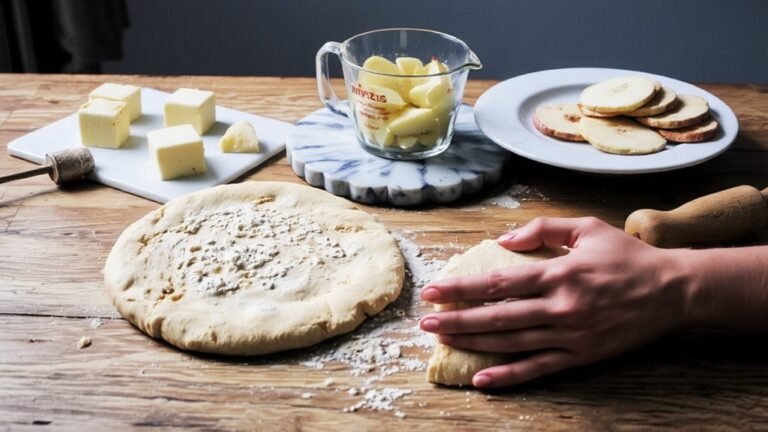
5. Choosing Your Crust
Why does your crust choice matter so much for chicken pot pie? Your crust foundation determines texture, flavor, and structural integrity of the entire dish.
You’ve got three compelling options:
- Butter crusts – Traditional all-butter formulations deliver flaky, golden layers through proper lamination and cold fat distribution
- Shortcrust varieties – Egg-enriched doughs create tender, crumbly textures ideal for filled pies
- Gluten free crusts – Rice flour and cornstarch blends accommodate dietary preferences without sacrificing structural stability
For ideal results, maintain a 3:1 flour-to-fat ratio and keep ingredients refrigerated.
Roll dough to 1/8-inch thickness for even baking.
You’re not bound by convention—experiment with alternative flours or pre-made options that align with your values and constraints.
Blind-bake at 375°F for 12 minutes to prevent soggy bottoms.
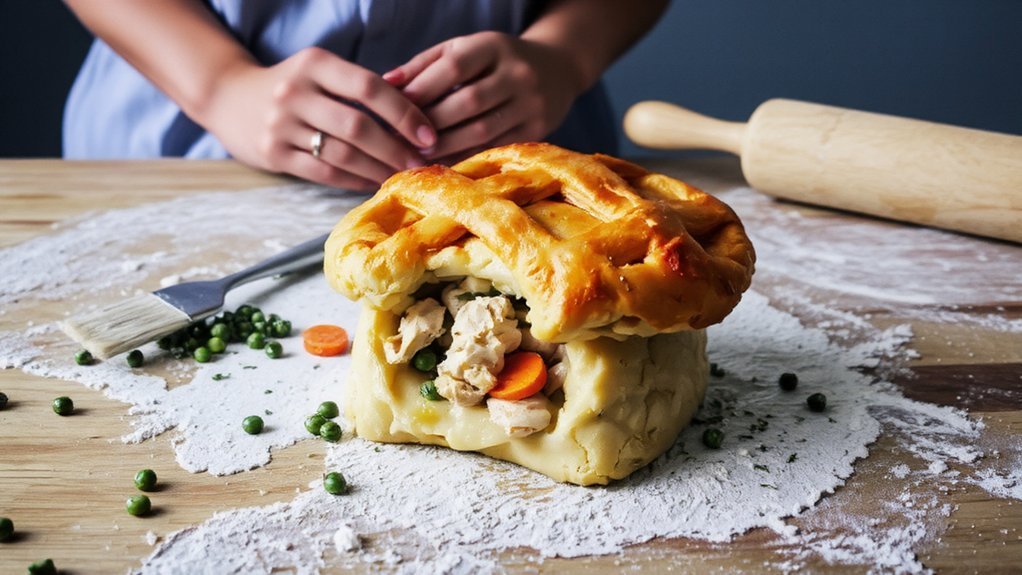
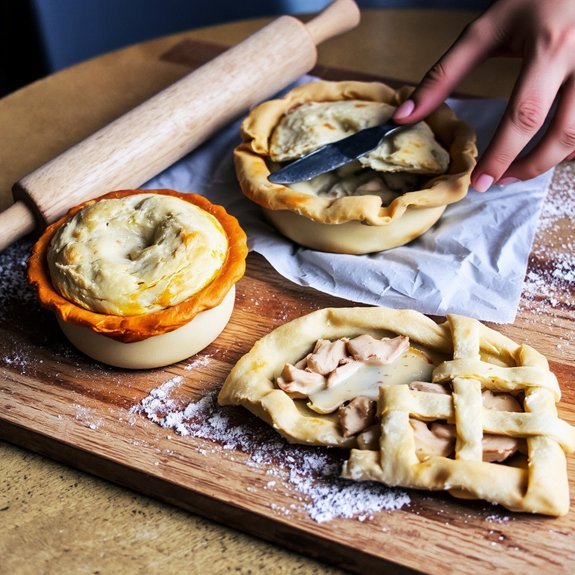
6. Assembling Your Pot Pie
Once you’ve prepared your crust foundation and blind-baked it to golden perfection, you’ll combine your filling components with architectural precision.
Select appropriate pan sizes—a standard 9-inch pie dish accommodates most home recipes effectively.
Begin your layer sequence by spooning your béchamel-bound chicken mixture into the prepared crust, distributing it evenly across the bottom.
Spoon your béchamel-bound chicken mixture into the prepared crust, distributing it evenly across the bottom layer.
The filling should reach approximately three-quarters full, allowing room for your top crust without spillover during baking.
Next, brush your egg wash along the crust’s inner rim.
Position your top crust carefully, pressing edges firmly to seal both layers together.
Cut steam vents using a sharp knife—typically three to four strategic slits.
Brush the entire surface with additional egg wash for ideal golden-brown coloration.
You’re now ready for the final bake, having established proper structure for even cooking and beautiful presentation.
7. Achieving the Perfect Golden Crust
Egg wash application is your primary tool for developing that coveted mahogany exterior. You’ll want to brush a mixture of one egg yolk beaten with one tablespoon water across your entire crust surface for ideal adhesion and color development.
Here’s what you need to control:
- Temperature consistency—maintain a 425°F oven to promote even browning without burning edges
- Egg wash ratio—use one egg yolk per tablespoon water for glossy results without excessive moisture
- Vent patterns—cut strategic slits allowing steam escape while maintaining structural integrity
Apply your egg wash only after your pie reaches room temperature, preventing premature crust separation.
Use a pastry brush with deliberate strokes, achieving complete coverage.
Avoid pooling excess liquid in crevices.
Bake until your crust achieves deep golden-brown coloration, typically 35-40 minutes.
This technique guarantees restaurant-quality results you’ll control completely.
8. Baking Time and Temperature
Since your filled pie’s internal components require different cooking times than your crust, you’ll need to manage heat strategically throughout the baking process.
Start at 425°F for 20 minutes to set your crust, then reduce to 350°F for the remaining 25-35 minutes until the filling reaches 165°F internally.
Begin with 425°F for 20 minutes to set the crust, then lower to 350°F until filling reaches 165°F internally.
Oven calibration matters substantially—use an independent thermometer to verify your oven’s accuracy, as variations compromise results.
Altitude adjustments are equally critical; at higher elevations, increase baking time by 15-25% and reduce oven temperature by 25°F to prevent over-browning while guaranteeing thorough filling cookery.
Shield your crust edges with foil if browning too quickly.
Your filling should bubble slightly at the edges and your internal temperature should register precisely before removing from heat.
This precision secures a properly set filling with an evenly golden crust.
9. Serving and Storage Tips
How you handle your finished chicken pot pie dramatically affects both its immediate enjoyment and its longevity.
You’ll maximize flavor and texture by serving your pie within two hours of baking, while the crust remains crisp and the filling stays properly emulsified.
For ideal storage, follow these guidelines:
- Cool the pie to room temperature before refrigerating to prevent condensation and sogginess
- Store covered portions in airtight containers for up to three days in your refrigerator
- Freeze individual servings in labeled containers, using freezer organization systems for easy identification
When labeling dates on your containers, note both the preparation and freeze dates.
You’ll maintain quality for approximately two months in the freezer.
Reheat frozen portions at 350°F for twenty-five minutes, covered, until the filling reaches 165°F internally.
Frequently Asked Questions
Can I Make Chicken Pot Pie Ahead and Freeze It Before Baking?
You can absolutely make your chicken pot pie ahead for freezer storage.
Assemble your unbaked pie in a freezer-safe dish, wrap it tightly in plastic wrap and foil, then freeze up to three months.
When you’re ready to bake, don’t thaw it—bake directly from frozen, adding 15-20 minutes to your cooking time.
This make-ahead method gives you complete control over your schedule while maintaining proper crust texture and filling consistency.
What’s the Best Way to Reheat Leftover Chicken Pot Pie?
You’ll get superior results using the oven method.
Preheat to 350°F, place your pie on a baking sheet, and reheat for 15-20 minutes until the filling reaches 165°F internally.
Cover with foil if the crust browns too quickly.
For microwave tips, use 50% power in 2-minute intervals, stirring the filling between rounds to promote even heating and prevent a soggy crust.
Your choice depends on prioritizing texture or convenience.
How Do I Prevent a Soggy Bottom Crust in Pot Pie?
You’ll prevent soggy bottoms by blind baking your crust before filling. Pre-bake at 375°F for 10-12 minutes until set but not browned. This creates a moisture barrier.
Additionally, you’re free to brush the crust with egg wash or melted butter for extra protection. Cut steam vents strategically in your top crust—three to four slits suffice—allowing controlled moisture escape without compromising structural integrity throughout baking.
Can I Substitute the Chicken With Other Proteins Like Turkey?
You can absolutely make turkey swaps in your pot pie—they’ll work brilliantly. Use equal ratios of cooked, diced turkey for chicken.
For tofu alternatives, you’ll want firm varieties pressed and cubed. Adjust your sauce’s fat content accordingly; tofu requires slightly less richness.
Season boldly since these proteins demand more assertive flavoring than poultry.
Your filling ratios stay consistent: maintain proper vegetable-to-protein balance for ideal texture and structural integrity throughout baking.
What if My Filling Is Too Thick or Too Thin?
You’ll adjust your filling’s consistency by employing targeted thickening agents or thinning techniques. For overly thin filling, incorporate cornstarch slurry or roux—whisk equal parts flour and butter, then add gradually.
For excessively thick filling, introduce cold broth incrementally while stirring. Maintain a precise 1:1 liquid-to-solid ratio for ideal results. These adjustments grant you complete autonomy over your pot pie’s final texture, ensuring professional-quality results every time you bake.


Leave a Comment