Key Takeaways
- Use a 9-inch round or 8-inch square light-colored aluminum pan, greased and floured for even heat distribution and easy release.
- Create vanilla and chocolate batters by creaming butter and sugar, beating in eggs, alternating dry ingredients, then dividing and adding cocoa paste to half.
- Layer batters with vanilla base first, add chocolate dollops 2 inches apart, then swirl with a knife using figure-eight motions for marbling effect.
- Bake at 350°F for 35–40 minutes on the middle rack until a toothpick inserted near center emerges with minimal crumbs.
- Cool in pan 10–15 minutes, transfer to wire rack for complete cooling, then level the top and apply thin crumb coat before final frosting.
Gather Your Ingredients and Tools
Before you start mixing, you’ll need to gather the right ingredients and tools to make sure your marble cake turns out perfectly. For ingredient sourcing, select quality all-purpose flour, fresh eggs, unsweetened cocoa powder, and pure vanilla extract.
Before you start mixing, gather quality all-purpose flour, fresh eggs, unsweetened cocoa powder, and pure vanilla extract for a perfect marble cake.
You’ll also need butter, sugar, baking powder, salt, and milk. Don’t compromise on these basics—they’re foundational to your cake’s texture and flavor.
For equipment, assemble two mixing bowls, an electric mixer, measuring cups and spoons, a whisk, and a 9-inch round cake pan.
Invest in reliable tools and commit to tool maintenance by cleaning them thoroughly after each use and storing them properly. Sharp measuring implements and a well-maintained mixer guarantee consistency and accuracy. Having everything prepped and ready streamlines your baking process and eliminates last-minute scrambling.
Prepare Your Baking Pan
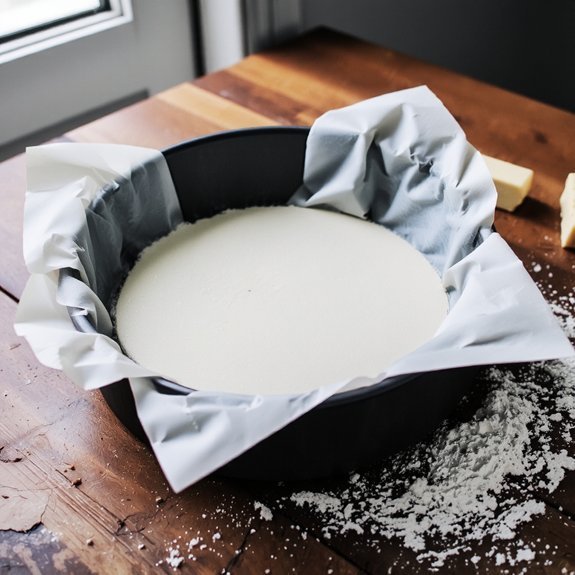
You’ll want to select a 9-inch round cake pan, which provides the ideal dimensions for achieving even baking and the classic marble cake appearance.
Grease the pan thoroughly with butter or cooking spray, ensuring you coat every corner and crevice to prevent sticking.
Dust the greased pan with flour, tapping out the excess so you’ve created a light, even coating that’ll help your cake release cleanly.
Select the Right Pan
What makes the difference between a marble cake that bakes evenly and one with burnt edges? Your pan choice.
You’ll want to select a pan material that conducts heat uniformly.
Light-colored aluminum pans distribute warmth consistently, preventing dark, crispy edges.
Avoid dark nonstick pans, which absorb excessive heat and compromise your cake’s texture.
Consider your size options carefully.
A standard 9-inch round or 8-inch square pan works best for most marble cake recipes.
These dimensions provide proper depth and surface area for that signature swirled pattern to develop fully.
Make sure your pan has straight sides—sloped edges prevent even batter distribution.
Grease it thoroughly or use parchment paper for easy release.
Your pan selection directly impacts your cake’s appearance and taste, so choose wisely and bake confidently.
Grease and Flour Thoroughly
Now that you’ve chosen your ideal pan, proper preparation guarantees your marble cake releases cleanly without sticking. You’ll need unsalted butter and all-purpose flour—your foundation for success.
Using a pastry brush, apply a thin, even layer of softened butter across all interior surfaces, including corners and crevices.
Don’t skimp; incomplete coverage invites sticking.
Dust your buttered pan generously with flour, rotating it to coat all surfaces.
Tap out excess flour dust to prevent a thick, gritty crust on your cake’s exterior.
Consider allergen transfer if baking for others—use dedicated equipment free from cross-contamination.
Never share flour containers without clearly labeling contents.
This straightforward preparation eliminates frustration during unmolding, ensuring your marble cake emerges intact with pristine edges, ready for frosting and serving.
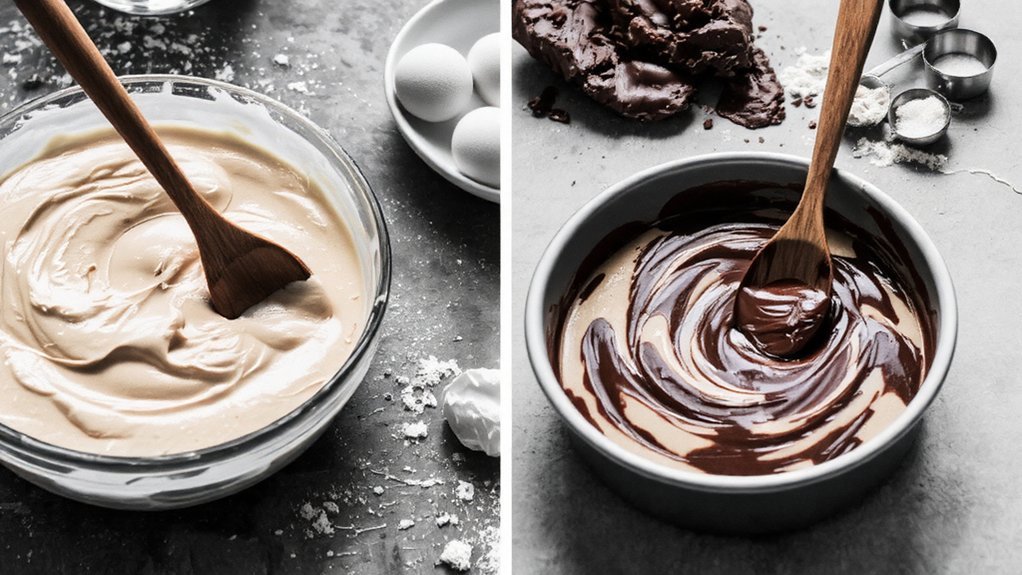
Mix Your Vanilla Batter
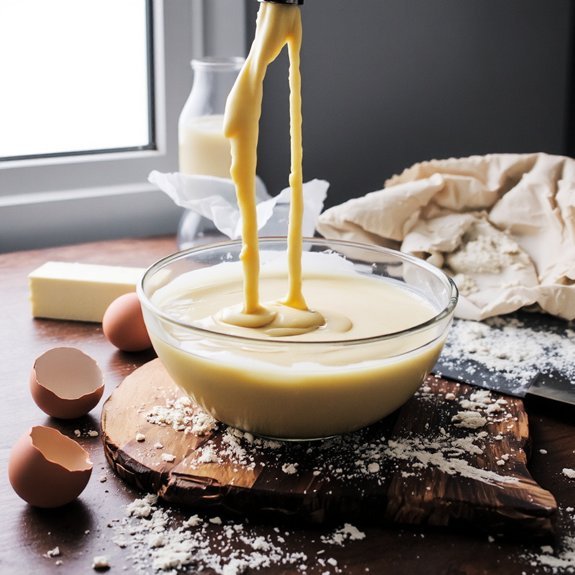
Combine your flour, baking powder, and salt in a medium bowl, then whisk them together to distribute the leavening agent evenly throughout the dry ingredients.
This aeration technique guarantees your cake rises uniformly without dense pockets.
Now you’ll create your vanilla batter base:
- Cream softened butter and sugar until light and fluffy, incorporating air that promotes rise
- Beat in eggs one at a time, allowing each to fully integrate before adding the next
- Alternate adding your dry mixture and vanilla extract, beginning and ending with dry ingredients to prevent gluten development from becoming excessive
- Mix on low speed until just combined, avoiding overworking that toughens your final cake
Your batter’s smooth consistency and proper aeration set the foundation for marble cake’s distinctive texture. You’ve now got the vanilla base ready for swirling with chocolate.
Mix Your Chocolate Batter
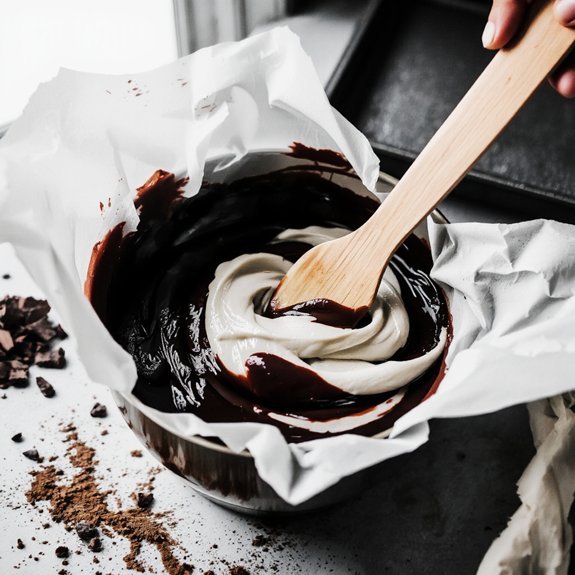
To create your chocolate swirl component, you’ll reserve one cup of your vanilla batter in a separate bowl before proceeding with the chocolate mixture.
Combine unsweetened cocoa powder with hot water to form a smooth paste. Your cocoa selection determines the depth of chocolate flavor—opt for Dutch-processed for richness or natural cocoa for brightness. Whisk this mixture into your remaining vanilla batter along with melted chocolate.
Emulsifier usage, specifically lecithin or egg yolks already present, promotes smooth chocolate integration without separation. Stir until fully incorporated.
| Ingredient | Amount | Purpose |
|---|---|---|
| Cocoa powder | ¼ cup | Flavor base |
| Hot water | ¼ cup | Cocoa dissolution |
| Melted chocolate | 2 oz | Richness enhancement |
This chocolate batter’s consistency should match your vanilla batter exactly, allowing both to blend seamlessly when layered.
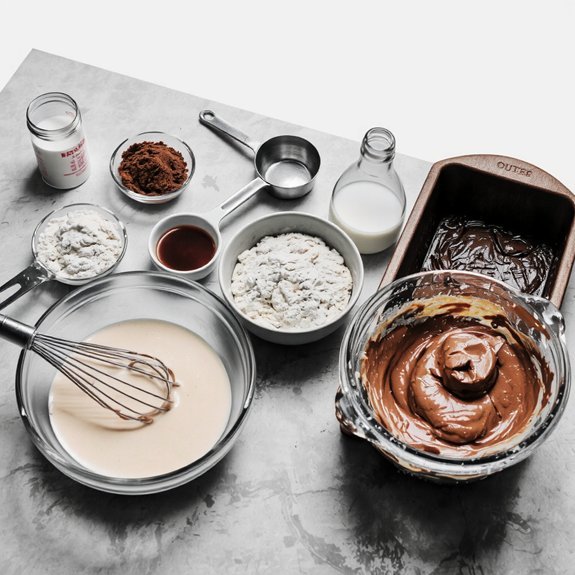
Layer the Batters in Your Pan
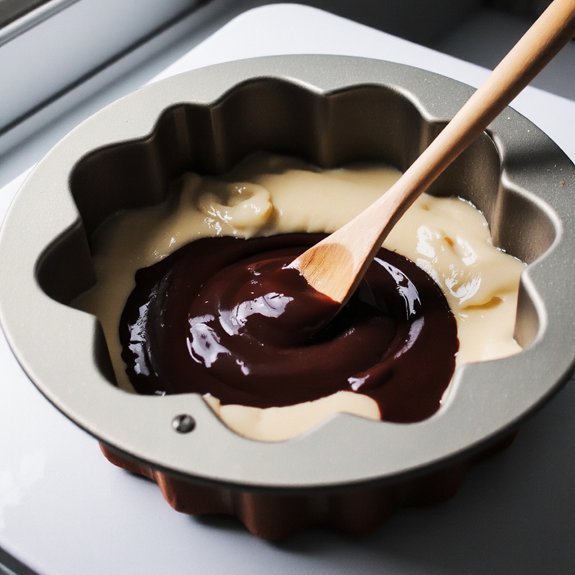
With both batters prepared and matched in consistency, you’re ready to build your marble cake’s signature visual pattern.
- Pour vanilla batter into your greased pan, establishing your base layer at roughly ½-inch thickness
- Use strategic dollop placement with your chocolate batter across the vanilla surface, spacing them evenly for balanced marbling
- Swirl a knife through both batters with decisive, figure-eight motions—don’t overwork the mixture
- Create distinct layer thickness variations by alternating between batters, building visual complexity
Your dollop placement determines the final aesthetic.
Space chocolate dollops about 2 inches apart for ideal swirling without over-blending.
Control your layer thickness—keep each application consistent at ½-inch to promote even baking and prevent one batter from dominating the crumb structure.
This methodical approach guarantees the striking marble effect you’re pursuing.
Create the Marble Effect
Now that you’ve placed your chocolate dollops strategically across the vanilla base, your knife becomes the primary tool for achieving the cake’s defining visual character.
Draw your blade vertically through the batter in parallel lines, then horizontally across those lines to create classic swirl techniques. You control the intensity of your visual patterns—subtle movements yield delicate veining, while bolder strokes produce dramatic swirls.
Draw your blade vertically, then horizontally, to create classic swirls. Subtle movements yield delicate veining; bolder strokes produce dramatic patterns.
Work deliberately but quickly; the batters set as they sit. Wipe your knife between passes to prevent muddying colors.
Some bakers prefer skewers or toothpicks for finer detail work. Your decisive hand motion determines whether the marbling appears refined or bold. The interplay between chocolate and vanilla creates the striking contrast that defines this dessert. Master these swirl techniques, and you’ll achieve professional-grade results.
Smooth the Top Layer
You’ll need to level any uneven surface areas before applying frosting, using an offset spatula or cake leveler to create a flat, even plane across the top.
Once you’ve achieved a smooth foundation, you’re ready to apply your frosting using proper techniques—hold your spatula at a shallow angle and use gentle, overlapping strokes to create an even, professional finish. This preparation guarantees your marble cake has a polished appearance that showcases the swirled interior design.
Leveling Uneven Surface Areas
Smoothing your marble cake’s surface requires a long serrated knife or cake leveler,
which you’ll glide horizontally across the cake’s crown to remove any doming or uneven peaks.
- Position your knife at a 90-degree angle slicing motion, maintaining consistent pressure throughout the core removal process
- Work in one fluid motion rather than sawing back and forth, which creates crumbs and uneven cuts
- Rotate your cake on a turntable for uniform height reduction across all sides
- Trim excess from the tallest points first, then address lower sections systematically
You’ll achieve a perfectly level surface that accepts frosting evenly. This technique guarantees your marble pattern displays beautifully without distortion from structural flaws.
Frosting Application Techniques
With your marble cake’s surface properly leveled, it’s time to apply frosting that’ll showcase your marbled interior without visual interference.
Choose a crumb coat first—a thin frosting layer that seals in loose particles and stabilizes your cake.
Use straight spreading patterns with an offset spatula, working from the center outward with controlled pressure.
This technique prevents crumbs from mixing into your final frosting layer.
Once set, apply your decorative frosting using consistent spreading patterns or piping tips for defined edges.
Consider open-top designs that display your marble swirls rather than heavy coverage that conceals them.
Maintain a steady hand and room-temperature frosting for ideal control.
Your technique directly impacts how effectively your cake’s interior design translates to visual appeal.
Bake Your Cake to Perfection
Once you’ve poured the batter into your prepared pan, be sure to maintain an oven temperature of 350°F (175°C) for even baking.
You’ll achieve superior results by prioritizing oven calibration to prevent hot spots that compromise your marble pattern.
Control these critical factors:
- Verify oven temperature using an independent thermometer
- Position your pan on the middle rack for uniform heat distribution
- Monitor humidity control—aim for 40-50% relative humidity to prevent uneven rise
- Avoid opening the oven door during the first 25 minutes
Bake for 35-40 minutes until a toothpick inserted near the center emerges with minimal crumbs.
Your cake’s structural integrity depends on respecting these parameters.
You’ve earned the freedom to skip guesswork by following precise technique.
Cool and Remove From Pan
You’ll want to test your marble cake for doneness first by inserting a toothpick into the center—it should emerge with a few moist crumbs, not wet batter.
Allow the cake to cool in the pan for 10-15 minutes, which lets the structure set enough to prevent crumbling during removal.
After cooling, run a thin knife around the edges, place a cooling rack on top, invert the pan, and gently lift it away.
Cooling Time Guidelines
After the marble cake’s internal temperature reaches 200°F, remove it from the oven and let it rest in the pan for 10-15 minutes before turning it out onto a wire rack.
This critical resting period allows carryover baking to complete while preventing structural collapse.
During this time, the cake’s crumb sets properly, and sugar crystallization stabilizes throughout the layers.
Follow these cooling guidelines for best results:
- Keep the cake in the pan during initial cooling to support the delicate crumb structure
- Transfer to a wire rack after 10-15 minutes to prevent moisture accumulation on the bottom
- Cool completely at room temperature for 2-3 hours before frosting or serving
- Avoid refrigeration during cooling, which can cause uneven texture development
This methodical approach guarantees your marble cake maintains its distinct vanilla and chocolate patterns while achieving the ideal moisture and density you’re seeking.
Releasing From Cake Pan
With your marble cake cooled to the touch but still slightly warm, you’re ready to release it from the pan.
Run a thin knife around the cake’s perimeter, angling it toward the pan to avoid damaging the delicate marble pattern.
This separation prevents the cake from sticking and tearing during removal.
Invert a wire rack or serving plate over the pan’s top.
In one confident motion, flip the pan and rack together.
If resistance occurs, use gentle tapping on the pan’s bottom and sides to encourage release without causing temperature shock, which can crack the cake’s structure.
Lift the pan away slowly.
If the cake doesn’t immediately release, tap again gently.
Once free, cool completely before frosting or serving.
Testing for Doneness First
How do you know when your marble cake’s actually done baking?
You’ll rely on precise indicators rather than guessing.
Here’s what to check:
- Insert a toothpick into the cake’s center—it should emerge clean or with minimal crumbs
- Check the internal temperature using a meat thermometer; it’ll read 200-210°F when done
- Look for the cake’s edges pulling away slightly from the pan sides
- Listen for the cake to stop sizzling when you remove it from the oven
Don’t remove your cake prematurely.
The toothpick test remains your most reliable method.
When you’ve confirmed doneness through these techniques, you’ve earned the freedom to proceed confidently.
Your marble cake’s ready for cooling, which guarantees proper structure before releasing it from the pan.
Slice and Serve Your Marble Cake
When’s the best time to cut into your cooled marble cake?
After it’s reached room temperature, you’ll get the cleanest slices.
Use a sharp, long-bladed knife dipped in hot water and wiped clean between cuts.
For serving presentation, plate each slice on white or neutral dishware to showcase the marbled pattern.
The contrasting vanilla and chocolate swirls deserve visual prominence.
Beverage pairings enhance the experience considerably.
Strong black coffee complements the chocolate notes, while earl grey tea balances the cake’s sweetness.
For afternoon service, consider milk—it’s classic for good reason.
Store remaining cake in an airtight container at room temperature for three days, or refrigerate up to five days.
Freezing wrapped portions preserves quality for up to two months.
Frequently Asked Questions
Can I Make Marble Cake Without Eggs for a Vegan Version?
You can absolutely create a vegan marble cake by substituting eggs strategically.
Use a flaxseed substitute—mix one tablespoon ground flaxseed with three tablespoons water per egg, letting it sit five minutes before incorporating.
Alternatively, aquafaba tips suggest using three tablespoons of this chickpea liquid per egg for superior binding and structure.
Both methods deliver reliable moisture and lift, ensuring your marbled layers remain distinct and your crumb stays tender throughout baking.
How Long Does Homemade Marble Cake Stay Fresh?
Your homemade marble cake’ll stay fresh for 3-4 days at room temperature when you’ve stored it properly. You’ll want to keep it in an airtight container away from direct sunlight.
For extended shelf life, refrigerate it for up to a week or freeze it for three months. Proper storage tips include wrapping individual slices tightly and maintaining consistent cool temperatures.
These ingredient-focused methods preserve your cake’s moisture and texture effectively.
What’s the Best Frosting to Pair With Marble Cake?
You’ll find that vanilla buttercream complements marble cake beautifully, allowing both chocolate and vanilla swirls to shine through. Alternatively, chocolate ganache offers a sophisticated choice that intensifies the cake’s depth.
You can apply ganache as a glossy coating or use it between layers for richness. Either frosting works because you’re not competing with competing flavors—you’re enhancing the marble cake’s natural complexity while maintaining its visual appeal and balanced taste profile.
Can I Freeze Marble Cake Before or After Baking?
You can freeze your marble cake both ways.
For unbaked batter, use airtight freezing methods in containers for up to three months.
Baked cakes freeze excellently when wrapped tightly for four months.
Your thawing techniques matter: defrost unbaked batter in the refrigerator overnight before baking, and let baked cakes thaw at room temperature for two hours.
Both approaches preserve your ingredient quality and give you flexibility in your baking schedule.
Why Did My Marble Cake Turn Out Dry?
Your marble cake turned out dry because you’ve likely overmixed the batter, which develops excess gluten and creates a dense crumb structure.
Additionally, you’re probably baking at too high an oven temperature, which causes the exterior to set before moisture distributes evenly throughout.
Lower your heat by 25°F and mix your ingredients just until combined.
Use quality butter and eggs—these fat sources retain moisture effectively and give you the tender crumb you’re after.


Leave a Comment