
Key Takeaways
- Select firm, bright yellow lemons weighing 2–3 ounces with pungent aroma for optimal juice and acidity levels.
- Cream softened butter and sugar for 3 minutes until fluffy, then alternately add dry ingredients and lemon juice.
- Bake at 350°F for 30–35 minutes until golden with moist crumbs; cool in pan 15 minutes before transferring.
- Combine powdered sugar and fresh lemon juice in 1:3 ratio, whisking until smooth and pourable consistency achieved.
- Apply glaze while warm to cake crown, working quickly as coating sets within minutes for glossy finish.
Gathering Your Ingredients and Equipment
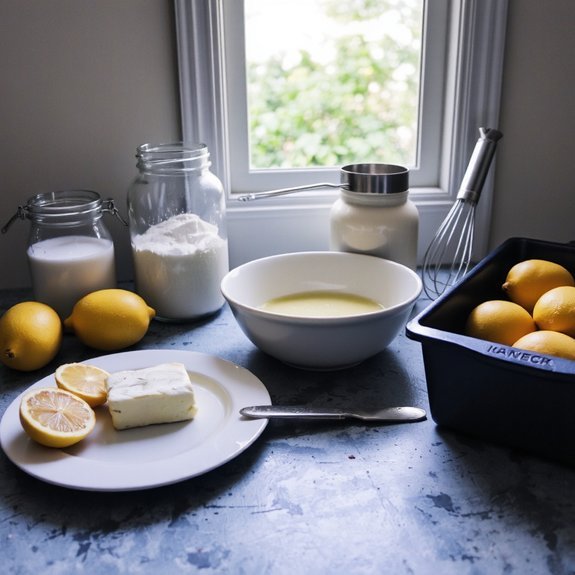
Before you begin mixing, you’ll need to assemble 2 cups all-purpose flour, 1½ teaspoons baking powder, ½ teaspoon baking soda, ¼ teaspoon salt, ½ cup unsalted butter (softened to 65-70°F), 1 cup granulated sugar, 2 large eggs (room temperature), ⅓ cup fresh lemon juice, 1 tablespoon lemon zest, and ½ cup whole milk.
Assemble your lemon cake ingredients: flour, baking powder, baking soda, salt, softened butter, sugar, room-temperature eggs, fresh lemon juice, zest, and milk.
Organize your pantry systematically by grouping dry ingredients separately from wet components.
Your shopping checklist should prioritize premium-quality items: freshly squeezed lemon juice yields superior flavor compared to bottled alternatives.
Room-temperature ingredients promote ideal emulsification and texture development.
Prepare your equipment: a stand mixer, measuring cups and spoons, mixing bowls, a microplane zester, and a 9-inch round cake pan.
Line the pan with parchment paper and grease it thoroughly.
This preparation strategy maximizes efficiency and prevents unnecessary delays during your baking process.
Selecting the Perfect Lemons
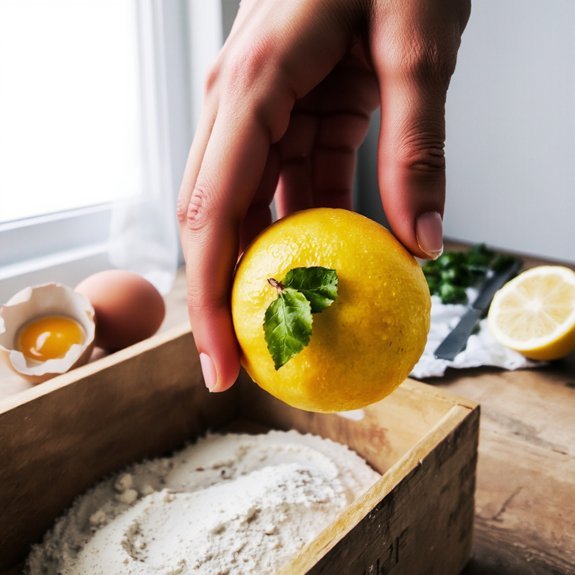
Now that you’ve gathered your equipment and dry ingredients, selecting high-quality lemons becomes your next priority.
Choose firm citrus fruits with unblemished skin texture—avoid soft spots or wrinkled surfaces indicating age or deterioration. The ideal lemon weighs 2-3 ounces and measures approximately 2 inches in length.
Conduct an aroma evaluation by gently squeezing the fruit near your nose. Quality lemons emit a bright, pungent fragrance signaling ideal juice content and acidity levels, typically between 5-6% citric acid. Heavier lemons generally contain more juice than lighter specimens of identical size.
Select bright yellow fruit with glossy finishes rather than dull, greenish specimens. Avoid any lemons displaying mold, bruising, or soft patches.
Room-temperature storage maximizes juice extraction during preparation. Purchase lemons 2-3 days before baking to guarantee peak flavor and moisture content for your cake.
Mixing and Preparing the Batter
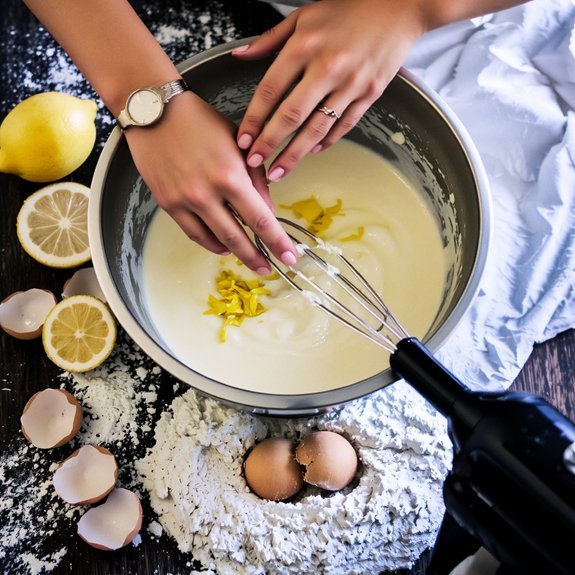
Combining your dry ingredients marks the foundation of a successful lemon cake batter. Sift together two cups all-purpose flour, two teaspoons baking powder, and half a teaspoon salt into a large mixing bowl.
This process aerates your mixture, incorporating air that’ll create a tender crumb structure.
In a separate bowl, cream together softened butter and granulated sugar using an electric mixer on medium speed for approximately three minutes until light and fluffy.
Add eggs individually, beating thoroughly after each addition.
Alternate adding your dry ingredients and fresh lemon juice, beginning and ending with dry components.
Mix on low speed only until combined—avoiding overmixing prevents gluten development, which’d result in a dense, tough cake.
Your batter should appear slightly lumpy.
This restraint guarantees the tender, delicate texture you’re after.
Baking and Cooling Your Cake
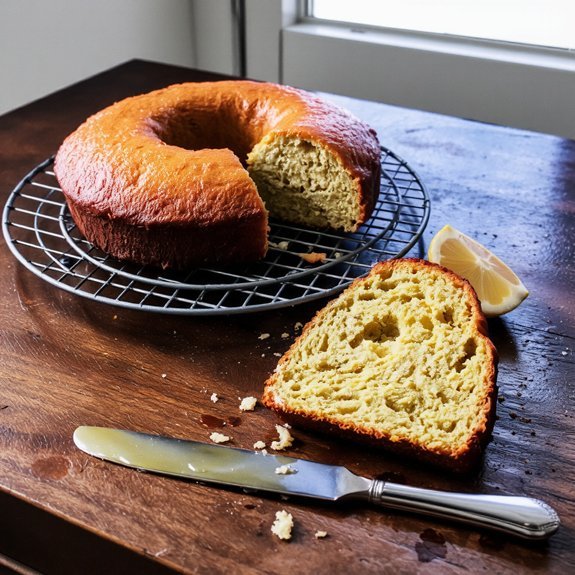
Once you’ve achieved that slightly lumpy batter, pour it into a greased 9-inch round cake pan and smooth the top with a spatula. Preheat your oven to 350°F and position the rack in the center—this guarantees even heat distribution and prevents cracks from forming.
| Temperature | Time | Result |
|---|---|---|
| 350°F | 30-35 minutes | Golden exterior |
| Toothpick test | Center insertion | Moist crumbs |
| Cooling period | 15 minutes in pan | Structural integrity |
Bake until a toothpick inserted at the center emerges with moist crumbs. Remove the cake and let it cool in the pan for fifteen minutes. This resting period allows the cake to set without compromising its structure. Transfer it to a wire cooling rack for complete temperature equalization before frosting or serving.
Creating the Tangy Lemon Glaze
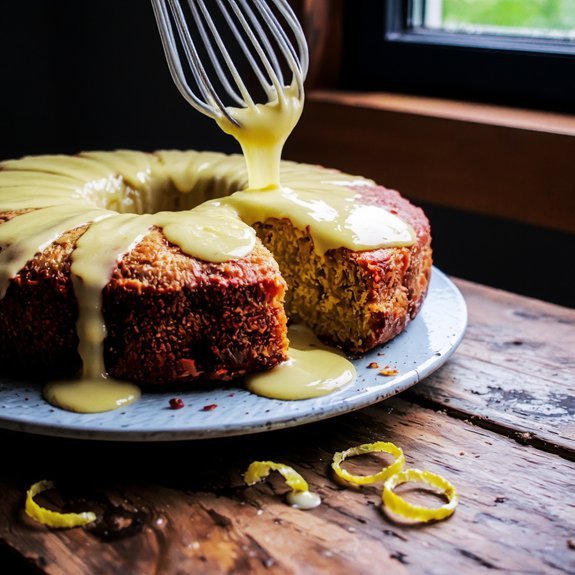
Whisking together powdered sugar, fresh lemon juice, and a pinch of salt creates the perfect complement to your cooled cake. You’ll want to maintain precise ratios—typically one cup powdered sugar to three tablespoons fresh lemon juice—to achieve ideal balancing acidity without overwhelming sweetness.
Incorporate the wet ingredients gradually, whisking continuously until you’ve achieved a smooth, pourable consistency. The mixture should coat the back of a spoon evenly. For a glossy finish, make sure your lemon glaze reaches approximately 120°F before application.
Pour the glaze directly onto your cake’s crown, allowing it to cascade naturally down the sides. Work quickly while the glaze remains fluid. You’ll notice the coating sets within minutes, creating that signature lustrous appearance. This technique delivers professional results without unnecessary complication.
Frequently Asked Questions
Can I Substitute Fresh Lemon Juice With Bottled Lemon Juice in This Recipe?
You can substitute bottled lemon juice, though you’ll encounter acid potency variations that impact your final product’s flavor profile. Bottled juice typically contains preservatives reducing its fresh brightness.
Use a 1:1 ratio by volume, but account for flavor impact by adding supplementary zest to compensate for diminished citrus notes. For ideal results in your baking application, fresh juice remains the superior technical choice, delivering superior aromatic compounds and authentic taste characteristics you’ll genuinely appreciate.
How Do I Store the Lemon Cake to Keep It Fresh Longer?
You’ll maximize your lemon cake’s shelf life by storing it in an airtight container at room temperature for up to three days.
For extended preservation, refrigerate it in a sealed container with moisture control—place parchment paper between layers to prevent condensation accumulation.
You can also freeze your cake for up to three months using vacuum-sealed packaging or freezer-safe containers.
This methodology maintains structural integrity and flavor profile while preventing oxidation and staleness.
Can I Freeze the Baked Lemon Cake Before Adding the Glaze?
Yes, you can absolutely freeze unglazed lemon cake.
Wrap your cooled cake layers in plastic wrap and aluminum foil to prevent freezer burn, then store at 0°F (-18°C) for up to three months.
When you’re ready to use it, thaw properly at room temperature for two to three hours before applying your glaze.
This method preserves moisture and flavor while giving you maximum flexibility in your baking schedule.
What Should I Do if My Cake Turns Out Too Dry?
If you’ve overbaked your cake, you can salvage it using the Syrup Soak technique. Pierce the cooled cake layers with a skewer, then brush a lemon-buttermilk mixture across the surface.
This Buttermilk Rescue method rehydrates the crumb structure effectively. Combine equal parts buttermilk and fresh lemon juice with dissolved sugar at precise ratios—approximately 1:1:0.5 by volume. Apply gradually, allowing absorption between applications.
This restoration procedure restores moisture content while maintaining structural integrity and flavor profile.
Can I Make This Cake Ahead of Time for an Event?
You can absolutely bake your lemon cake ahead.
For ideal timeline planning, bake it two days prior, allowing the crumb structure to set completely.
Store it in an airtight container at room temperature.
Apply frosting within 24 hours of serving to prevent moisture degradation.
For transport logistics, use a rigid cake carrier with non-slip matting to stabilize the cake during movement.
This methodology guarantees professional presentation and maintains structural integrity throughout your event.


Leave a Comment