Key Takeaways
- Bring cream cheese to room temperature and mix with sugar in stages, adding eggs one at a time on low speed to prevent lumps and cracks.
- Press graham cracker crust firmly into a springform pan bottom, creating uniform 1/4-inch thickness for even baking and stability.
- Bake at 325°F in a water bath (160–180°F) to create humidity and prevent surface cracks from developing.
- Cool gradually by turning off the oven, cracking the door open, and letting the cheesecake sit for one hour before transferring to room temperature.
- Refrigerate for at least eight hours or overnight to allow complete setting before serving or cutting with a hot, wet blade.
Gathering Your Ingredients
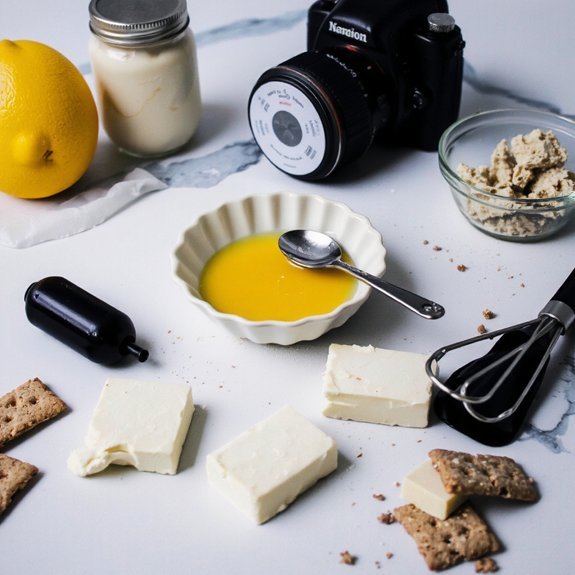
Before you begin mixing and baking, you’ll need to gather the essential ingredients for your cheesecake.
Before you begin mixing and baking, gather all essential ingredients for your cheesecake to ensure success.
You’ll want cream cheese, butter, sugar, eggs, and vanilla extract as your foundation.
For the crust, you’ll need graham cracker crumbs and additional butter.
Your quality selection matters greatly.
Choose full-fat cream cheese at room temperature for ideal texture and flavor.
Select unsalted butter to control sodium levels independently.
If you’re working with dietary restrictions, consider allergen alternatives.
You can substitute regular graham crackers with gluten-free versions or almond flour-based crusts.
For egg-free preparations, aquafaba works effectively as a binder.
Non-dairy cream cheese options now perform comparably to traditional versions.
Organize everything before starting.
Measure precisely and position ingredients within reach.
This preparation streamlines your baking process and eliminates mid-recipe scrambling, ensuring consistent results.
2. Preparing the Crust Foundation
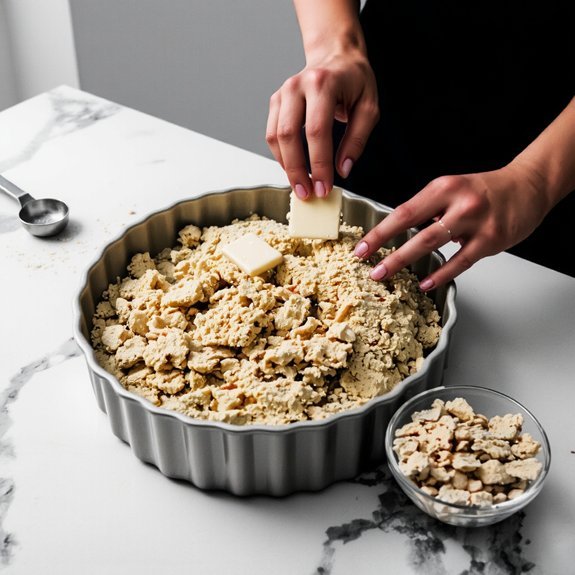
With your ingredients assembled and measured, you’re ready to construct the crust that’ll anchor your cheesecake.
Combine your graham cracker crumbs, melted butter, and sugar in a bowl, mixing until the texture resembles wet sand.
Press this mixture firmly into your springform pan’s bottom, establishing an even crust thickness of approximately one-quarter inch.
Your pressing technique matters considerably.
Follow these steps:
- Use the bottom of a measuring cup to apply consistent, downward pressure
- Work from the center outward, ensuring uniform density throughout
- Create slight edges along the pan’s perimeter for structural integrity
This methodical approach prevents weak spots and promotes even baking.
Your foundation now supports the creamy filling you’ll add next, delivering the textural contrast that defines exceptional cheesecake.
3. Making the Cheesecake Filling
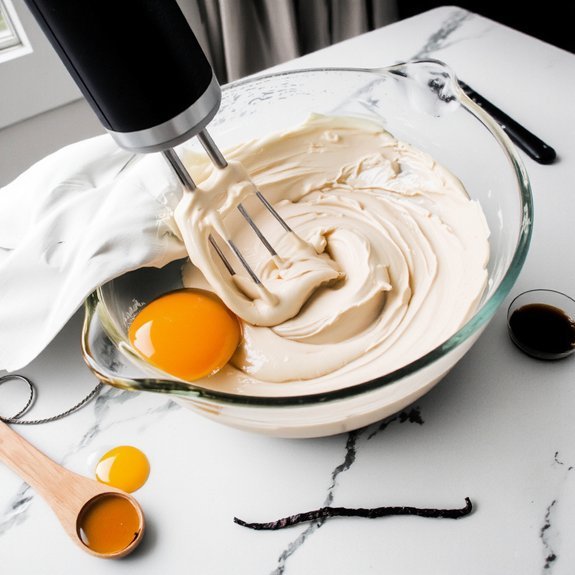
You’ll begin by bringing your cream cheese to room temperature, ensuring it’s soft enough to blend without lumps.
Next, you’ll incorporate sugar and eggs methodically, beating each addition until fully integrated to prevent overmixing, which can introduce excess air and cause cracks.
Finally, you’ll balance your flavoring agents and adjust the texture by selecting between sour cream or Greek yogurt, depending on whether you prefer tanginess or density in your final product.
Cream Cheese Preparation
Bringing cream cheese to room temperature guarantees it’ll blend smoothly into a lump-free filling.
You’ll achieve superior results by selecting premium brands with higher fat percentages, typically 33% or above, which contribute to richness and stability.
Remove your cream cheese from refrigeration thirty to forty minutes before mixing.
This preparation involves three critical steps:
- Unwrap the package and place it in a mixing bowl
- Allow ambient temperature to soften the entire block uniformly
- Test readiness by pressing gently—it should yield without crumbling
Cold cream cheese resists incorporation, creating stubborn lumps that mar your final texture.
You’re establishing the foundation for a dense, creamy cheesecake by respecting this fundamental requirement.
Temperature control directly determines your filling’s quality and mouthfeel.
Sugar and Egg Incorporation
Once your cream cheese reaches room temperature, the next critical phase begins: gradually incorporating sugar and eggs to create a homogeneous filling.
You’ll add granulated sugar in stages, beating thoroughly between additions to guarantee complete sugar dissolution.
This process breaks down crystals and prevents graininess in your final cheesecake.
Next comes egg tempering—a essential technique that prevents curdling.
You’ll whisk eggs separately, then add them one at a time while mixing on low speed.
This controlled incorporation allows the eggs to fully integrate without introducing excess air, which can cause cracks during baking.
Continue beating until you’ve achieved a smooth, creamy consistency.
Don’t overwork the mixture; excessive beating introduces unwanted air pockets.
Your filling should be silky and uniform, ready for the next stage of cheesecake construction.
Flavoring and Texture Balance
With your base mixture now smooth and properly aerated, it’s time to introduce flavors and adjust the filling’s final consistency.
You’ll want to master spice layering by incorporating vanilla extract, lemon zest, or cinnamon in measured increments—each addition builds complexity without overwhelming your palate.
Textural contrast distinguishes exceptional cheesecake from mediocre versions.
Consider these approaches:
- Fold in graham cracker crumbs for subtle crunch
- Swirl in fruit compote for dimensional depth
- Add sour cream for silky, tangy refinement
Blend your chosen flavoring agents thoroughly, ensuring even distribution.
The mixture should reach ribbon-like consistency when you lift your whisk—neither too stiff nor too loose. This precision prevents cracking during baking while maintaining that coveted creamy interior you’re after.
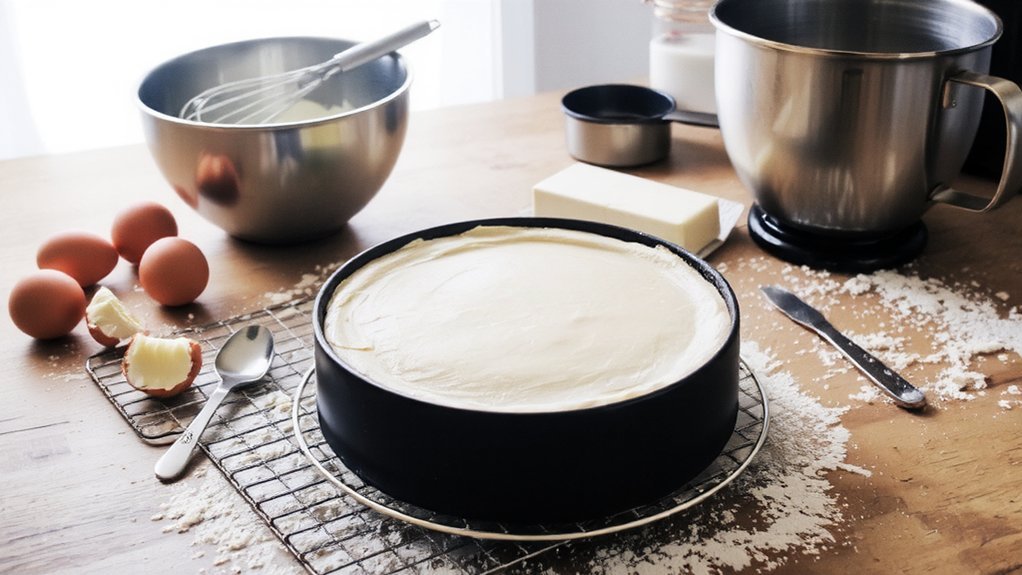
4. Setting Up Your Water Bath
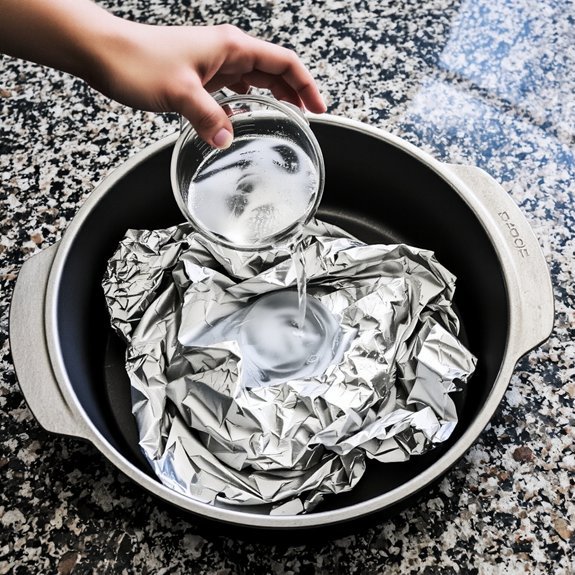
You’ll want to maintain your water temperature between 160–180°F throughout baking, as this gentle heat prevents the filling from cracking while cooking evenly.
Select a springform pan that fits comfortably inside your larger roasting pan, ensuring at least an inch of space on all sides for water circulation.
Wrapping your springform pan’s exterior with heavy-duty foil creates a moisture barrier that stops water from seeping into your cheesecake during the baking process.
Water Temperature Matters Most
Because cheesecake’s creamy interior demands gentle, even heat, your water bath‘s temperature becomes the critical variable separating a silky result from a cracked disaster.
You’ll want to maintain these precise temperatures:
- 325°F (163°C) for your oven setting
- 150-160°F (65-71°C) for your water bath itself
- Room-temperature ingredients before mixing
This thermal gradient prevents the outer edges from setting before the center cooks through, eliminating stress fractures.
Hot water creates turbulent thermal gradients that shock your batter, causing the dreaded cracks you’re trying to avoid.
Check your water bath temperature with an instant-read thermometer—don’t rely on guessing.
Ambient humidity also affects your results; drier environments require slightly warmer water to compensate for faster surface evaporation.
You’re controlling every variable to guarantee your cheesecake emerges unblemished and perfectly dense.
Choosing the Right Pan
Selecting the proper springform pan sets the foundation for both even heat distribution and successful water bath assembly.
You’ll want to prioritize pan materials—aluminum conducts heat efficiently, while stainless steel offers durability and longevity.
Size selection matters substantially; a 9-inch diameter pan remains the industry standard for cheesecake recipes.
Verify your pan’s depth reaches at least 2.75 inches to accommodate the crust and filling without overflow.
Inspect the springform mechanism thoroughly, ensuring it releases smoothly and seals tightly during baking.
A compromised seal allows water to infiltrate your cheesecake, ruining texture and flavor.
Consider investing in a high-quality pan that’ll withstand repeated use.
You deserve equipment that performs reliably, giving you complete control over your baking results without unnecessary complications or failures.
Preventing Cracks Effectively
A water bath—also called a bain-marie—creates the humid environment necessary to prevent the surface cracks that plague many home bakers.
You’ll achieve ideal humidity control by submerging your springform pan in hot water during baking, which moderates temperature fluctuations and allows your cheesecake to set gradually.
To execute this technique effectively:
- Fill a larger roasting pan with hot water until it reaches halfway up your cheesecake pan’s sides
- Wrap your springform pan’s exterior completely with heavy-duty foil to prevent water seepage
- Place both pans in your preheated oven simultaneously
Vibration elimination matters too—avoid opening the oven door during baking and keep your oven rack stable.
This steady, controlled environment lets your cheesecake bake evenly without the stress fractures that compromise appearance and texture.
You’re investing in professional results through deliberate technique.
5. Baking at the Right Temperature
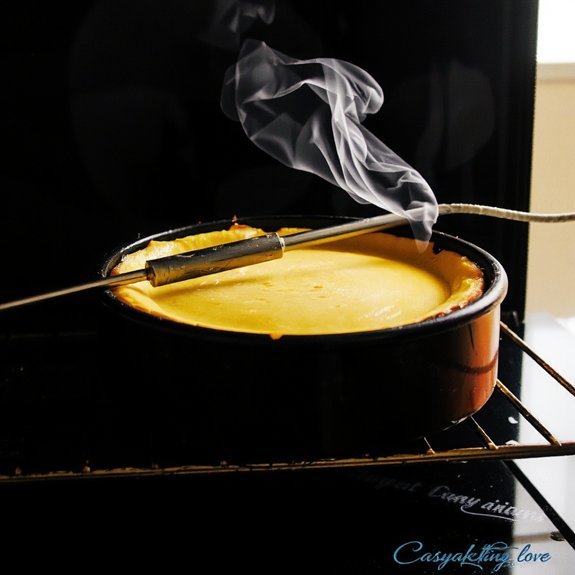
You’ll want to maintain a consistent oven temperature of 325°F throughout the baking process, as this moderate heat guarantees the cheesecake’s interior sets evenly without the surface cracking or browning excessively.
Proper oven calibration is essential—use an independent thermometer to verify your oven’s accuracy, as many units run hot or cold. Kitchen humidity also affects baking outcomes; higher moisture can slow cooking times slightly. Position your cheesecake on the middle rack for even heat distribution.
| Temperature | Effect |
|---|---|
| 300°F | Uneven cooking, dense texture |
| 325°F | Ideal; even setting |
| 350°F | Risk of cracks, overbrowning |
| 375°F+ | Severe cracking, rubbery edges |
| Below 300°F | Prolonged baking, separation |
Monitor your cheesecake closely during the final 10 minutes. You’ll achieve perfect results through precise temperature control and environmental awareness.
6. Cooling and Chilling Properly
Once your cheesecake emerges from the oven, the cooling process becomes just as critical as baking itself. Rushing this phase risks cracking and compromises texture. Here’s your protocol:
The cooling process is just as critical as baking itself—rushing this phase risks cracking and compromises texture.
- Turn off the oven and crack the door open slightly
- Let the cheesecake sit inside for one hour to achieve gradual cooling
- Transfer to room temperature for another hour before refrigeration
This deliberate approach prevents thermal shock that causes surface fissures.
Next, implement covered chilling by placing plastic wrap directly on the surface, then covering the entire pan.
Refrigerate for at least eight hours—preferably overnight. This extended period allows the filling to set completely and develop its signature dense, creamy consistency.
You’re not just waiting; you’re engineering perfection through controlled temperature shifts.
7. Troubleshooting Common Issues
Even with meticulous technique, cheesecake presents predictable pitfalls that you’ll encounter. Cracks typically indicate excessive heat or rapid cooling—prevent them by baking at lower temperatures and allowing gradual temperature changes.
If your cheesecake won’t set properly, you’ve likely underbaked it; extend cooking time by five-minute increments until the center jiggles slightly when moved.
For transport stability, reinforce your springform pan with aluminum foil wrapped around the exterior base. This prevents leaking during movement and preserves structural integrity.
Slice presentation suffers when you’re using dull knives. A hot, wet blade creates clean edges and prevents dragging. Wipe between cuts for ideal results. If separation occurs between crust and filling, your oven temperature was too high. Embrace these solutions, and you’ll master consistent, restaurant-quality cheesecakes every time.
Frequently Asked Questions
Can I Make Cheesecake Without a Water Bath?
You can skip the water bath, though you’ll sacrifice some advantages.
Without it, you’ll encounter higher oven humidity fluctuations, risking cracks and uneven cooking.
Alternative methods include wrapping your pan in foil, lowering oven temperature to 325°F, and extending baking time.
You’re also free to use a dry baking method with precise temperature control.
These approaches demand vigilance but grant you independence from traditional techniques while maintaining acceptable results.
How Far in Advance Can I Bake a Cheesecake?
You can bake your cheesecake up to three days ahead.
Store it in fridge storage, covered tightly to prevent odor absorption.
Don’t garnish until serving time—you’ll maintain prime texture and flavor integrity.
If you’re preparing for a gathering, this advance preparation liberates your schedule considerably.
Simply remove your cheesecake from refrigeration thirty minutes before serving for ideal consistency and taste development.
Can I Freeze Cheesecake, and for How Long?
You can freeze cheesecake for up to three months without compromising quality.
Wrap your cooled cheesecake tightly in freezer packaging—plastic wrap and aluminum foil work best—to prevent freezer burn.
When you’re ready to enjoy it, skip thawing tips that involve room temperature sitting; instead, refrigerate your cheesecake overnight for ideal texture restoration.
This method preserves your freedom to indulge whenever you choose.
What’s the Difference Between New York and Italian Cheesecake?
You’ll notice New York cheesecake delivers denser texture contrast with its heavy cream cheese base, while Italian versions incorporate ricotta for lighter, airier consistency.
New York’s flavor profiles emphasize rich tanginess and subtle vanilla; Italian variants introduce delicate sweetness through mascarpone and candied fruits.
You’re choosing between bold, unapologetic decadence or refined, nuanced elegance—each reflecting distinct culinary philosophies that liberate your palate differently.
Why Did My Cheesecake Crack on Top?
Your cheesecake cracked because you’ve likely committed one of two cardinal sins.
First, you’re probably running your oven too hot—excessive oven temperature causes the top to set rapidly while the interior remains underbaked, creating stress fractures. Second, you’re overmixing your batter, incorporating too much air. This causes uneven expansion and contraction. Mix minimally, maintain precise temperature control at 325°F, and you’ll achieve that pristine, crack-free surface you’re after.


Leave a Comment