
Key Takeaways
- Mix 3 cups flour, 1½ tsp yeast, 1¼ tsp salt, 1 cup water, and 2 tbsp olive oil until shaggy dough forms.
- Knead 8–10 minutes using push-fold-rotate sequence until dough is smooth, supple, and springs back when poked.
- Bulk ferment in oiled container at 75–78°F for 60–90 minutes until dough doubles, then dimple at ½-inch intervals.
- Generously coat dimpled surface with 3 tbsp extra-virgin olive oil; press rosemary, thyme, or oregano into surface; add sea salt.
- Preheat oven to 425°F and bake 20–25 minutes until deep golden-brown; internal temperature should reach 205–210°F.
Ingredients You’ll Need

You’ll need 3 cups all-purpose flour, 1½ teaspoons instant yeast, 1¼ teaspoons kosher salt, 1 cup room-temperature water, 2 tablespoons olive oil, and coarse sea salt for finishing.
Beyond these essentials, you’ll want premium extra-virgin olive oil for the dough’s hydration and surface brushing.
Select olive varieties from regions matching your flavor preferences—robust Tuscan oils or delicate Arbequina varieties work exceptionally well.
For herb selection, you’re not restricted to traditional rosemary.
Consider pairing thyme, oregano, or sage according to your taste.
Fresh herbs yield superior results compared to dried alternatives, though dried herbs concentrate flavors effectively when used judiciously.
You’ll also benefit from having a stand mixer, though hand-kneading remains viable.
Make sure your water reaches room temperature for ideal yeast activation and consistent fermentation throughout your focaccia preparation.
Preparing the Dough
You’ll combine 3½ cups bread flour, 1¾ teaspoons salt, ½ teaspoon instant yeast, and 1¼ cups water at 75°F, mixing until you’ve incorporated all dry ingredients.
Knead the dough for 8-10 minutes until you’ve developed adequate gluten structure and achieved a smooth, elastic texture.
Allow the dough to rise at room temperature (68-72°F) for 60-90 minutes until it’s doubled in volume.
Mixing Ingredients Together
Combine the flour, salt, and instant yeast in a large mixing bowl, whisking them together to distribute the yeast evenly throughout the dry mixture.
Next, you’ll create the wet ingredients by combining 1¼ cups warm water (110°F) with 3 tablespoons extra virgin olive oil.
Pour this mixture into your dry ingredients gradually, mixing with a wooden spoon or dough hook for ideal mixing ergonomics.
Your tool selection matters—a sturdy mixing bowl and proper equipment prevent fatigue. Key mixing stages include:
- Initial incorporation of wet and dry components
- Development of shaggy dough consistency
- Full hydration of flour particles
- Gluten network formation
- Achieving tacky, cohesive texture
Mix for 8–10 minutes until you’ve developed adequate gluten structure.
You’ll know you’re finished when the dough pulls away from bowl sides cleanly. This foundational step determines your focaccia’s final texture and rise potential.
Kneading Dough Properly
Transferring your shaggy dough onto a lightly floured work surface marks the beginning of gluten development refinement.
You’ll knead for approximately 8-10 minutes, employing consistent wrist motion to build elasticity and strength throughout the dough structure.
Establish a massage rhythm by pushing the dough away from you with your palm, folding it back over itself, then rotating it slightly.
Repeat this methodical sequence without interruption.
You’re developing the protein matrix that’ll trap gases during fermentation, creating focaccia’s characteristic open crumb.
Your dough should shift from sticky and rough to smooth and supple.
It’s ready when it springs back immediately after poking—indicating proper gluten network formation.
This tactile feedback confirms you’ve achieved ideal consistency and structure, freeing you from guesswork.
Trust your hands; they’re your most reliable measuring tools.
First Rise Time
Once your dough’s properly kneaded, it’s ready for bulk fermentation—a critical phase where yeast colonies multiply and flavor compounds develop.
You’ll control this process by managing temperature and time to achieve ideal results without external constraints.
Here’s what you need to monitor:
- Temperature range: Maintain 75-78°F for standard fermentation (6-8 hours)
- Ambient humidity: Higher moisture reduces crust crispness; adjust proofing duration accordingly
- Altitude effects: Higher elevations accelerate fermentation; reduce time by 15-20%
- Visual cues: Dough should increase 50-75% in volume
- Poke test: Your finger creates an impression that slowly rebounds
Place your dough in an oiled container, covering it loosely.
This bulk fermentation period develops gluten structure and complex flavors, giving you complete control over your focaccia’s final character.
The First Rise
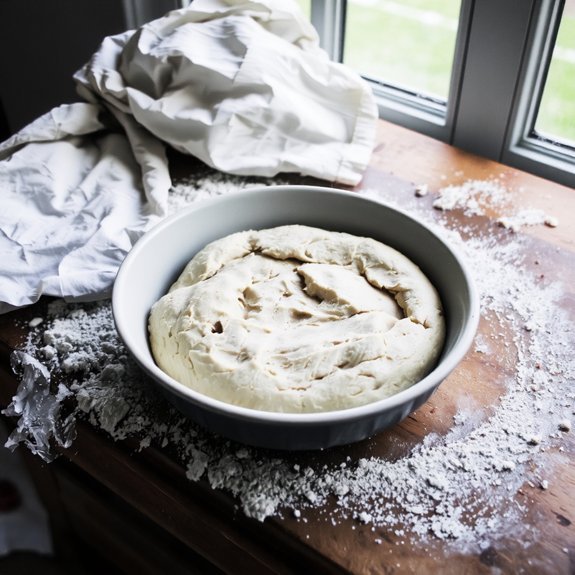
You’ll allow your dough to rise at 75-80°F (24-27°C) for approximately 1-2 hours until it doubles in volume, as warmer temperatures accelerate fermentation while cooler conditions extend the timeline.
You should monitor the dough’s consistency throughout the rise, ensuring it remains slightly tacky and cohesive without becoming overly sticky or deflating.
You can verify proper fermentation by performing the poke test—gently pressing your finger into the dough and observing whether the indentation slowly springs back halfway, indicating ideal gluten development and readiness for the next stage.
Temperature and Time
After transferring your dough to the oiled bowl, you’ll want to maintain a consistent temperature of 75–80°F (24–27°C) for ideal fermentation.
The first rise typically requires 1–2 hours, depending on conditions:
- Seasonal Adjustments: Summer temperatures accelerate fermentation; reduce time by 15–30 minutes. Winter demands extended periods or warmer environments.
- Altitude Effects: Higher elevations lower air pressure, requiring 10–15% longer fermentation times.
- Visual Indicators: Dough should increase 50–75% in volume, with visible bubbles throughout.
- Poke Test: Press your finger into dough; it’ll slowly spring back halfway when properly risen.
- Temperature Precision: Invest in a kitchen thermometer; fluctuations compromise gluten development and texture.
Your autonomy in adjusting conditions guarantees superior results, accommodating your unique environment and preferences throughout the fermentation process.
Dough Consistency Matters
While temperature and timing establish the framework for fermentation, the dough’s physical consistency during the first rise determines whether you’ll achieve the open crumb structure focaccia demands.
You’ll notice hydration percentages between 75-85% create a slack, extensible dough that develops characteristic large air pockets.
Monitor texture perception carefully—your dough should feel tacky yet cohesive, never stiff or overly wet.
As fermentation progresses, you’ll observe gradual volume increase and surface dome formation.
The dough’s consistency directly influences gluten network development and gas retention capacity.
Resist the urge to manipulate excessively; gentle handling preserves delicate bubble structures.
Your mastery of dough consistency grants you complete control over focaccia’s final architecture and interior crumb composition.
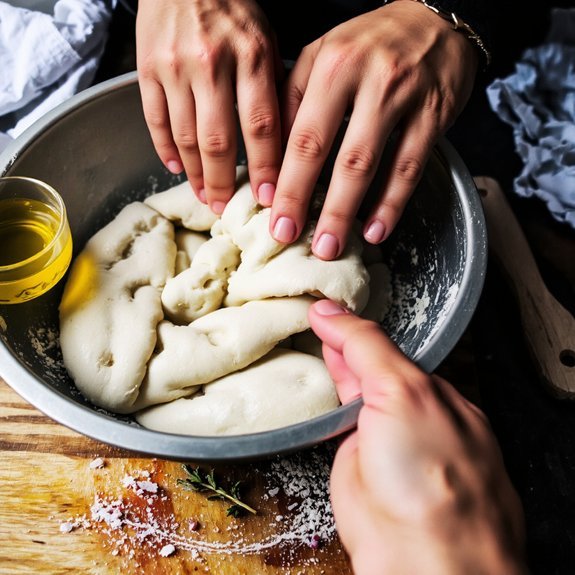
Shaping and Dimpling
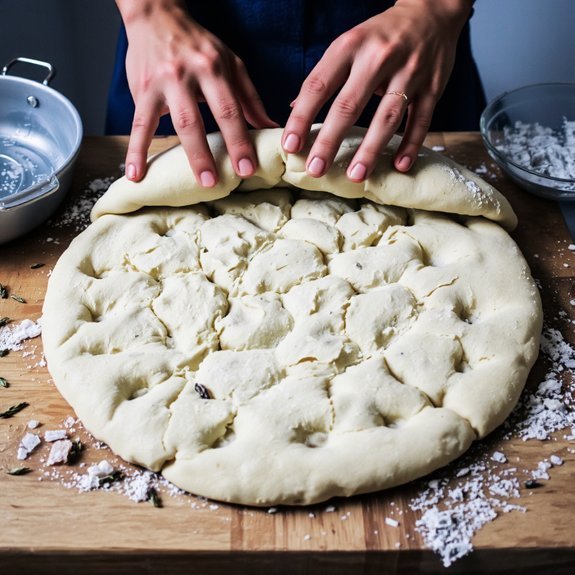
Transferring your risen dough to a prepped baking sheet marks the shift to the signature focaccia technique. You’ll now apply edge techniques and create dimple patterns that define authentic focaccia.
Transferring risen dough to your prepped baking sheet marks the shift to signature focaccia technique and authentic dimple patterns.
- Oil your fingertips generously to prevent sticking
- Press dimples at 2-inch intervals across the entire surface
- Use consistent depth of approximately ½ inch for uniform texture
- Work from center outward to maintain even distribution
- Apply edge techniques by gently stretching dough toward sheet perimeters
You’ll discover that proper dimpling accomplishes two critical functions: it traps olive oil and seasonings while creating the characteristic texture. Press firmly but don’t puncture the dough completely.
This manipulation aerates your dough and guarantees the final product achieves that coveted crispy exterior with tender crumb. Your technique here directly determines focaccia’s structural integrity and flavor absorption capacity.
Topping Your Focaccia

Generously coating your dimpled surface with quality olive oil creates the foundation for exceptional flavor and texture development.
You’ll want to use approximately 3 tablespoons of premium extra virgin olive oil, ensuring complete coverage of your focaccia’s surface.
For herb pairings, consider rosemary sprigs, fresh thyme, or oregano pressed directly into the oil.
You can also incorporate sea salt crystals and cracked black pepper for savory depth.
If you’re exploring sweet toppings, you’ve got freedom to experiment.
Try drizzling honey, sprinkling cinnamon sugar, or adding candied citrus peel before baking.
Some bakers prefer fig jam or a light dusting of powdered sugar post-bake.
Whatever direction you choose, apply toppings immediately after dimpling, allowing them to infuse during the final proof and baking process.
Baking to Golden Perfection
Once you’ve applied your toppings, you’ll preheat your oven to 425°F (220°C) for approximately 15 minutes, allowing it to reach ideal temperature for oven spring and crust development.
During baking, you’ll monitor the browning science that transforms your focaccia’s exterior.
The Maillard reaction creates that desirable golden-brown crust while sugar caramelization develops complex flavor profiles.
Key baking considerations:
- Bake for 20-25 minutes until deep golden-brown emerges
- Position your rack in the middle for even heat distribution
- Rotate the pan halfway through if browning unevenly
- Check internal temperature reaches 205-210°F for proper doneness
- Remove when the crust achieves firm, crispy texture
You’ll know your focaccia’s ready when it exhibits a mahogany-colored surface and sounds hollow when tapped. This precision guarantees ideal texture and flavor development without compromise.
Storage and Serving Tips
Proper storage extends your focaccia’s shelf life while maintaining its crispy crust and tender crumb structure.
For storing leftovers, wrap cooled focaccia in parchment paper, then place it in an airtight container at room temperature for up to three days.
This method prevents moisture loss while avoiding condensation that softens the crust.
For extended preservation, freeze your focaccia in freezer-safe bags for up to three months.
When you’re ready to enjoy it, reheating methods matter notably.
Thaw frozen focaccia at room temperature for two hours, then restore crispness by baking at 375°F for five to eight minutes.
Alternatively, use a toaster oven to reheat individual slices, achieving ideal texture without drying out the interior.
Avoid microwaving, which compromises the crust’s structural integrity and creates an undesirable texture.
Frequently Asked Questions
Can I Make Focaccia Dough Ahead and Freeze It for Later Use?
Yes, you can freeze focaccia dough effectively.
Prepare your dough, portion it into airtight containers, and execute your freezing schedule within two hours of completion.
You’ll achieve ideal results storing it at 0°F for up to three months.
For thawing tips, transfer your dough to the refrigerator overnight, then allow 2-3 hours at room temperature before shaping and proofing.
This method preserves gluten development and fermentation characteristics, granting you scheduling flexibility without compromising your final product’s quality.
What’s the Difference Between Focaccia and Other Italian Bread Types?
You’ll find focaccia distinguishes itself through its characteristic dimpled surface and oil-enriched dough, creating exceptional texture contrast against a crispy crust.
Unlike ciabatta’s open crumb structure or pane toscano’s density, focaccia’s hydration level and olive oil integration produce its signature tender, pillowy interior.
Regional varieties—Ligurian focaccia col formaggio, Barese focaccia con le cipolle—showcase how geographic traditions shape flavor profiles and toppings, giving you authentic flexibility in your baking choices.
How Do I Fix Focaccia That Turns Out Too Dense or Dry?
You’ll fix dense, dry focaccia by increasing hydration adjustment—add 2-3% more water to your dough formula.
Control your proofing meticulously; you’re aiming for 60-90 minutes at 75°F rather than over-proofing.
Don’t skimp on olive oil; generously coat your pan and dimple the surface aggressively.
These technical modifications guarantee you’ll achieve that signature tender crumb and moist exterior you’re after, giving you complete control over your results.
Can I Use Whole Wheat Flour Instead of All-Purpose Flour?
You can substitute whole wheat flour, though you’ll need hydration adjustments since whole wheat absorbs more moisture than all-purpose flour.
Increase your water content by 10-15%.
Consider flour blends—combining 25-50% whole wheat with all-purpose flour gives you better results than complete substitution.
This approach maintains your focaccia’s characteristic texture while incorporating whole grain benefits.
Your dough’s extensibility and final crumb structure will remain superior with this blended methodology.
Why Did My Focaccia Come Out Flat Without the Characteristic Dimples?
Your focaccia likely suffered from over proofing, causing the dough to lose structural integrity and collapse during baking.
You’ve also skipped the dimple technique—the critical step that creates those signature indentations.
Press your fingertips into the dough’s surface at precise intervals before baking.
Don’t let your dough rise excessively; you’re in control of fermentation timing.
Master this method, and you’ll achieve the authentic texture you’re after.


Leave a Comment