
Key Takeaways
- Mix 3.5 cups flour, 1.5 tsp salt, and 2.25 tsp yeast; add eggs, water, oil, and honey; knead until elastic.
- Bulk ferment 1.5–2 hours at 75–78°F until dough increases 50–75% in volume and passes the finger-poke test.
- Divide dough into six portions, roll into ropes, and braid with consistent tension; final proof 45–60 minutes until dome forms.
- Apply egg wash, bake at 375°F for 30–35 minutes with steam for the first 20 minutes until deep golden-brown.
- Cool on a wire rack for at least one hour; store in breathable bags at room temperature or freeze up to three months.
Ingredients You’ll Need
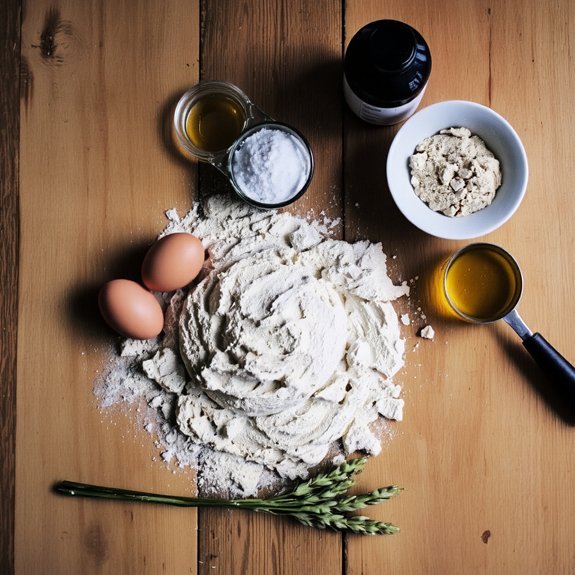
You’ll need six basic components to make traditional challah: three and a half cups of all-purpose flour, one and a half teaspoons of salt, two and a quarter teaspoons of instant yeast, three-quarters cup of warm water (110°F), one-quarter cup of vegetable oil, two large eggs plus one additional egg for the egg wash, and two tablespoons of honey.
When sourcing ingredients, prioritize quality flour with consistent protein content for ideal gluten development.
Quality flour with consistent protein content ensures ideal gluten development for superior challah texture and structure.
Select active dry yeast or instant yeast from reputable suppliers to guarantee reliable fermentation.
The nutrition facts reveal approximately 280 calories per serving, with 8 grams of protein and 5 grams of fat per slice.
Measure water temperature precisely using a kitchen thermometer—this activates yeast properly without killing beneficial microorganisms.
Your ingredient choices directly impact final texture, rise time, and crust color development.
3. Preparing Your Dough

Combining your dry ingredients marks the first critical step in dough development.
Whisk together flour, salt, and instant yeast in a large bowl, ensuring even distribution.
Create a well in the center and add your wet ingredients—eggs, water, and melted butter—then mix until a shaggy mass forms.
Now you’ll employ the autolyse benefits by allowing this mixture to rest for 20-30 minutes.
This resting period lets gluten develop naturally without additional kneading, strengthening your dough’s structure.
After resting, knead for 8-10 minutes until the dough becomes smooth and elastic.
Perform hydration testing by stretching a small portion—it should thin without tearing.
Your dough should feel supple yet slightly sticky, indicating proper moisture balance for ideal texture and rise.
4. The First Rise

Once your dough reaches the proper elasticity, transfer it to a lightly oiled bowl, turning it to coat all surfaces evenly.
Cover the bowl with plastic wrap or a damp kitchen towel to prevent surface drying.
Position your dough in an environment maintaining 75-78°F for ideal fermentation timing.
This temperature range accelerates yeast activity without compromising gluten development.
Bulk fermentation typically requires 1.5 to 2 hours, though you’ll adjust based on ambient conditions.
Monitor dough volume—it should increase 50-75% during this phase.
Press two fingers into the dough; proper proofing leaves a slow-springing indentation.
Temperature control remains critical; cooler environments extend fermentation, while warmer conditions accelerate it.
Your dough’s readiness determines subsequent shaping success.
Don’t rush this stage—proper fermentation develops flavor complexity and structural integrity essential for challah’s characteristic texture.
5. Shaping and Braiding Your Loaf

You’ll divide your risen dough into equal portions—typically three to six strands depending on your desired braid complexity—and roll each portion into a rope of uniform thickness.
Master fundamental braiding techniques, starting with a three-strand braid and progressing to four, six, or even eight-strand patterns, ensuring consistent tension throughout to achieve an even, visually appealing loaf.
Once you’ve completed your braid, you’ll shape it into your final form and allow it to undergo its second rise until it reaches approximately 90% of its full oven spring potential.
Dividing Your Dough Portions
After your dough’s first rise completes, gently turn it onto a lightly floured work surface and divide it into six equal portions, each weighing approximately 100-120 grams if you’re working with a standard 700-gram batch.
Weight accuracy promotes consistent braiding and even baking results.
Use a kitchen scale for precision—portion ratios directly impact your final loaf’s appearance and texture.
Roll each portion into a tight ball, then allow them to rest for 5-10 minutes.
This relaxation period prevents the dough from snapping back as you shape it.
You’ll notice the gluten structure becomes more workable, making elongation easier.
Pre-portioning before shaping gives you complete control over your braiding process and guarantees a professional-looking challah every time.
Braiding Techniques and Patterns
With your portioned dough balls rested and relaxed, you’re ready to shape them into the strands that’ll form your challah’s distinctive braided pattern.
Roll each portion into a uniform rope, approximately 12-16 inches long, maintaining consistent diameter throughout.
For a classic three-strand braid, arrange strands parallel and interlace them tightly from one end to the other, sealing the ends firmly.
Explore decorative variations by experimenting with four, six, or eight-strand braids for visual complexity.
Regional styles dictate different approaches—some traditions favor tight, dense braids, while others embrace looser, more sculptural formations.
Spiral braids and twisted patterns offer alternative aesthetics.
You’ll control the final appearance through tension and technique.
Practice builds muscle memory, allowing you creative freedom in developing your signature braid style while maintaining structural integrity for ideal baking results.
Final Shaping and Rising
Assembling your braided loaf requires precision timing and proper technique to guarantee even rise and baked structure.
After completing your braid, place it seam-side down on a parchment-lined baking sheet, positioning it to maximize oven space without restriction.
Develop surface tension by gently stretching the dough during placement, creating a taut exterior that promotes controlled expansion.
This technique prevents irregular rising and maintains your braid’s definition throughout proofing.
Cover your loaf with a damp cloth or plastic wrap, then let it rise at room temperature for 45-60 minutes until it increases by approximately 50 percent.
Before baking, apply egg wash to enhance browning, then perform edge crimping along the braid’s perimeter using your fingertips.
This reinforces structure and creates an attractive, professional finish.
6. The Second Rise and Egg Wash

Once you’ve braided your challah and placed it on the parchment-lined baking sheet, you’ll let it undergo its second rise for 45 minutes to an hour at room temperature until it’s increased by about 50% in volume.
| Timing Cue | Action |
|---|---|
| 15 minutes | Check for slight dome formation |
| 30 minutes | Assess volume increase progress |
| 45 minutes | Begin final inspection phase |
| 50-60 minutes | Dough should pass poke test |
| Ready to wash | Proceed to egg application |
You’ll prepare your egg wash by whisking one egg with a tablespoon of water. Apply this mixture generously with a pastry brush, coating all braided surfaces. If you prefer alternatives, you can substitute milk, honey dilution, or oil for a matte finish. You’ve now mastered the critical second rise phase—your challah’s ready for the oven.
7. Baking to Perfection
Your oven should be preheated to 375°F (190°C) for at least 15 minutes before you place the challah inside.
Proper oven calibration guarantees even heat distribution and prevents undercooked interiors or burnt exteriors.
You’ll bake your challah for 30-35 minutes until it achieves a deep golden-brown crust.
Check for doneness by tapping the bottom; it’ll sound hollow when fully baked.
Internal temperature should reach 190°F (88°C).
For ideal results, you’ll want to manage humidity control by placing a shallow pan of hot water on the lowest oven rack.
This creates steam during the first 20 minutes of baking, promoting crust development and preventing excessive browning.
Cool your finished loaf on a wire rack for at least one hour before slicing.
8. Storage and Serving Tips
You’ll want to cool your challah completely before wrapping it tightly in plastic wrap and freezing at 0°F for up to three months to maintain ideal texture and flavor.
When you’re ready to serve, thaw your bread at room temperature for 2-3 hours, then refresh it by wrapping in foil and warming in a 350°F oven for 10 minutes to restore its soft crumb structure.
Present your challah sliced or whole on a breadboard, and serve it within 24 hours of thawing for the best quality.
Proper Freezing Methods
To preserve challah’s soft crumb structure and flavor integrity, wrap the cooled loaf tightly in plastic wrap, then place it in a freezer-safe, airtight container or heavy-duty freezer bag, removing as much air as possible before sealing.
Consider flash freezing your challah by placing the wrapped loaf on a baking sheet at -18°C for two hours before transferring to storage containers. This controlled freezing method minimizes ice crystal formation, which can compromise texture upon thawing.
Label your container with the freezing date; properly stored challah maintains peak quality for up to three months.
When you’re ready to enjoy it, thaw the loaf at room temperature for two to three hours, still wrapped. You can also refresh frozen challah by reheating unwrapped loaves in a 160°C oven for ten minutes.
Best Serving Practices
Once thawed or freshly baked, challah’s ideal serving window spans 24-48 hours at room temperature when stored in a breathable linen bag or paper bag rather than plastic, which traps moisture and accelerates staleness.
You’ll maximize flavor and texture by serving slices at room temperature or lightly toasted to restore crumb structure.
Presentation styles range from traditional whole-loaf displays for family meals to individual slices for casual brunches. Pairing spreads enhance your experience—try cultured butter, honey, cream cheese, or jam.
For breakfast applications, consider French toast or bread pudding to utilize aging loaves.
Slice thickness should measure approximately ½ inch for best surface-to-crumb ratio. You maintain superior quality by consuming within this narrow window, ensuring peak sensory experience.
Frequently Asked Questions
What Is the Historical and Cultural Significance of Challah Bread in Jewish Traditions?
You’ll discover that challah represents Jewish freedom and covenant through its Sabbath symbolism, where braided loaves commemorate the twelve shewbreads in the Temple.
As you observe this tradition, you’re honoring ancient practices that transcend borders.
Diaspora variations—from Eastern European to Middle Eastern communities—reflect how you’ve adapted this bread across generations, maintaining cultural identity while embracing local ingredients.
Each braid you craft connects you to centuries of liberated Jewish expression and resilience.
Can I Make Challah Dough Without Eggs, and What Are Suitable Substitutes?
You can absolutely make egg-free challah by using aquafaba binder—three tablespoons per egg—whisked until foamy.
Alternatively, you’ll get excellent results with flaxseed substitute: combine one tablespoon ground flaxseed with three tablespoons water per egg, letting it sit five minutes.
Both methods deliver ideal binding and structure.
You’re not sacrificing quality; you’re exercising your right to bake according to your dietary preferences.
The dough’ll rise beautifully, producing that coveted golden crust and tender crumb you deserve.
How Do I Know if My Dough Has Risen Enough During Fermentation?
You’ll know your dough’s risen enough by performing the poke test: press your finger gently into the dough. If it springs back slowly, leaving a slight indentation, you’ve achieved proper fermentation.
For volume check, your dough should’ve increased by approximately 50-75% of its original size.
You’re looking for a pillowy, airy texture that signals adequate gluten development and yeast activity. Don’t over-ferment, or you’ll compromise your bread’s structure.
What’s the Difference Between a Traditional Two-Strand and Six-Strand Braid?
You’ll find that the two-strand braiding technique creates a simpler, denser crumb structure with fewer air pockets.
The six-strand method produces a more intricate pattern and yields a lighter, airier crumb through increased manipulation.
With six strands, you’re weaving over-under sequences that trap more gas during proofing.
Two-strand braiding demands less technical precision, while six-strand work requires disciplined hand positioning.
Your choice determines both aesthetics and final texture—giving you complete control over your loaf’s character.
Why Does My Challah Sometimes Turn Out Dry, and How Can I Prevent It?
You’re getting dry challah because you’re likely underestimating your hydration levels.
You’ll want to maintain 65-70% hydration—that’s roughly 650-700ml water per kilogram flour.
Don’t overbake; you’re looking for an internal temperature of 190°C, not higher.
Brush your loaf with egg wash before baking, then again immediately after.
You’re controlling moisture retention through precise measurements and technical execution, giving you the freedom to master consistent, tender results.


Leave a Comment