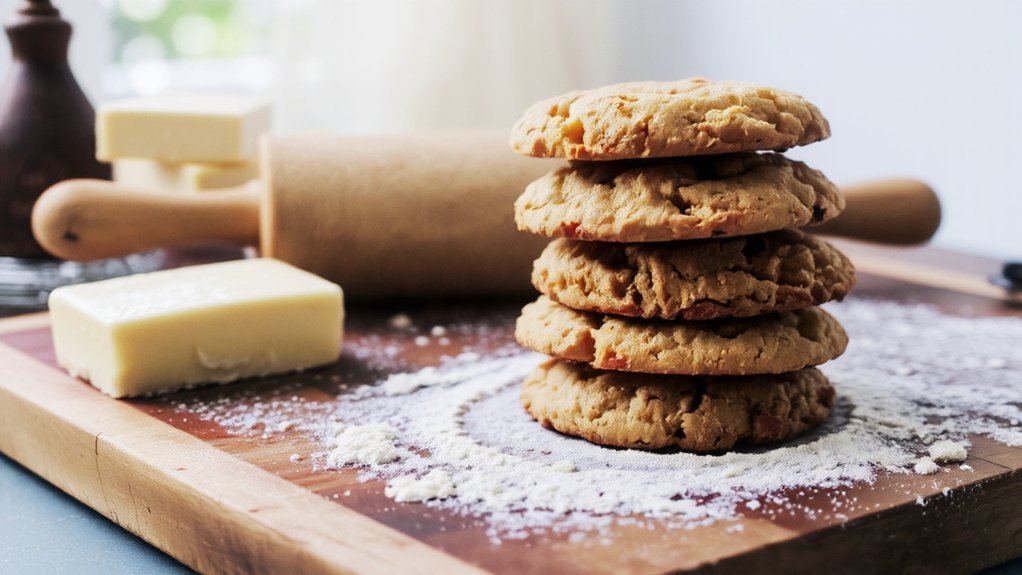
Key Takeaways
- Use a 1:2 butter-to-flour ratio by weight with high-butterfat butter (82%+) for melt-in-the-mouth texture.
- Cream softened butter with minimal sugar until pale and fluffy, then gently fold in dry ingredients.
- Chill shaped cookies at least 30 minutes refrigerated or 2 hours frozen to prevent spreading during baking.
- Bake at 325°F for 12–22 minutes until edges turn light golden while centers remain pale.
- Cool on baking sheets 5 minutes, then transfer to wire racks for complete 30–45 minute cooling.
Ingredients You’ll Need
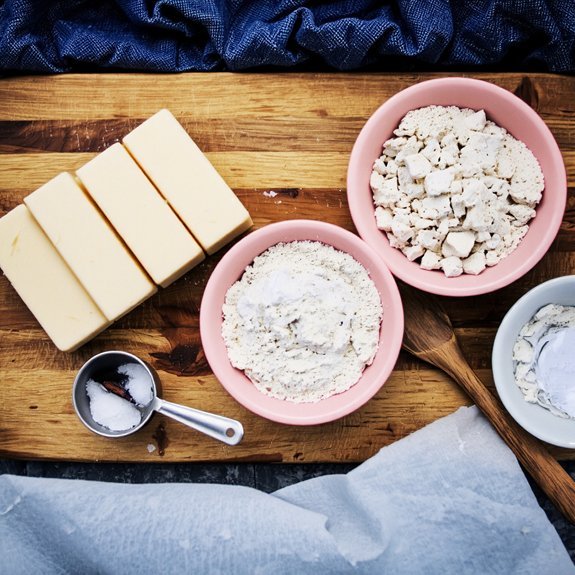
You’ll need 226 grams (2 cups) of all-purpose flour, 113 grams (1 stick) of unsalted butter softened to room temperature, 50 grams (¼ cup) of granulated sugar, and 2.5 milliliters (½ teaspoon) of kosher salt.
When sourcing your ingredients, prioritize sustainable sourcing practices.
Review ingredient labels carefully to verify flour hasn’t undergone bleaching or bromination.
Select butter from grass-fed cattle when possible, ensuring superior fat composition and flavor complexity.
Your granulated sugar should contain zero anti-caking additives.
Kosher salt—whether Diamond Crystal or Morton’s—affects osmotic balance differently; Diamond Crystal yields finer texture due to lower density.
Weigh all components using a digital scale for precision.
Room-temperature butter incorporates uniformly, creating ideal dough consistency.
This measured approach guarantees reproducible results and superior shortbread quality.
Why Shortbread Is So Special
Shortbread’s distinctive character emerges from the precise ratio of butter to flour—typically 1:2 by weight—which creates a tender crumb structure that’s fundamentally different from other cookies.
You’ll find this ratio produces a melt-in-your-mouth texture impossible to achieve with standard cookie formulas.
The Historical Origins of shortbread trace back to medieval Scotland, where butter was abundant and expensive, making it a luxury confection.
You’re in effect enjoying centuries of culinary refinement when you bite into one.
Its Cultural Traditions remain strong across Britain and beyond.
You’re not just making cookies; you’re participating in heritage baking.
The high butter content and minimal sugar create a cookie that doesn’t spread excessively, allowing you to achieve crisp edges while maintaining a delicate interior. This technical precision distinguishes shortbread as the gold standard among butter cookies.
Choosing Quality Butter
You’ll want to select unsalted butter so you can control the sodium content in your shortbread, whereas salted butter introduces unpredictable seasoning variables that compromise consistency.
The fat content matters most—you’re seeking 80-82% butterfat, which you’ll find in European-style butters that yield superior texture and browning compared to standard 80% American varieties.
Check the ingredient label to verify you’re purchasing pure butter without added water or emulsifiers, as these additives interfere with the proper fat-to-flour ratio that creates shortbread’s characteristic crumbly structure.
Unsalted vs. Salted Butter
Since butter’s fat content and water percentage directly impact shortbread’s texture and spread, selecting the right type becomes essential to your recipe’s success.
You’ll find that unsalted butter gives you complete control over your dough’s sodium levels, allowing precise flavor development.
Salted butter, conversely, contains added sodium that’ll affect your cookie’s taste profile unpredictably.
Regional preferences heavily influence butter availability in your area.
European-style butters contain higher fat percentages—around 86%—compared to standard American butter at 80%, creating denser, richer cookies.
Check labeling laws in your region, as they dictate fat content declarations on packaging.
You’ll want to verify whether your butter meets these standards.
For ideal shortbread results, you should use unsalted butter with at least 82% butterfat, ensuring consistent texture and allowing you to control saltiness independently.
Fat Content Matters Most
Building on butter selection fundamentals, the fat percentage becomes your primary lever for achieving proper shortbread structure.
You’ll find that butter with 82-86% butterfat delivers superior results compared to lower-fat alternatives.
Check nutrition labeling carefully—this reveals the exact fat content you’re working with.
Here’s what matters most:
- 82% butterfat minimum creates the tender crumb you’re after
- Higher fat percentages reduce gluten development through texture science principles
- Lower-quality butter contains excess water, compromising your cookie’s structure
- European-style butter typically offers superior fat content and performance
You’re not just selecting an ingredient; you’re controlling your dough’s hydration ratio and gluten network formation.
This precision determines whether you get that signature melt-in-your-mouth shortbread or a dense, tough cookie.
Don’t compromise on fat content—it’s non-negotiable.
Step-by-Step Instructions
You’ll begin by whisking together 2 cups all-purpose flour, ½ teaspoon salt, and ¼ teaspoon baking soda in a medium bowl.
Next, you’ll cream 1 cup softened butter with ¾ cup granulated sugar using an electric mixer on medium speed for 3-4 minutes until the mixture becomes pale and fluffy.
Finally, you’ll fold the dry ingredients into the butter mixture, then press the dough into a parchment-lined 9×13-inch pan, bake at 325°F for 18-22 minutes until golden, and cool completely before cutting into squares.
Mixing Dry Ingredients
Combining flour, cornstarch, and salt requires precision to guarantee even distribution of the cornstarch throughout the mixture, which’ll create the shortbread’s characteristic tender crumb.
You’ll achieve ideal results by implementing these sifting techniques:
- Sift flour and cornstarch together twice through fine-mesh sieve to eliminate lumps
- Add salt gradually during the second sift for consistent spice distribution
- Whisk ingredients vigorously for 30 seconds post-sifting to guarantee homogeneous blend
- Transfer mixture to medium bowl, breaking apart any remaining clumps with fingers
The cornstarch’s precise ratio—typically one part to three parts flour—directly impacts texture.
Inadequate mixing compromises cookie structure.
You’re creating a dry base that’ll absorb butter evenly, preventing dense or greasy results.
This foundational step determines whether your shortbread achieves that coveted melt-in-your-mouth quality.
Creaming Butter and Sugar
Once your dry ingredients are properly combined, it’s time to create the butter-sugar base that’ll incorporate air and establish the dough’s structure.
Beat softened butter (65-70°F) with granulated sugar for 3-5 minutes using an electric mixer. This aeration science process creates microscopic air pockets essential for texture development. Tool selection matters: a stand mixer outperforms hand mixers for consistent results.
| Tool Type | Speed Setting | Duration |
|---|---|---|
| Stand Mixer | Medium | 3-4 minutes |
| Hand Mixer | High | 4-5 minutes |
| Manual Whisk | N/A | 8-10 minutes |
The mixture transforms from gritty to pale, fluffy, and homogeneous—indicating proper emulsification. Your independence in choosing equipment won’t compromise quality if technique remains precise. Stop beating once you’ve achieved maximum volume without separating the emulsion.
Baking and Cooling
After transferring your dough to parchment-lined baking sheets, preheat your oven to 325°F and arrange racks to the middle position for even heat distribution.
Bake for 12-15 minutes until edges turn pale golden brown.
Monitor closely, as kitchen humidity and ambient temperature affect baking duration.
Your shortbread shouldn’t darken noticeably—pale edges indicate doneness.
Key cooling steps:
- Let cookies rest on baking sheets for 5 minutes to set structure
- Transfer to wire racks for complete cooling (approximately 30 minutes)
- Provide adequate air circulation around each cookie
- Store in airtight containers once fully cooled
This cooling sequence allows residual heat to firm the cookies’ interiors while preventing over-browning.
Proper cooling prevents brittleness and maintains that signature tender, buttery texture you’re after.
Mixing and Kneading Techniques
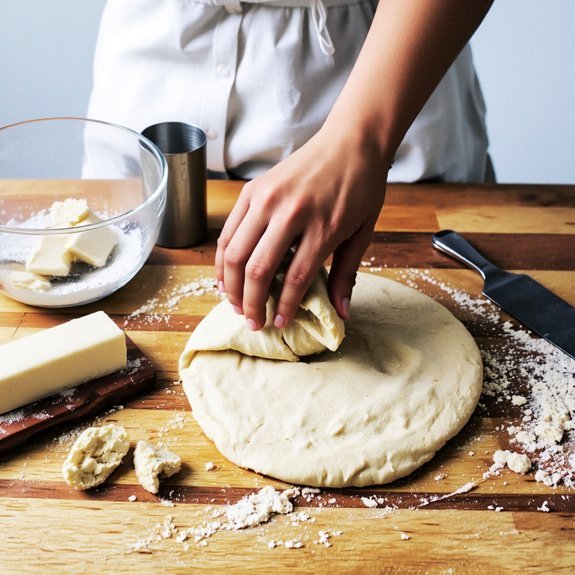
To achieve the ideal texture, you’ll blend your dry ingredients—flour, powdered sugar, and salt—in a medium bowl using a whisk or fork for 30 seconds, ensuring even distribution.
Next, cut cold butter into small cubes and incorporate them using a pastry cutter or fork, working at varying speeds.
Start slowly to prevent overworking, then increase tempo slightly as the mixture becomes crumbly.
Pay close attention to tactile cues—you’re aiming for coarse breadcrumb consistency without visible butter chunks.
The entire mixing process shouldn’t exceed two minutes. Avoid overmixing, which develops gluten and toughens your cookies.
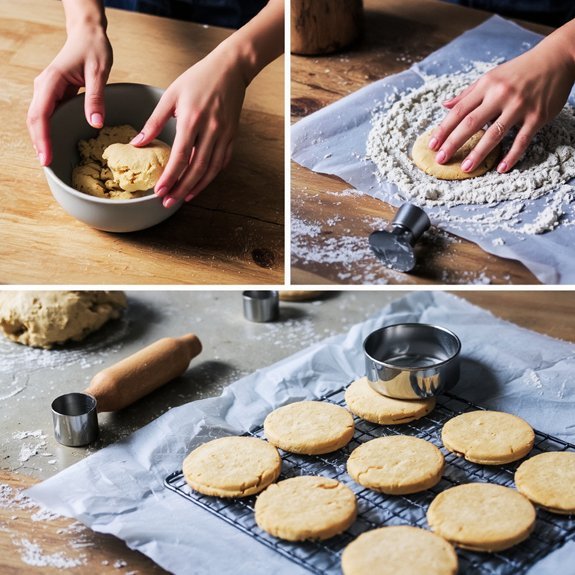
Once you’ve achieved the desired texture, transfer the dough to your work surface and knead gently for 10-15 seconds, just enough to bring it together cohesively.
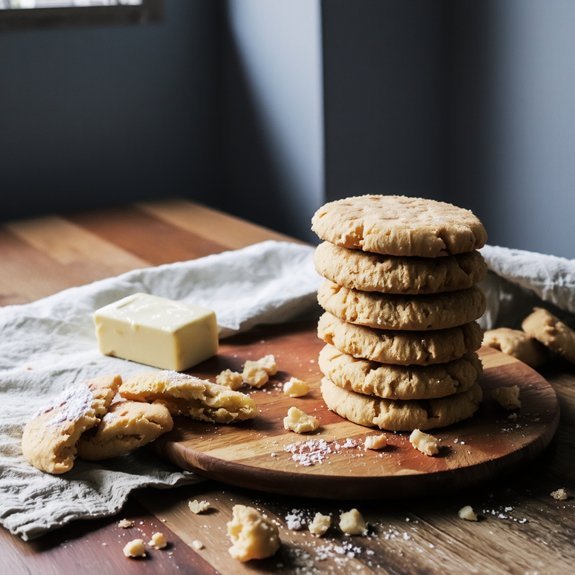
Shaping and Cutting Your Cookies
You’ll roll your dough to a uniform 1/4-inch thickness between two sheets of parchment paper, ensuring even baking throughout.
Use sharp cutters or templates to press cleanly through the dough without twisting, which seals edges and prevents proper rise.
Refrigerate your cut shapes on a baking sheet for at least 30 minutes to maintain crisp definition and prevent spreading during baking.
Rolling and Flattening Dough
Flattening your dough to a uniform thickness of ¼ to ⅜ inch promotes even baking and consistent texture throughout your shortbread.
You’ll achieve ideal results by establishing a rolling rhythm and using thickness guides to maintain precision throughout the process.
Here’s your approach:
- Position parchment paper above and below your dough to prevent sticking and guarantee uniform pressure distribution
- Use a rolling pin with marked thickness guides or dowels as spacers for consistent depth
- Apply steady, even pressure in overlapping strokes, working from the center outward
- Rotate your dough 90 degrees periodically to achieve uniform expansion and prevent uneven thickness
Your disciplined rolling technique directly impacts your final product’s quality.
Maintain consistent pressure, avoid excessive force, and prioritize precision over speed for superior shortbread cookies.
Cutting Shapes Perfectly
With your dough rolled to the proper thickness, you’re ready to cut shapes that’ll bake evenly and maintain crisp edges throughout the oven.
Position your cutters perpendicular to the dough surface, applying steady downward pressure. Your hand positioning should remain firm yet controlled, ensuring clean cuts without dragging through the butter layers.
| Technique | Benefit | Application |
|---|---|---|
| Straight cuts | Uniform baking | Square/rectangular shapes |
| Lifted extraction | Edge preservation | All shape types |
| Chilled cutters | Reduced sticking | Intricate designs |
Work quickly to prevent dough warming. After extracting each shape, execute edge finishing by lightly smoothing any rough spots with your fingertip. This eliminates irregularities that’d otherwise create uneven browning.
Transfer cut cookies to parchment-lined baking sheets immediately, spacing them half-inch apart. This method guarantees professional-quality results with maximum control over your final product.
Chilling Before Baking
Returning your cut cookies to the refrigerator after shaping guarantees they’ll maintain their form during baking and develop the signature crisp texture shortbread demands.
You’ll achieve ideal results by following these chill timing guidelines:
- Refrigerate for 30 minutes minimum at 40°F to firm the dough structure
- Apply the freezer technique by placing shaped cookies on parchment for 2 hours at 0°F for enhanced stability
- Monitor thickness carefully—thicker cookies need extended chill time to prevent spreading
- Batch your baking by keeping reserve dough chilled while baking the first batch
This deliberate cooling period prevents you from losing cookie definition during heat exposure.
You’re not wasting time; you’re investing in precision. The cold dough resists heat’s initial spread, allowing edges to set before the interior bakes through, creating that coveted shortbread crispness that justifies your methodical approach.
Baking Times and Temperatures
Once you’ve prepared your dough and shaped it, you’ll need to bake your shortbread at 325°F (163°C) for 12–15 minutes, depending on thickness and your oven’s individual calibration.
Monitor the edges carefully—they’ll turn light golden brown when done, while centers remain pale. Oven calibration varies considerably between models, so invest in an oven thermometer for accuracy.
Monitor edges for light golden brown while centers stay pale—an oven thermometer ensures accuracy across varying models.
If you’re baking at higher altitudes, you’ll need to increase your oven temperature by 15–25°F and reduce baking time by 2–3 minutes due to lower air pressure affecting heat distribution.
Remove cookies when edges are set but centers yield slightly to pressure. They’ll continue cooking on the hot baking sheet for two minutes after removal, achieving ideal texture through carryover cooking.
Cooling and Storage Tips
Proper cooling is essential to developing your shortbread’s final texture and crispness.
You’ll achieve ideal results by following these proven techniques:
- Cool on the baking sheet for 5 minutes to allow structural stabilization before transferring to a wire rack
- Complete cooling at room temperature for 30-45 minutes, ensuring even moisture evaporation throughout
- Select airtight container with food-grade plastic or glass to maintain your cookies’ integrity and prevent staleness
- Maintain humidity control between 35-50% relative humidity; excess moisture compromises crispness while desiccant packets absorb unwanted moisture
Store your shortbread at room temperature away from direct sunlight and heat sources.
Properly cooled and stored cookies maintain peak quality for up to two weeks.
You’ll preserve that characteristic buttery crumb and delicate snap that defines authentic shortbread.
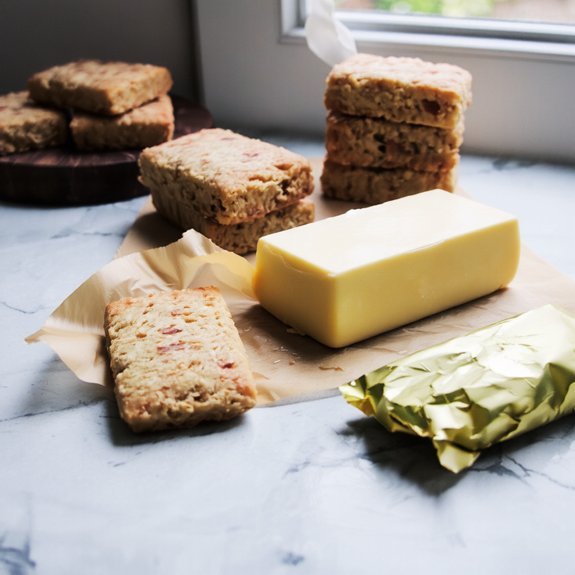
Flavor Variations to Try
While you’ve mastered the fundamentals of cooling and storage, you’ll discover that shortbread’s versatility extends far beyond the classic butter formula.
Beyond the classic butter formula, shortbread’s versatility offers endless opportunities for creative regional and seasonal variations.
You can incorporate regional twists by adding Scottish whisky, Danish cardamom, or French lavender to your dough.
Experiment with seasonal themes: citrus zest for spring, chocolate chips for winter, or spiced varieties for autumn.
Measure your extracts precisely—use 1/4 teaspoon vanilla or almond extract per batch to avoid overpowering your base.
You’re free to manipulate ratios of butter to flour while maintaining structural integrity.
Consider infusing your butter with herbs or incorporating freeze-dried fruit powder at a 2-tablespoon ratio per 2 cups flour.
These modifications allow you to customize your shortbread without compromising its signature crumbly texture and buttery profile.
Serving Suggestions and Pairings
How you present your shortbread dramatically influences the tasting experience and determines which beverages’ll enhance its buttery richness.
You can elevate your shortbread presentation through these strategic pairings:
- Dessert Boards: Arrange your shortbread alongside complementary items like dark chocolate, candied citrus, and aged cheeses for sophisticated tasting experiences
- Tea Service: Pair with Earl Grey or English breakfast tea to cut through richness with subtle tannins
- Cocktail Pairings: Combine with bourbon or single-malt scotch; the cookies’ high fat content balances alcohol’s intensity
- Coffee Accompaniments: Serve with espresso or cappuccino for contrast between bitter and sweet notes
Your shortbread’s delicate texture demands careful handling during plating.
Stack cookies at slight angles rather than flat to showcase their golden edges.
Position on room-temperature vessels to prevent grease absorption.
This approach respects your guests’ freedom to savor each bite deliberately.
Frequently Asked Questions
Can I Make Shortbread Cookies Without Butter or With Butter Substitutes?
You can absolutely substitute butter with vegan fats or coconut oil in your shortbread recipe.
Use a 1:1 ratio by weight—if your recipe calls for 200g butter, swap it with 200g coconut oil or your preferred vegan fat. Make sure your substitute’s melting point matches butter’s 32-35°C for ideal texture.
Work quickly; keep ingredients cold to achieve that signature crumbly, tender crumb structure shortbread demands.
How Do I Fix Shortbread That Turns Out Too Crumbly or Dry?
You’ll fix overly crumbly shortbread by increasing your egg yolks—they’re binding agents that add moisture and richness.
Substitute brown sugar for granulated sugar; its molasses content retains more hydration.
Reduce your flour-to-fat ratio slightly, aiming for precise measurements.
Make sure you’re not overbaking; pull your batch at the first golden edge sign.
You’ve got the freedom to adjust these variables until you achieve that perfect tender, cohesive crumb structure you’re after.
Can Shortbread Dough Be Frozen, and How Long Does It Last?
You can absolutely freeze your shortbread dough using two proven freezing methods: wrap it tightly in plastic wrap and aluminum foil, or portion it into an airtight container. Your dough’ll stay fresh for up to three months.
When you’re ready, thawing tips suggest transferring it to the refrigerator overnight before rolling and cutting. This approach gives you complete control over your baking schedule without compromising quality or texture.
Why Did My Shortbread Spread Too Much or Burn During Baking?
Your shortbread’s spreading or burning stems from two critical factors you’ll control.
First, verify your oven calibration—ovens often run hot, causing premature browning.
Second, make sure your butter temperature stays around 65-68°F; warmer butter weakens dough structure, promoting excessive spread.
Use an oven thermometer for accuracy, and chill dough thoroughly before baking.
These adjustments guarantee you’ll achieve perfectly baked, structurally sound shortbread with proper edges and golden color.
Are Shortbread Cookies Safe for People With Gluten or Dairy Allergies?
You’ll need to modify traditional shortbread recipes to accommodate allergies.
Standard versions contain butter and wheat flour, making them unsafe for dairy and gluten-sensitive individuals.
You can substitute gluten-free flour blends and dairy-free butter alternatives, but you’re responsible for verifying gluten labeling on all ingredients.
Watch for cross contamination risks during preparation—use dedicated utensils and surfaces.
Always consult ingredient statements carefully; manufacturers aren’t obligated to disclose every potential allergen exposure risk.


Leave a Comment