Key Takeaways
- Classic Red Velvet Cupcakes offer striking crimson appearance with cream cheese frosting, perfect for Valentine’s Day elegance and handcrafted quality.
- Raspberry Cheesecake Brownies feature three-layer structure combining fudgy brownie, creamy filling, and fruit swirl for sophisticated dessert presentation.
- Heart-Shaped Sugar Cookies with royal icing provide customizable decoration options and precise technique for romantic, personalized Valentine’s treats.
- Champagne Macarons combine delicate shells with concentrated champagne reduction, offering elegant French confection ideal for intimate celebrations.
- Decadent Chocolate Truffles showcase ganache emulsions with luxurious coatings like dark chocolate, raspberries, and gold leaf for refined gifting.
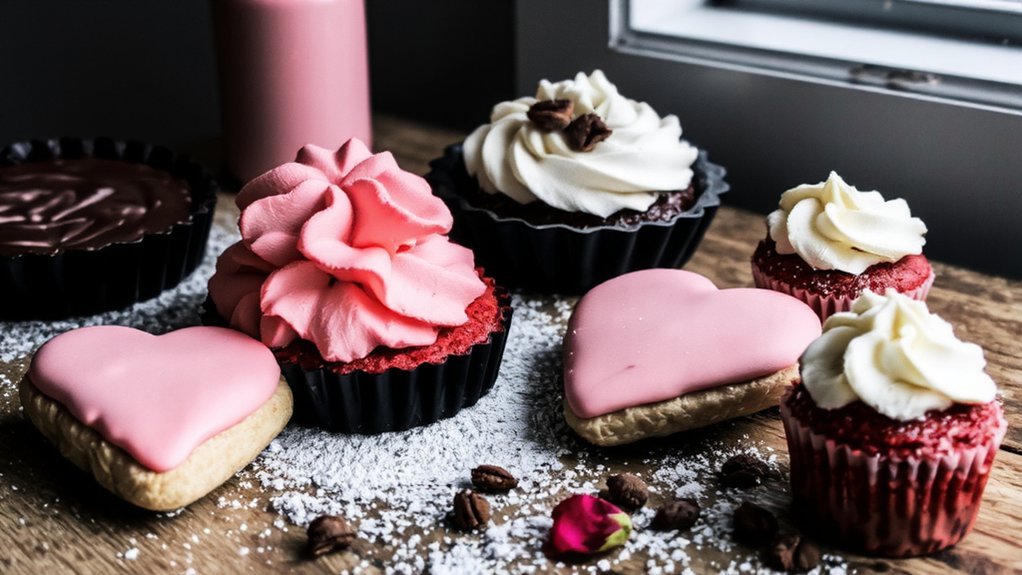
Classic Red Velvet Cupcakes
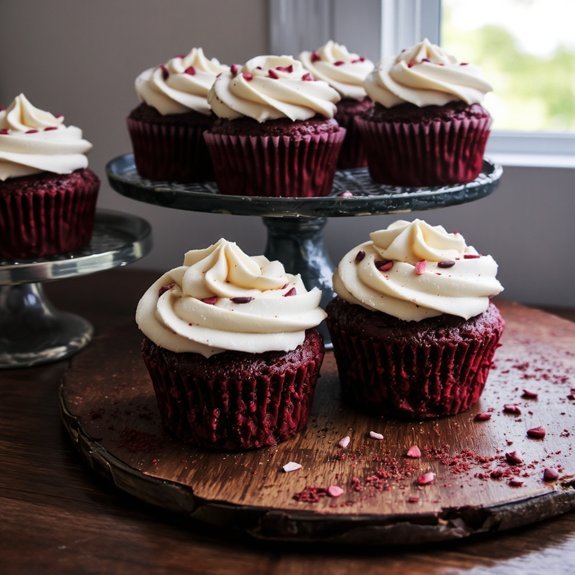
Why’re red velvet cupcakes a Valentine’s Day staple? The answer lies in their striking crimson appearance and sophisticated flavor profile.
You’ll achieve the perfect crumb structure through buttermilk chemistry.
The acidic buttermilk reacts with baking soda, creating tender, light cupcakes with subtle tanginess.
Buttermilk’s acidity reacts with baking soda, creating tender, light cupcakes with subtle tanginess that elevates your baking.
This chemical interaction differentiates red velvet from standard chocolate varieties.
For natural coloring, you’re not bound to artificial dyes. Incorporate beetroot powder or hibiscus tea to develop that signature hue without synthetic additives. These alternatives deliver genuine red tones while maintaining your baking integrity.
The cream cheese frosting complements the cocoa-tinged cake, balancing sweetness with mild earthiness. You control every ingredient, ensuring quality throughout.
These cupcakes represent liberation from mass-produced confections—handcrafted treats reflecting your values and Valentine’s Day intentions.
Decadent Chocolate Truffles
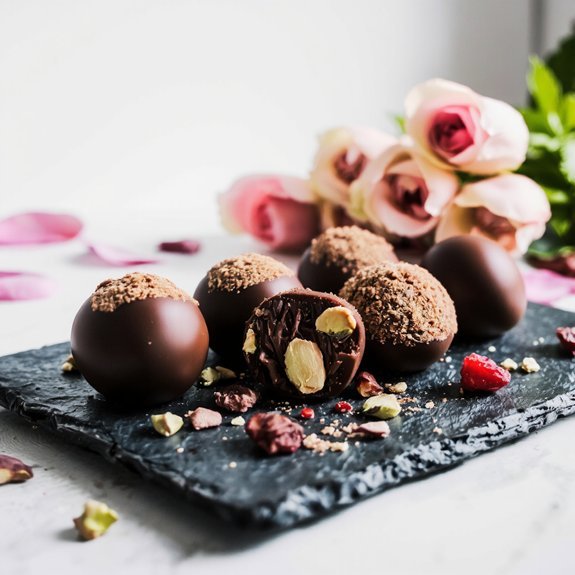
When you’re crafting chocolate truffles, you’re working with ganache—an emulsion of chocolate and cream that demands precision.
You’ll control ganache textures by adjusting your chocolate-to-cream ratio, creating everything from silky-smooth centers to firmer structures that hold their shape.
Master coating variations to elevate your truffles:
- Dark chocolate shell with sea salt crystals for sophisticated contrast
- White chocolate coating with freeze-dried raspberries for tartness
- Cocoa powder dusting for classic, understated elegance
- Tempered milk chocolate dip with gold leaf accents
- Crushed pistachios mixed into coating for textural complexity
Your success depends on temperature control and technique.
Chill your ganache properly, then shape with confidence.
Each coating variation transforms your truffles’ appearance and flavor profile.
You’re not just making candy—you’re crafting refined confections that showcase your technical mastery and creative independence.
Strawberry Shortcake With Whipped Cream
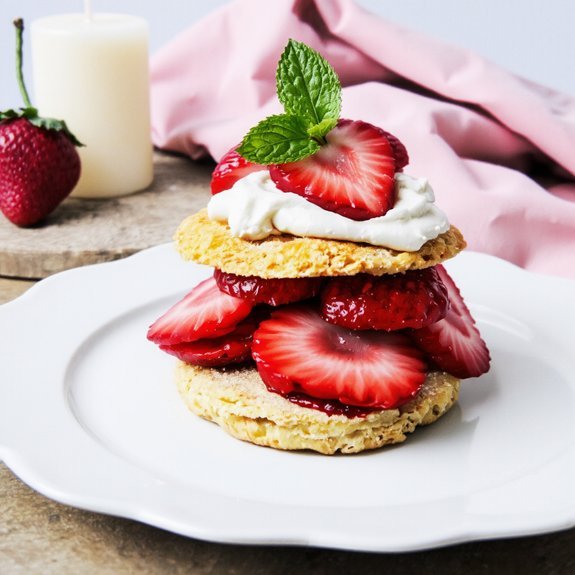
You’ll create ethereal light sponge cake layers by whipping eggs and sugar to stiff peaks, then folding in flour with precision to maintain airiness.
Your whipped cream reaches perfection when you chill both the bowl and beaters beforehand, then beat heavy cream to soft peaks before adding powdered sugar and vanilla extract.
This combination of tender cake and silky cream provides the ideal foundation for fresh strawberries and creates the classic Valentine’s dessert.
Light Sponge Cake Layers
A properly executed sponge cake relies on incorporating air through mechanical beating rather than chemical leavening agents, which creates the characteristic light, airy crumb that contrasts beautifully with fresh strawberries and whipped cream.
You’ll master this by practicing precise egg separation and mastering your folding technique. Whip yolks with sugar until pale, then beat whites to stiff peaks. Carefully fold them together, preserving trapped air throughout.
- Golden yolks whisked into ribbony peaks
- Cloud-like egg white foam holding structural integrity
- Gentle folding motions maintaining airspace
- Delicate, tender crumb dissolving on your tongue
- Perfect canvas for vibrant red berries
Your disciplined approach yields a sponge that’s entirely yours to perfect—no shortcuts, no compromises.
Whipped Cream Perfection Tips
Building on that delicate sponge foundation, your whipped cream demands equal precision—it’s the textural counterpoint that elevates the entire dessert.
You’ll achieve ideal results by chilling your bowl and beaters beforehand, then whipping cold heavy cream at controlled temperatures between 60-65°F.
This prevents overwhipping and butter separation.
For stability without cornstarch, you’ve got options: gelatin provides reliable structure, while cream cheese adds tang and hold.
Whip your cream to stiff peaks—roughly two to three minutes—stopping before it loses its silky sheen.
Your freedom lies in customization.
Add vanilla extract or a touch of liqueur if you prefer.
Work quickly once stabilized, as even slight temperature increases compromise texture.
Time matters here.
Prepare whipped cream within two hours of assembly to maintain that perfect cloud-like consistency your strawberry shortcake deserves.
Heart-Shaped Sugar Cookies
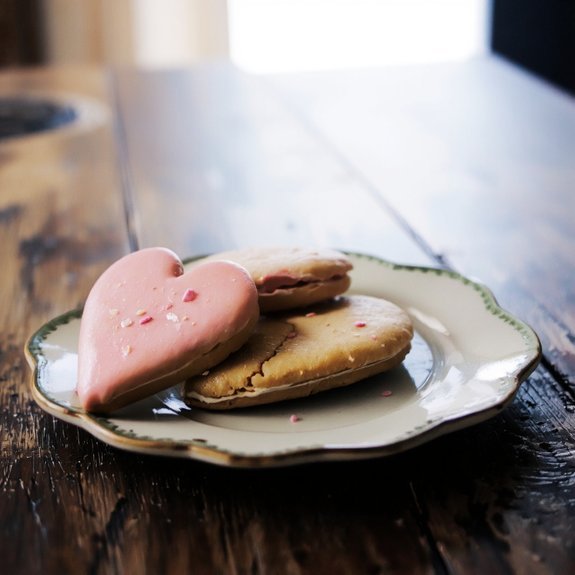
Crafting heart-shaped sugar cookies requires precise measurements and controlled technique to achieve consistent results. You’ll need to chill your dough for at least two hours—this prevents spreading and guarantees sharp edges on your finished cookies.
Precise measurements and controlled technique create consistent results. Chill dough two hours minimum to prevent spreading and guarantee sharp edges.
Roll the dough between parchment sheets to maintain uniform thickness, then cut with your heart-shaped cutter.
Master these essential steps:
- Chill dough thoroughly to eliminate shrinkage during baking
- Maintain consistent thickness for even browning
- Bake at 350°F for exactly 10-12 minutes
- Cool completely before applying icing techniques
- Use royal icing for crisp, decorative finishes
You’ll achieve professional results by respecting temperature control and dough chilling protocols.
Apply icing techniques with precision—thin consistency for coverage, thick consistency for dimensional details.
Your homemade cookies will rival commercial bakery quality when you honor these methodical requirements.
Raspberry Cheesecake Brownies

While sugar cookies demand finesse with decoration, raspberry cheesecake brownies require you to master layering and precise baking temperatures. You’ll build three distinct layers: a fudgy brownie base, creamy cheesecake filling, and a striking raspberry swirl that cuts through richness.
| Layer | Temperature | Time |
|---|---|---|
| Brownie Base | 350°F | 12 minutes |
| Cheesecake Layer | 325°F | 18 minutes |
| Raspberry Swirl | 325°F | 20 minutes |
| Cooling Stage | Room temp | 2 hours |
| Final Chill | Refrigerated | 4 hours |
You’ll achieve ideal texture by preventing overmixing and maintaining exact oven conditions. For a gluten free adaptation, substitute all-purpose flour with almond flour blend—you’ll preserve structure while expanding your baking freedom. This approach demands precision but rewards you with sophisticated, restaurant-quality results that liberate you from store-bought constraints.
Champagne Macarons
You’ll master champagne macarons by first perfecting your macaron shell technique, which requires precise macaronage—the folding method that achieves the ideal batter consistency for those signature feet.
Next, you’ll infuse authentic champagne flavor through both the almond flour mixture and the filling, ensuring the alcohol doesn’t compromise the delicate structure.
Finally, you’ll execute elegant assembly by piping your champagne-infused ganache or buttercream between shells with controlled pressure and positioning.
Perfecting the Macaron Shell
Because macarons demand precision at every stage, mastering the shell requires understanding the specific technique of macaronage—the folding method that determines whether your batter achieves the ideal consistency.
You’ll need meringue stability to support your champagne-infused batter. Fold carefully using a spatula, rotating the bowl quarter-turns. Your piping technique must be deliberate: hold the pastry bag perpendicular to the mat, applying steady pressure for uniform discs.
Critical factors for success:
- Fold until ribbons fall from your spatula in a continuous stream
- Pipe 1.5-inch rounds with consistent diameter and height
- Rest piped shells 15-30 minutes until a skin forms
- Tap the baking sheet firmly to release trapped air
- Bake at 300°F for precisely 18-20 minutes
You’ll recognize doneness when shells develop feet—the characteristic ruffled base distinguishing macarons from mere meringue cookies.
Champagne Flavor Infusion Techniques
Infusing champagne into your macaron batter requires careful reduction to concentrate flavor while eliminating excess moisture that’d compromise shell structure.
You’ll start by simmering champagne until it’s reduced by seventy percent, creating a potent syrup that won’t destabilize your meringue.
For aromatic extraction, incorporate this reduction gradually into your almond flour mixture during macronage.
The technique demands precision—add too much liquid and your shells won’t set properly.
Advanced bakers employ vacuum infusion methods to extract champagne’s delicate notes without heat degradation.
This approach preserves the wine’s complex aromatics while maintaining your batter’s ideal consistency.
Once your infused batter achieves the correct flow, pipe onto prepared sheets.
Your champagne macarons will deliver sophisticated, concentrated flavor without structural compromise.
Elegant Filling and Assembly
Pairing your champagne shells with an equally sophisticated filling demands attention to complementary flavor profiles and structural integrity.
You’ll want to master ganache consistency—achieving that perfect spreadability without compromising structural support. Consider these assembly techniques:
- Pipe your filling using a steady hand and consistent pressure for uniform distribution
- Apply mirror glaze delicately across the macaron dome for a luxurious, reflective finish
- Position edible flowers strategically before the glaze sets for botanical elegance
- Allow proper resting time between layers to prevent shell collapse
- Stack your finished macarons with precision, creating vertical visual interest
Your filling shouldn’t overpower the champagne notes you’ve cultivated.
Instead, complement them with subtle vanilla undertones or delicate fruit notes. This methodical approach guarantees you’re not just assembling treats—you’re crafting edible art that celebrates refined taste and creative independence.
Chocolate-Dipped Profiteroles
To craft these elegant pastries, you’ll need to master two essential components: delicate choux pastry shells and a smooth chocolate coating.
The choux technique requires precise temperature control and timing—pipe small mounds onto parchment, then bake until golden and hollow.
This creates the foundational texture contrast that distinguishes profiteroles from ordinary pastries.
Once cooled, fill each shell with pastry cream or whipped filling using a piping bag fitted with a thin nozzle.
Work methodically to maintain consistent portions and professional presentation.
For the chocolate coating, temper your chocolate carefully to achieve a glossy finish that sets cleanly.
Dip each profiterole halfway into the melted chocolate, allowing excess to drip off.
Arrange on parchment until the coating hardens completely, creating an impressive dessert that demonstrates your technical mastery and commitment to precision.
Vanilla Bean Panna Cotta
While chocolate-dipped profiteroles demand exacting temperature control and rapid assembly, panna cotta offers a different kind of precision—one that hinges on proper gelatin ratios and patient chilling.
You’ll master this Italian custard by understanding how gelatin sets your silky texture without overcooking cream or eggs.
Your technique requires:
- Heating cream to 160°F, then cooling before gelatin incorporation
- Blooming gelatin in cold water for five minutes before dissolving
- Straining through fine mesh to eliminate lumps
- Chilling six hours minimum for ideal set
- Using vegan alternatives like agar-agar for dietary freedom
You control every variable—cream quality, vanilla bean grade, setting time.
This methodical approach yields restaurant-quality results.
Whether you’re crafting traditional versions or experimenting with vegan alternatives, panna cotta rewards precision with elegance.
Red Velvet Cheesecake
Complexity defines red velvet cheesecake—you’re balancing the cake’s tangy cocoa notes with cream cheese richness while maintaining the signature crimson hue without overpowering sweetness.
You’ll want to use beet coloring instead of artificial red dye for a cleaner ingredient list that aligns with your values.
For the foundation, consider crust alternatives like almond flour or crushed graham crackers mixed with melted butter, offering you flexibility beyond traditional options.
Layer your filling methodically: combine cream cheese, eggs, sour cream, and cocoa powder, ensuring smooth incorporation at each stage.
The beet juice incorporates gradually, preventing color streaking.
Bake at 325°F for approximately 55 minutes until the center sets slightly.
Cooling slowly prevents cracking.
This approach grants you complete control over every component.
White Chocolate Peppermint Bark
You’ll need to master three essential techniques to create flawless white chocolate peppermint bark: layering your chocolate at the correct temperature to achieve a smooth, glossy finish without streaking or cracking.
Crush your peppermint candy to precise, uniform sizes so the pieces distribute evenly across each layer and adhere properly to the chocolate’s surface.
Finally, you’ll set and store your bark in a cool environment, ensuring each layer hardens completely before adding the next one to prevent the flavors from bleeding together.
Layering Chocolate Perfectly
Creating distinct, visually appealing layers in white chocolate peppermint bark demands precision in temperature control and timing.
You’ll master this technique by understanding how chocolate behaves at specific heat points.
Key layering steps:
- Melt your base white chocolate to 110°F, then cool to 82°F for ideal molding surfaces
- Pour onto parchment-lined baking sheets, spreading evenly to ¼-inch thickness
- Allow 15 minutes for initial set before adding your middle layer
- Crush peppermint candies and sprinkle while chocolate’s still tacky
- Top with tempered white chocolate at precise 80°F for final coating
You’ll achieve professional results by respecting temperature control throughout.
Each layer requires patience—rushing creates blooming and separation.
Maintain consistent thickness so your bark snaps cleanly.
This methodical approach guarantees you’re not bound by guesswork; instead, you’ve got complete command over your creation’s structure and appearance.
Peppermint Candy Crushing
Crushing peppermint candies requires strategic technique to achieve the right texture and distribution for your bark. You’ll want to place unwrapped candies in a sturdy plastic bag, then use a rolling pin or mallet to break them into varied sizes—some fine powder, some chunky pieces.
This variation creates textural interest in your finished product.
Before you begin, take safety precautions by securing your work surface and ensuring proper hand positioning to prevent slipping.
After crushing, consider wrapper recycling by collecting the discarded materials separately.
You’re now ready to sprinkle your crushed peppermint directly onto melted white chocolate, pressing gently so pieces adhere. Work quickly before the chocolate sets. This methodical approach yields professional-quality bark with ideal flavor distribution and visual appeal.
Setting and Storing
Once the peppermint bark’s surface reaches room temperature, you’ll transfer it to a refrigerator set between 35–40°F for approximately 30–45 minutes until the chocolate fully solidifies.
For ideal storage, implement these practices:
- Date labeling: Mark your container with the creation date to track freshness and guarantee consumption within two weeks
- Stack organization: Layer parchment between bark pieces to prevent adhesion and facilitate efficient storage
- Airtight containment: Use sealed containers to eliminate moisture exposure and preserve texture
- Cool placement: Position your bark on the refrigerator’s middle shelf away from temperature fluctuations
- Separation protocol: Keep peppermint bark isolated from aromatic foods that could transfer unwanted flavors
You’ll maintain ideal quality by adhering to these methodical storage protocols, preserving your bark’s integrity and flavor profile throughout its shelf life.
Frequently Asked Questions
How Far in Advance Can I Prepare Valentine’s Day Baked Goods Without Them Going Stale?
You’ll maximize shelf life by preparing baked goods 2-3 days ahead for most items. For extended storage, you’ve got freedom to freeze most Valentine’s treats up to three months.
Follow freezing guidelines: wrap items individually in airtight containers, avoiding moisture exposure. Thaw at room temperature before serving.
Cookies and brownies maintain quality longest; delicate pastries require shorter storage windows. This methodical approach guarantees your homemade creations stay fresh and delicious without sacrificing your schedule flexibility.
What Are the Best Dairy-Free and Vegan Substitutes for Traditional Valentine’s Baking Recipes?
You’ll find Aquafaba Magic transforms your Valentine’s creations—three tablespoons replaces one egg flawlessly.
Coconut Yogurt substitutes dairy yogurt one-to-one, delivering moisture and tang.
You can swap butter with coconut oil at equal ratios for rich, indulgent results.
Almond milk replaces cow’s milk identically.
These substitutes grant you complete baking freedom without sacrificing texture or flavor—your vegan confections rival traditional recipes precisely.
How Do I Fix Common Baking Mistakes Like Sunken Centers or Grainy Chocolate Textures?
You’ll fix sunken centers by checking your oven calibration with a thermometer—ovens often run hot or cold.
For grainy chocolate, you’re not tempering properly.
Use precise mixing technique: melt chocolate slowly over double boilers, maintaining exact temperatures.
Don’t rush.
You’ll control your results by respecting these fundamentals.
Master the mechanics, and you’re liberated from guesswork.
Your Valentine’s creations’ll turn professional-grade when you eliminate variables through methodical precision.
What Decorating Tools and Techniques Create Professional-Looking Valentine’s Day Dessert Presentations at Home?
You’ll master professional presentations by mastering piping tips—round, star, and leaf varieties—for precise chocolate work and frosting details.
Layer edible gold leaf strategically on dark ganache surfaces for luxury appeal.
Deploy offset spatulas for clean cake edges, bench scrapers for textured finishes, and stencils for controlled dusting.
Practice your hand pressure consistently.
You’ll control every aesthetic element independently, achieving gallery-quality desserts that showcase your technical expertise and culinary sovereignty.
Which Valentine’s Baked Goods Can Be Safely Shipped or Transported to Distant Recipients?
You’ll find Low Moisture Cookies your best bet for shipping—their reduced water content prevents spoilage during transit.
Shelf Stable Brownies also withstand transportation admirably; their dense structure resists crumbling.
Avoid cream-filled pastries and frosted cakes that’ll deteriorate.
Pack items in airtight containers with parchment layers separating each piece.
Choose expedited shipping to minimize time exposure.
Hard candies, biscotti, and fruit cakes travel exceptionally well.
You’re empowered to send quality homemade gifts confidently.
Leave a Comment