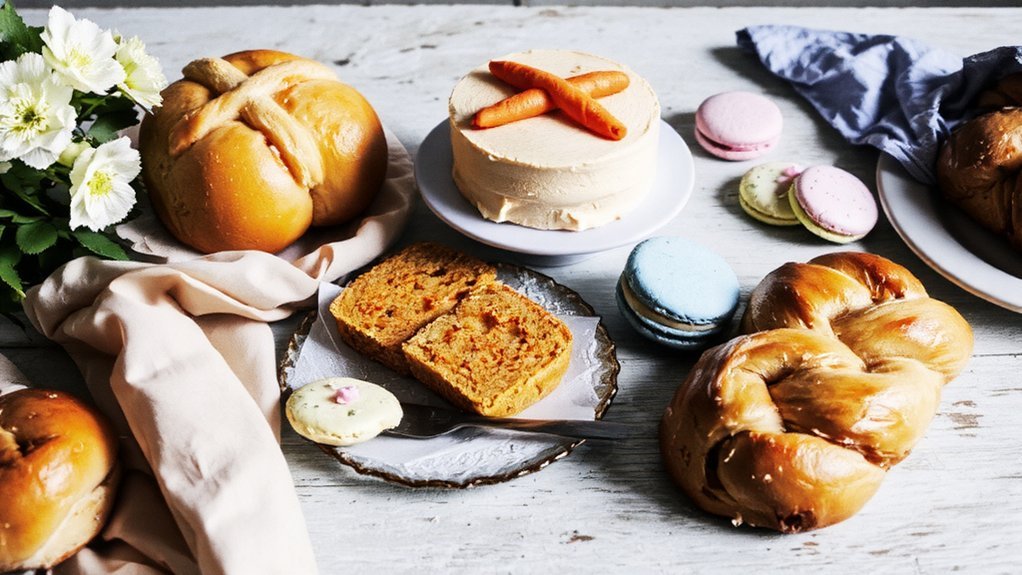
Key Takeaways
- Classic Hot Cross Buns feature warm spice blends, currants, and candied peel with iconic cross scoring for authentic Easter tradition.
- Fluffy Carrot Cake uses oil for superior moisture retention, crushed pineapple, and grated carrots with cream cheese frosting for celebration.
- Adorable Bunny-Shaped Sugar Cookies combine chilled dough with royal icing and fondant decoration for festive, visually appealing treats.
- Chocolate Nest Desserts with Speckled Eggs offer easy advance preparation using melted chocolate, crushed cereal, and candy egg customization.
- Lemon Glazed Easter Bread requires proper fermentation temperature control, optimal dough hydration, and immediate post-bake glaze application for brightness.
Classic Hot Cross Buns
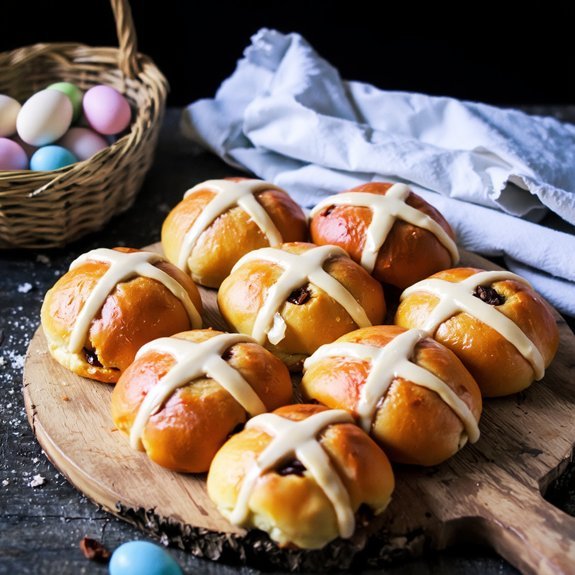
Mastering hot cross buns requires understanding how their signature spice blend, dried fruit, and cross topping work together to create the traditional Easter treat.
You’ll combine warm milk, active dry yeast, and flour to initiate yeast fermentation, which develops the dough’s characteristic texture and flavor complexity.
Mix in your spices—cinnamon, nutmeg, and allspice—along with currants and candied peel for authentic taste.
Once your dough rises adequately, you’ll shape individual buns and perform precise dough scoring across the top, creating the iconic cross pattern.
This scoring accomplishes two functions: it facilitates even baking and establishes visual distinction.
Before final proofing, you’ll brush an egg wash across each bun’s surface.
Bake at 400°F until golden, then brush with a light sugar glaze for that signature glossy finish.
Fluffy Carrot Cake With Cream Cheese Frosting
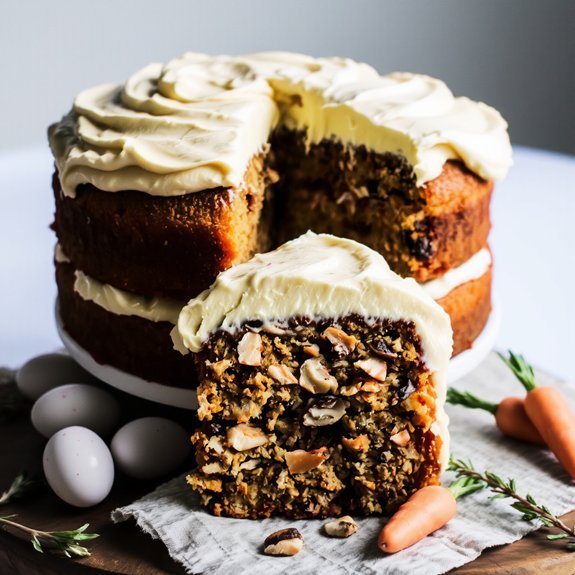
While hot cross buns showcase yeast-driven fermentation, carrot cake relies on chemical leavening agents—baking soda and baking powder—to achieve its characteristic crumb structure.
You’ll appreciate how these agents create the cake’s tender, moist crumb through CO2 gas production during baking.
The texture science behind carrot cake hinges on oil’s emulsifying properties, which retain moisture better than butter alone.
Oil’s emulsifying properties retain moisture superior to butter, creating carrot cake’s signature tender crumb structure.
Crushed pineapple and grated carrots contribute additional hydration, ensuring your cake stays supple.
For ideal results, you’ll want to cream your sugar and oil thoroughly before incorporating eggs.
This technique aerates the batter, promoting even rise.
Regarding storage methods, you’ve got flexibility.
Unfrosted layers keep refrigerated for five days or freeze for three months.
Once frosted with cream cheese frosting, consume within four days refrigerated for peak quality and food safety compliance.
Adorable Bunny-Shaped Sugar Cookies
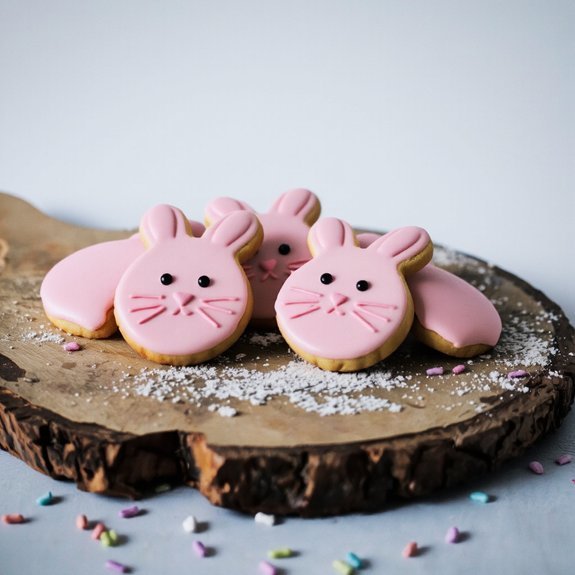
You’ll start by combining your dry ingredients—flour, baking powder, and salt—then cream together butter and sugar before folding in your egg and vanilla extract to form a smooth dough.
Once you’ve chilled your dough properly, you’ll roll it out and cut your bunny shapes using specialized cookie cutters, ensuring uniform thickness for even baking. Finally, you’ll apply royal icing, food coloring, and edible decorations to transform your cooled cookies into festive bunny designs that capture Easter’s charm.
Decorating Techniques and Tips
How can you elevate bunny-shaped cookies from plain to polished? Master professional decorating techniques to transform your creations into showstoppers.
| Technique | Materials | Application |
|---|---|---|
| Royal Icing | Egg whites, powdered sugar, water | Piping details, outlining |
| Fondant Smoothing | Pre-made fondant, cornstarch | Creating seamless surfaces |
| Airbrushing | Food-grade airbrush, gel colors | Gradient shading effects |
| Hand-Painting | Edible markers, food coloring | Fine artistic details |
You’ll achieve professional results by applying Royal Icing for intricate features like whiskers and eyes. Fondant Smoothing provides flawless base coverage, guarantee polished bunny faces. Layer these techniques strategically: establish your fondant foundation first, then add Royal Icing details for dimension.
Your cookies demand precision. Control moisture levels carefully—overly wet icing spreads uncontrollably, while dry icing resists application. Temperature management matters; work in cool environments to prevent fondant slippage. These technical approaches guarantee your Easter bunnies command attention and deliver exceptional results.
Cookie Dough Preparation Guide
Creating the perfect sugar cookie foundation requires precision in ingredient selection and methodology.
You’ll want to cream your butter and sugar until you’ve achieved a light, fluffy texture—typically three to five minutes of beating.
Incorporate your eggs individually, guaranteeing complete integration before adding the next.
Your flour, baking powder, and salt mixture demands careful sifting to eliminate lumps that compromise dough consistency.
Hydration control proves critical in this process.
You’re aiming for a dough that holds its shape without becoming brittle.
Add vanilla extract slowly, adjusting quantities based on your dough’s moisture level.
Chill your prepared dough for at least two hours before rolling—this prevents spreading during baking and guarantees your bunny shapes maintain their definition.
You’ll notice the dough becomes more pliable and easier to cut when properly refrigerated.
Chocolate Nest Desserts With Speckled Eggs
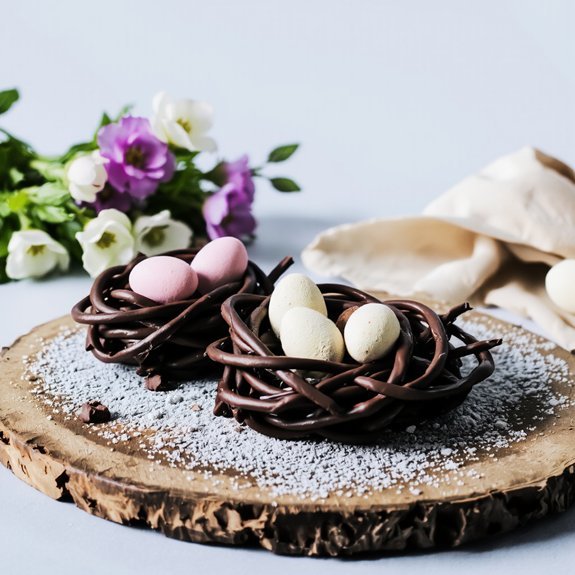
Chocolate nests with speckled eggs combine dark or milk chocolate with crispy cereal components to create an elegant Easter centerpiece that showcases both texture and visual appeal.
You’ll melt your chocolate base, then fold in crushed cereal for structural integrity.
Pour the mixture into cupcake liners or silicone molds, pressing gently to form nest shapes.
Once set, you’re free to customize with speckled candy eggs in various sizes.
Marshmallow nests offer a lighter alternative—you’ll whip melted chocolate with marshmallows before molding.
These mini servings prove ideal for guests seeking portion control without sacrificing indulgence.
The cereal component provides essential crunch that contrasts beautifully against smooth chocolate.
You can prepare nests days ahead, allowing you flexibility in your Easter planning.
Store them in cool conditions to maintain their structural definition and visual presentation.
Lemon Glazed Easter Bread
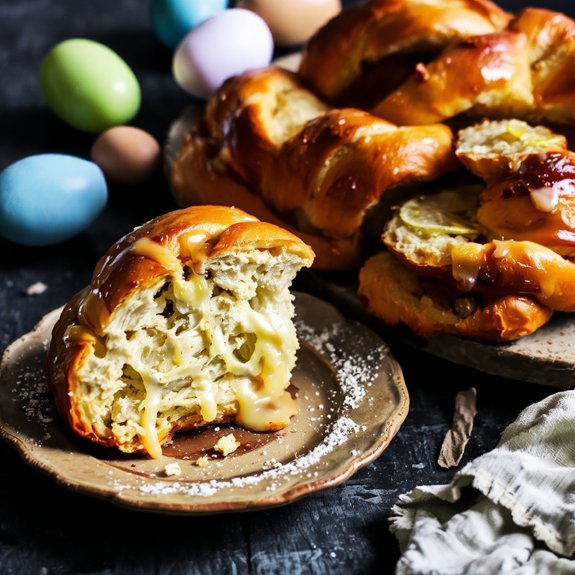
You’ll master lemon glazed Easter bread by employing traditional recipe techniques including proper dough fermentation, shaping methods, and egg wash application to achieve ideal texture and rise.
Your glaze flavor combinations should balance tart citrus notes with powdered sugar’s sweetness, while incorporating lemon zest and juice for complexity and brightness.
These ingredient-focused adjustments directly influence both the bread’s crumb structure and the glaze’s adherence and flavor intensity.
Traditional Recipe Techniques
Because lemon glazed Easter bread demands precision in both methodology and ingredient ratios, mastering the foundational techniques guarantees ideal texture and flavor development.
You’ll control fermentation through temperature management, typically maintaining 75-78°F for peak yeast activity and flavor complexity.
Proper dough hydration—around 65-70%—ensures you achieve the light crumb structure this bread requires.
When you’re ready, open fire baking develops superior crust formation and caramelization compared to conventional ovens.
You’ll score the dough strategically before baking, allowing controlled expansion.
The lemon zest integration demands gentle folding to distribute oils evenly without deflating your carefully developed gluten network.
Finally, you’ll apply the glaze immediately post-baking while the surface remains porous, ensuring maximum flavor penetration and visual appeal.
Glaze Flavor Combinations
What transforms lemon-glazed Easter bread from competent to exceptional? Mastering glaze flavor combinations that elevate your creation with precision and purpose.
You’ll discover that layering complementary flavors demands technical knowledge:
- Citrus foundation: Fresh lemon juice combined with powdered sugar creates your base, while zest intensifies brightness without excess moisture
- Tropical infusions: Incorporating passion fruit or yuzu adds complexity and distinguishes your bread from standard recipes
- Nutty drizzles: Toasted almond or hazelnut oils introduce depth, balancing the glaze’s natural acidity
You’re not bound by convention.
Experiment with Madagascar vanilla or cardamom to personalize your interpretation.
The key lies in precise measurement—each ingredient’s ratio matters.
Your glaze should coat evenly without pooling, achieving that professional finish that signals control over your craft.
This approach gives you freedom to innovate while maintaining structural integrity.
Spring Flower Decorated Cupcakes
Crafting delicate floral toppers elevates standard cupcakes into sophisticated Easter centerpieces that showcase both technical skill and seasonal aesthetics. You’ll gain creative freedom by mastering fondant flower techniques and natural petal applications. Strategic liner aesthetics enhance your presentation—choose pastel or metallic cups to complement your floral designs. Your photo styling improves dramatically when you pair coordinating backgrounds with your decorated cupcakes.
| Flower Type | Piping Tip | Color Palette | Drying Time |
|---|---|---|---|
| Buttercream Rose | 1M | Blush Pink | 2 hours |
| Fondant Peony | Hand-Sculpted | Cream | 24 hours |
| Gum Paste Tulip | None | Deep Purple | 48 hours |
| Royal Icing Daisy | 1 | White | 4 hours |
You’ll achieve professional results by prioritizing ingredient quality and precise technique execution throughout your decorating process.
Honey Easter Bunny Cake
A golden honey cake serves as the ideal foundation for this whimsical Easter centerpiece, requiring you to balance moisture retention with structural integrity for sculpting.
You’ll craft bunny ears, facial features, and decorative details using fondant and royal icing techniques.
Key components you’ll need:
- Honey-infused sponge layers stabilized with proper crumb coat application
- Cream cheese frosting providing both adhesion and flavor complexity
- Food-grade fondant allowing precise sculpting of bunny features
You’ll achieve best results by tempering ingredient ratios—excess moisture compromises structural stability while insufficient hydration creates dryness.
Store your finished cake in airtight containers at controlled temperatures to preserve freshness for three days maximum.
Pair this delicate creation with chamomile tea or light floral beverages that complement honey’s subtle sweetness without overwhelming the palate.
Chocolate Chip Bunny Cookies
You’ll want to select high-quality chocolate chips and butter as your foundational ingredients, ensuring they’re at proper temperature for desired dough consistency.
Shaping your bunny decorations requires precision—you’ll form the body, attach distinct ears, and use chocolate chips strategically for eyes and details before baking.
You’ll achieve the ideal texture by baking at 350°F for 10-12 minutes, watching closely so the edges firm while the centers remain slightly soft.
Ingredient Selection Tips
Since the success of chocolate chip bunny cookies depends on ingredient quality, selecting each component with precision is essential.
You’ll want to source premium components that align with your baking standards and dietary preferences.
Consider these critical factors:
- Chocolate chips: Choose high-cocoa varieties (70% or higher) for superior flavor and texture; opt for allergen alternatives like carob chips if needed
- Seasonal produce: Incorporate fresh, locally-sourced eggs and dairy when available to enhance nutritional value and taste
- Flour options: Select unbleached, all-purpose flour or explore allergen alternatives such as almond flour for specialized dietary requirements
Your ingredient decisions directly impact cookie texture, rise, and flavor complexity.
Don’t compromise on quality—premium components yield superior results.
You’re free to experiment with organic, non-GMO, or specialty ingredients that match your baking philosophy and nutritional goals.
Shaping Bunny Decorations
Once your premium ingredients are combined and your dough’s reached the proper consistency, shaping transforms your mixture into recognizable bunny forms.
You’ll want to use paper templates as guides for consistent sizing and proportions across your batch.
Position your template atop the dough, then carefully cut around it with a sharp knife for clean edges.
For dimensional details, consider employing wire armatures beneath the surface.
These internal supports maintain your bunny’s ears and limbs during baking, preventing sagging or breakage.
Insert the wire before the dough firms completely, ensuring it’s fully embedded.
After shaping, chill your formed bunnies for thirty minutes.
This resting period stabilizes the structure and prevents spreading during baking.
You’ve now prepared your cookies for the oven, ready to achieve that perfect golden-brown finish.
Baking Time Temperature Guide
What’s the ideal baking environment for chocolate chip bunny cookies? You’ll need precise control over your oven’s performance and environmental factors.
Proper oven calibration guarantees your cookies bake uniformly without burning. Use an oven thermometer to verify actual temperature matches your dial setting—most home ovens drift noticeably.
Your chocolate chip bunny cookies require:
- 350°F for 10-12 minutes, achieving golden edges while maintaining chewy centers
- Altitude adjustments: add 15-25°F and reduce baking time by 5 minutes above 3,000 feet
- Middle oven rack positioning for consistent heat distribution
Monitor your cookies’ progress at the nine-minute mark. They’ll continue cooking slightly after removal, so extract them when edges appear set but centers remain slightly underdone.
This technique preserves moisture and prevents overdrying, essential for maintaining your bunny-shaped cookies’ structural integrity and appealing texture.
Berry Filled Easter Tart
A buttery pastry shell paired with fresh berries creates the foundation for this elegant Easter dessert.
You’ll combine high-quality butter, flour, and a pinch of salt to craft a crisp, golden crust that holds your berry filling securely.
Layer your choice of raspberries, blueberries, or strawberries atop a light custard or pastry cream filling for ideal flavor complexity.
For wine pairings, you’ll find this tart pairs beautifully with Moscato d’Asti or Champagne, enhancing the berry notes while complementing the buttery pastry’s richness.
Storage methods matter crucially—you’ll want to refrigerate your finished tart in an airtight container for up to three days, ensuring the filling remains fresh while the crust maintains its structural integrity throughout your Easter celebration.
Coconut Nest Brownies
For those seeking a dessert that marries rich chocolate with tropical flavor, coconut nest brownies offer a compelling departure from fruit-forward confections.
You’ll appreciate the striking texture contrast between dense, fudgy brownie bases and crispy toasted coconut layers.
Your recipe requires:
- Premium unsweetened cocoa powder and quality dark chocolate for depth
- Shredded coconut, toasted until golden for nutty complexity
- Sweetened condensed milk as binding agent
You create these by spreading brownie batter into prepared pans, then topping with toasted coconut mixture before baking.
The result delivers sophisticated flavor without unnecessary complexity.
The toasted coconut develops caramelized notes that elevate standard brownie profiles, while maintaining structural integrity.
You’re free to customize coconut ratios based on preference, making these entirely yours to control.
Frequently Asked Questions
Can I Make These Easter Baking Recipes Ahead and Freeze Them?
You can freeze most Easter baked goods successfully. Store them in airtight containers at freezing temperatures below 0°F for ideal preservation.
Thawing methods depend on your recipe—allow 2-4 hours at room temperature for cakes and pastries, or refrigerate overnight for cream-filled items.
Properly wrapped cookies maintain quality for three months. Ingredient composition affects freezability; butter-based recipes freeze better than those with delicate meringues or fresh toppings.
What Are the Best Substitutes for Eggs in Easter Baking Recipes?
You’ll find several reliable egg substitutes for your Easter baking.
Applesauce and mashed banana work as binding options, though they’ll add moisture and sweetness.
Flax or chia seeds mixed with water create effective leavening alternatives, requiring 15 minutes to gel.
Aquafaba—chickpea liquid—performs exceptionally well for structure.
Commercial egg replacers offer consistent results across recipes.
You’re free to experiment with these substitutes, though adjusting liquid ratios guarantees ideal texture and rise in your holiday creations.
How Long Do Homemade Easter Baked Goods Typically Stay Fresh?
You’ll find that most homemade Easter baked goods maintain peak quality for 2-3 days at room temperature, depending on ingredient composition.
Refrigerator storage extends freshness to 5-7 days, particularly for items containing dairy or eggs.
High-fat formulations—utilizing butter or oil—naturally preserve longer than lean batters.
You should store goods in airtight containers to prevent moisture loss and oxidation.
Freezing extends shelf life substantially, allowing you complete control over when you enjoy your creations without compromise.
Which Easter Recipes Are Safest for Guests With Common Allergies?
You’ll find nut free options ideal for safest Easter baking. Prioritize recipes using eggs, dairy, and gluten-free flour blends.
Implement rigorous cross contact prevention by designating separate utensils, cutting boards, and preparation surfaces. Source ingredients from facilities with certified allergen protocols.
Consider flourless chocolate cakes, meringue-based confections, and dairy-free coconut preparations. Document all ingredient sourcing and handling procedures, enabling your guests to make informed choices about what they consume.
Can I Use Dairy-Free Butter in These Traditional Easter Baking Recipes?
You can absolutely substitute dairy-free butter in traditional Easter recipes.
You’ll notice minimal flavor profile differences with quality brands.
However, you’ll need texture adjustments—dairy-free butter contains more water, so reduce liquid slightly and chill dough longer.
Choose brands with higher fat content for ideal results.
This ingredient swap maintains your baking freedom while accommodating dietary preferences without compromising Easter treats’ structural integrity or taste satisfaction.
Leave a Comment