Key Takeaways
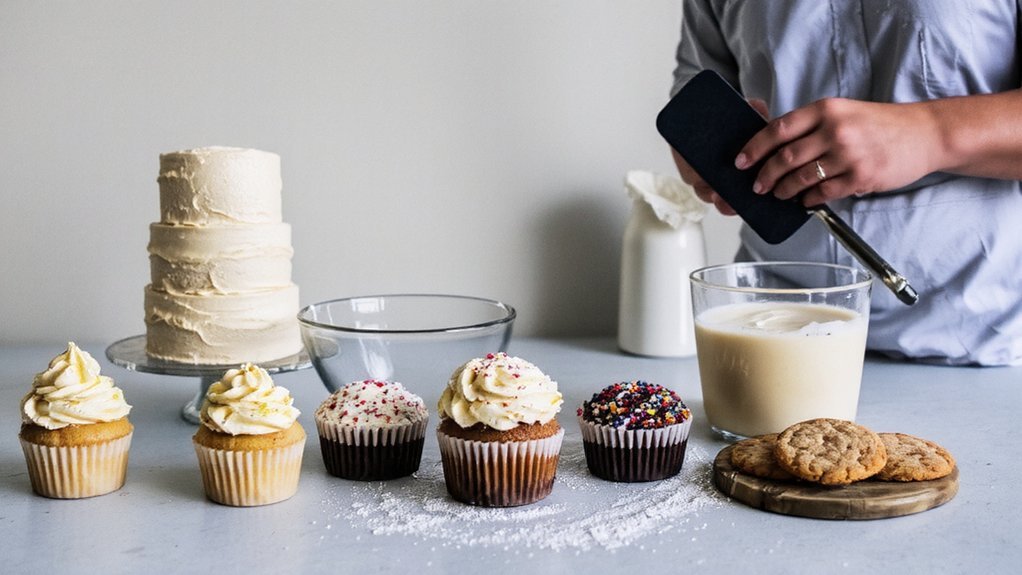
- Classic Vanilla Layer Cake is a reliable family-party centerpiece that serves as the perfect blank canvas for any birthday celebration.
- Decadent Chocolate Fudge Cake delivers professional-grade chocolate intensity and pairs beautifully with bold red wine or espresso for adult gatherings.
- Fruit-Filled Sponge Cake with whipped cream and seasonal berries offers superior shelf life and stays fresh for three days.
- Red Velvet Cake with Cream Cheese Frosting provides signature texture and color when precise measurements and room-temperature ingredients are used.
- Colorful Buttercream Cupcakes allow endless flavor pairings and decorative techniques, integrating seamlessly with balloon garlands for cohesive birthday displays.
Classic Vanilla Layer Cake
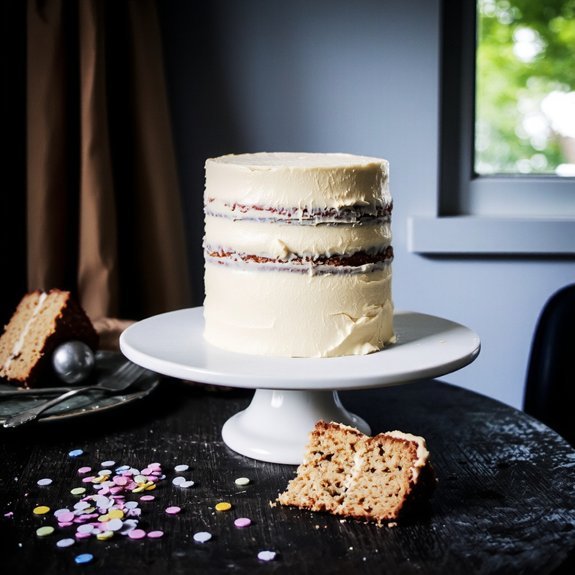
A foundation of precision: you’ll need two cups of all-purpose flour, one and a half teaspoons of baking powder, half a teaspoon of salt, one cup of unsalted butter at room temperature, one and a half cups of granulated sugar, four large eggs, one cup of whole milk, and two teaspoons of vanilla extract.
Cream your butter and sugar until light and fluffy—roughly three minutes.
Incorporate eggs individually, allowing each to fully integrate.
Alternate adding your dry ingredients with milk in three additions, starting and ending with flour.
Mix until just combined.
Divide batter evenly between two greased nine-inch pans.
Bake at 350°F for twenty-five to thirty minutes until a toothpick emerges clean.
Cool completely before frosting.
This family tradition becomes your party centerpiece—a straightforward yet impressive cake that delivers consistent results every time you bake it.
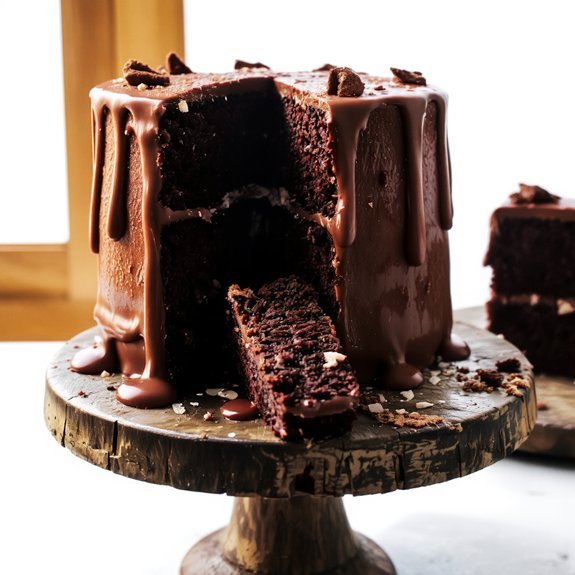
Decadent Chocolate Fudge Cake
For this indulgent creation, you’ll need two cups of all-purpose flour, two cups of granulated sugar, three-quarters cup of unsweetened cocoa powder, two teaspoons of baking soda, one teaspoon of baking powder, one teaspoon of salt, two large eggs, one cup of strong brewed coffee (cooled), one cup of buttermilk, half a cup of vegetable oil, and two teaspoons of vanilla extract.
| Ingredient | Function |
|---|---|
| Coffee | Intensifies chocolate depth |
| Buttermilk | Guarantees tender crumb structure |
| Cocoa powder | Delivers pure chocolate flavor |
| Baking soda | Activates acidity reaction |
| Vegetable oil | Provides moisture and richness |
Combine dry ingredients, then whisk wet components separately before merging. Pour into prepared pans and bake at 350°F for thirty-five minutes. This decadent centerpiece honors celebration traditions across cultures. Pair with bold red wine or espresso for sophisticated enjoyment. You’re crafting a showstopping dessert that commands the birthday table with uncompromising chocolate intensity and professional-grade execution.
Fruit-Filled Sponge Cake
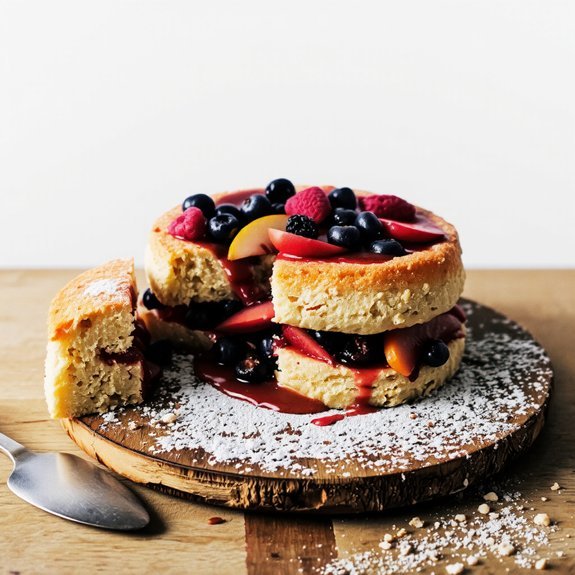
While the fudge cake delivers chocolate’s intense complexity, you’ll now explore a lighter architecture that showcases fresh fruit’s natural brightness.
This sponge cake‘s open crumb structure absorbs fruit juices without becoming soggy, creating a stable foundation that resists degradation during transport.
You’ll whip eggs and sugar to maximum volume, incorporating air that yields tender crumbs. Fold in cake flour gently to maintain lift.
Layer thin sponge rounds with whipped cream and seasonal berries—the cake’s travel durability depends on proper assembly and refrigeration.
Unlike heavier cakes, this design offers superior shelf life when stored at controlled temperatures, staying fresh for three days. You’re building a structure that prioritizes structural integrity while delivering vibrant, unadulterated fruit flavors without excessive density or moisture retention issues.
Colorful Buttercream Cupcakes
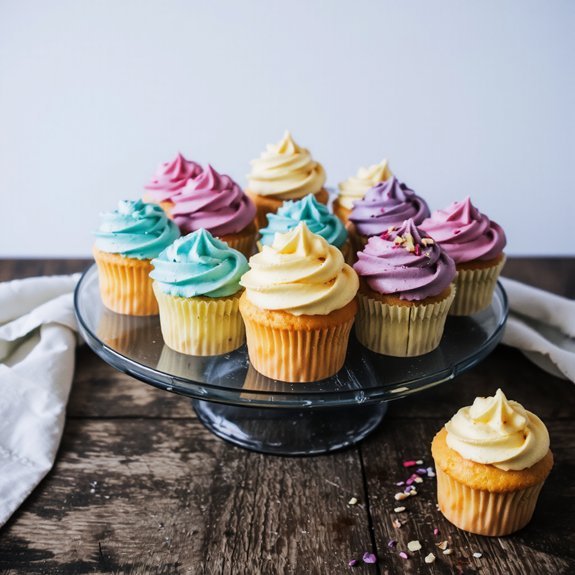
You’ll create vibrant cupcakes by mastering flavor combinations like vanilla-raspberry, chocolate-mint, and lemon-blueberry, each pairing your cake base with complementary buttercream infusions.
Your decorating success depends on achieving the right buttercream consistency—typically 2-3 minutes of beating—and applying techniques like piping rosettes, creating ombré effects, and layering contrasting colors for visual impact.
These technical adjustments in mixing time, food coloring ratios, and piping pressure directly determine your final cupcake presentation and flavor delivery.
Flavor Combinations and Variations
Because buttercream’s neutral base readily accepts flavor infusions and food coloring, it’s the ideal medium for creating cupcakes with distinct taste profiles and visual appeal.
You’ll gain complete creative control by experimenting with:
- Herb infusions – steep lavender, rosemary, or mint in your buttercream for sophisticated, botanical notes
- Spice blends – incorporate cardamom, cinnamon, or clove for warming complexity
- Citrus zests – blend lemon, orange, or lime oils for bright, punchy flavors
- Extract combinations – layer almond with vanilla or add coffee for depth
You’re not limited to standard variations.
You can infuse your buttercream by heating it gently with whole herbs, then straining before beating.
Spice blends work best when bloomed in warm butter first, maximizing their potency.
This technique-driven approach guarantees your cupcakes deliver both visual impact and genuine flavor differentiation at every bite.
Decorating Techniques and Tips
Transforming buttercream into vibrant, visually striking designs requires mastery of both pigmentation and piping technique. You’ll achieve professional results by controlling consistency—soft peak for delicate swirls, stiff peak for structural elements. Gel-based food coloring prevents excess moisture, preserving your buttercream’s integrity while delivering saturated hues.
| Technique | Tool | Consistency | Effect |
|---|---|---|---|
| Rosettes | Wilton 1M | Stiff Peak | Dimensional texture |
| Ombré | Offset Spatula | Soft Peak | Gradient shifts |
| Drip | Squeeze Bottle | Thin | Elegant contrast |
| Borders | Round Tip | Stiff Peak | Definition |
| Marbling | Palette Knife | Medium | Abstract patterns |
You’ll elevate presentation by integrating balloon garlands and strategic centerpiece styling around your display. These decorative elements frame your cupcakes, creating cohesive birthday installations that command attention while letting your buttercream artistry shine independently.
Decorated Sugar Cookies
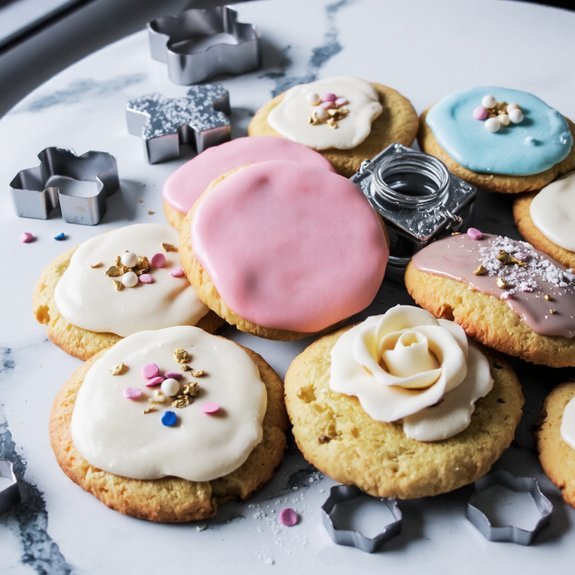
You’ll master decorated sugar cookies by learning frosting techniques that require precise consistency—typically a 15-second spread consistency for base coats and a 10-second consistency for piping details.
Your design execution depends on controlling piping bag pressure, nozzle angle, and hand speed to create clean lines, dots, and dimensional elements.
You can elevate your cookies through strategic layering of contrasting icing colors, flood-and-detail methods, and surface texturing with edible glitter or royal icing accents applied before the base layer sets.
Frosting Techniques and Tips
Once you’ve baked your sugar cookies to golden perfection, the frosting consistency becomes your primary concern—it’ll determine whether your decorative lines stay crisp or bleed into adjacent colors.
Master these essential frosting techniques:
- Royal icing ratios – Combine 3 egg whites with 1 pound powdered sugar for ideal consistency that hardens completely
- Piping bag control – Use steady hand pressure and 45-degree angles for clean lines and defined shapes
- Transport stability – Flood cookies with thin icing first, then pipe details after it sets to prevent smudging
- Sanitation practices – Sanitize piping tips between color changes and use food-grade equipment exclusively
You’ll achieve professional results by maintaining precise icing thickness.
Too thin floods uncontrollably; too thick clogs your piping bag. Adjust water content incrementally until you’ve reached that sweet spot where frosting flows smoothly yet holds its shape. Your decorated cookies’ll transport safely and display impeccably.
Creative Design Ideas
With your frosting consistency perfected and piping skills sharpened, you’re ready to channel that technical control into distinctive designs.
Transform plain sugar cookies into statement pieces that complement your party backdrops and elevate favor packaging aesthetics.
Start by sketching designs directly onto cooled cookies using edible markers—geometric patterns, monograms, or abstract shapes work brilliantly.
Layer contrasting frosting colors using thin piping tips for precision linework.
Royal icing hardens to create dimension; apply it strategically for raised details that catch light.
Consider negative space deliberately.
White cookies with minimal frosting accents photograph exceptionally well against colorful backgrounds.
Metallic dust suspended in vodka adds sophistication without compromising texture.
Push your boundaries with unconventional combinations: incorporate hand-painted elements, textured finishes using sanding sugar, or deliberate drips for contemporary flair.
Your technical mastery allows creative freedom—use it boldly.
Lemon Drizzle Pound Cake
A balance of bright citrus and buttery richness defines this classic cake, which relies on precise measurements and proper creaming technique to achieve its tender, even crumb.
A balance of bright citrus and buttery richness defines this classic cake through precise measurements and proper technique.
You’ll master texture science by understanding how air incorporation during creaming creates the cake’s delicate structure.
- Zest three lemons into softened butter before creaming for maximum flavor extraction
- Maintain 68-72°F ingredient temperatures to optimize emulsification
- Alternate dry ingredients and buttermilk in three additions for consistent texture
- Apply glaze while cake cools to facilitate proper absorption
Your storage methods matter: keep this cake wrapped in parchment at room temperature for two days, or refrigerate up to five days.
The citrus compounds remain stable, maintaining brightness and structural integrity throughout.
Red Velvet Cake With Cream Cheese Frosting
You’ll need to combine buttermilk, cocoa powder, and red food coloring with your dry ingredients while maintaining precise measurements to achieve the cake’s signature texture and color.
Your frosting technique depends on bringing room-temperature cream cheese and butter together until they’re fully incorporated before you gradually add powdered sugar to avoid lumps.
You’ll pipe or spread your frosting in smooth, even layers between cake tiers and across the top, using an offset spatula or piping bag to create clean edges and decorative swirls that showcase the frosting’s rich, tangy flavor.
Ingredient Selection and Preparation
Success with red velvet cake hinges on gathering precise measurements and understanding how each component functions within the formula.
You’ll need to source quality ingredients that work in concert to achieve the cake’s signature texture and color.
- Dutch-process cocoa powder—just ½ teaspoon for subtle depth
- Buttermilk and vinegar—they react chemically to tenderize crumb
- Red food coloring or seasonal sourcing of natural alternatives like beet juice
- Cream cheese frosting components—ensure room-temperature butter and full-fat cream cheese
You’re free to explore allergen alternatives like plant-based buttermilk substitutes or dairy-free cream cheese if you’re catering to dietary needs.
Measure everything precisely; baking demands accuracy.
Pre-sift your dry ingredients and bring all components to room temperature before combining.
Frosting Technique and Decoration
Once your cake layers’ve cooled completely, the frosting becomes your vehicle for achieving that signature red velvet finish.
You’ll need precise temperature control—keep your cream cheese frosting between 65-70°F for ideal spreadability and stability.
Apply a crumb coat first, a thin frosting layer that seals in debris before your final coat.
For decoration, implement stencil layering techniques that let you create intricate patterns without compromising structural integrity.
Position your stencil firmly against the frosted surface, then dust with cocoa powder or edible glitter for sharp, defined designs.
Work methodically.
Use an offset spatula with confident, deliberate strokes to achieve smooth, professional surfaces. Chill between applications if needed.
Your frosting technique separates amateur bakes from show-stopping centerpieces that command attention and deliver the visual impact your birthday cake deserves.
Strawberry Shortcake
Layers of tender sponge cake, whipped cream, and macerated strawberries create this classic dessert.
You’ll master shortcake origins rooted in British tea traditions, then evolved into America’s beloved summer staple.
Here’s your technique breakdown:
- Prepare your sponge with precise flour-to-egg ratios for ideal crumb structure
- Execute berry maceration by combining hulled strawberries with sugar 2-4 hours ahead
- Whip heavy cream to stiff peaks without overworking the mixture
- Assemble components immediately before serving to prevent sogginess
You’ll want room-temperature ingredients for superior cake rise.
Your shortcake won’t tolerate shortcuts—measure accurately and respect timing.
The macerated berries release their juices, creating that signature syrupy layer you’re after.
Stack strategically: cake, cream, berries, repeat.
This approach gives you control over moisture distribution and structural integrity.
Your freedom lies in customizing berry varieties while maintaining technical precision.
Brownie Bites and Blondies
While strawberry shortcake demands restraint and timing, brownie bites and blondies‘ll reward you with forgiving chemistry and dense, fudgy results.
You’ll control texture contrast by adjusting cocoa ratios and fat content—butter, chocolate, and eggs create that signature crumb structure.
Mix in ideas freely: fold brown butter for depth, add espresso powder to amplify chocolate notes, or incorporate sea salt for complexity.
Your technique matters here.
Melt chocolate and butter together, whisk eggs with sugar until pale, then fold dry ingredients minimally to avoid overdevelopment.
Brownies need just enough gluten activation for structure; blondies rely on brown sugar’s molasses for moisture and chew.
Bake at precise temperatures—325°F guarantees even cooking without burnt edges.
These portable bites deliver bold flavor without fussy assembly, making them ideal birthday centerpieces for anyone who values simplicity and impact.
Puff Pastry Cream Puffs
Mastering choux pastry—a simple dough of butter, water, flour, and eggs—demands understanding how steam creates those signature hollow interiors.
You’ll heat the mixture until it pulls from the pan, then incorporate eggs individually for proper structure.
Here’s what you need to master:
- Pipe uniform portions onto parchment for consistent baking
- Bake at high temperature initially, then lower heat to dry interiors
- Fill with pastry cream, whipped cream, or savory fillings
- Customize with chocolate glaze or powdered sugar coating
These portable desserts transcend traditional birthday fare.
You’re not confined to sweet applications—try herb-infused cream or chicken salad for versatility.
The technique’s precision rewards your attention: proper egg incorporation and oven timing yield reliably crispy shells with creamy centers.
You’ve got complete control over flavor profiles and presentations, making cream puffs an unrestricted canvas for your creativity.
Frequently Asked Questions
How Far in Advance Can I Bake Birthday Cakes Without Losing Freshness?
You can bake your birthday cake up to two days ahead without compromising quality. Store it in an airtight container at room temperature—proper temperature control prevents staleness and moisture loss.
For extended shelf life, refrigerate for up to five days or freeze unfrosted layers for three months. Frosting acts as a protective barrier, extending freshness considerably.
You’ve got flexibility here: bake components separately, then assemble and decorate the morning of your celebration for ideal taste and texture.
What Are the Best Dairy-Free Substitutes for Butter and Eggs in Baking?
You’ll find coconut oil replaces butter in a 1:1 ratio, delivering moisture and richness without dairy restrictions.
For eggs, aquafaba methods offer remarkable binding power—three tablespoons of chickpea liquid equals one egg. You’re liberated from conventional baking constraints. Aquafaba whips into meringues and foams, while coconut oil creates tender crumbs. These substitutions demand precision in measurement and mixing techniques, but they’ll unleash your creative baking freedom without compromising structure or flavor profiles in your birthday creations.
Can I Freeze Decorated Cakes and Cupcakes Before Serving at Parties?
You can absolutely freeze decorated cakes and cupcakes.
Buttercream Freezability works best—it’ll hold up to three months when properly wrapped.
Fondant Stability remains excellent when frozen; you’re not compromising structural integrity.
Wrap everything airtight to prevent freezer burn, then thaw at room temperature before serving.
You’ll gain complete control over your party prep timeline, eliminating last-minute stress while maintaining your cake’s visual appeal and taste profile exactly as you’ve designed it.
How Do I Prevent Cakes From Sinking in the Middle While Baking?
You’ll prevent cake sinking by maintaining precise oven temperature—avoid opening the door during baking.
Don’t overmix your batter; combine ingredients until just incorporated to prevent deflation.
Use room-temperature eggs and liquids for ideal incorporation.
Fill pans only two-thirds full, allowing proper rise.
Confirm your leavening agents—baking powder and baking soda—are fresh and accurately measured.
These technique-driven adjustments give you control over your baking results.
What’s the Easiest Way to Level and Stack Multiple Cake Layers Evenly?
You’ll achieve even layers by using Cake Strips—they regulate heat distribution, preventing doming and ensuring level surfaces you don’t need to trim.
After baking, employ the Doweling Method: insert dowel rods vertically through stacked layers at strategic points.
This stabilizes your structure, prevents settling, and gives you complete control over assembly.
You’re mastering the technical foundation that separates amateur stacks from professional-grade constructions.


Leave a Comment