Key Takeaways
- Mix 1¾ cups flour, 1 tsp baking soda, ½ tsp salt, and spices; fold into wet ingredients until just combined.
- Cream melted butter with ¾ cup sugar, then add 2–3 beaten eggs, 1 tsp vanilla, and 1¼ cups mashed ripe bananas.
- Fold ¾–1 cup chopped walnuts or pecans into batter last to distribute evenly without overmixing.
- Fill muffin cups three-quarters full and bake at 375°F for 18–20 minutes until a toothpick emerges clean.
- Use room-temperature ingredients (68–72°F) and avoid overmixing to prevent dense, sunken centers and ensure light, moist crumbs.
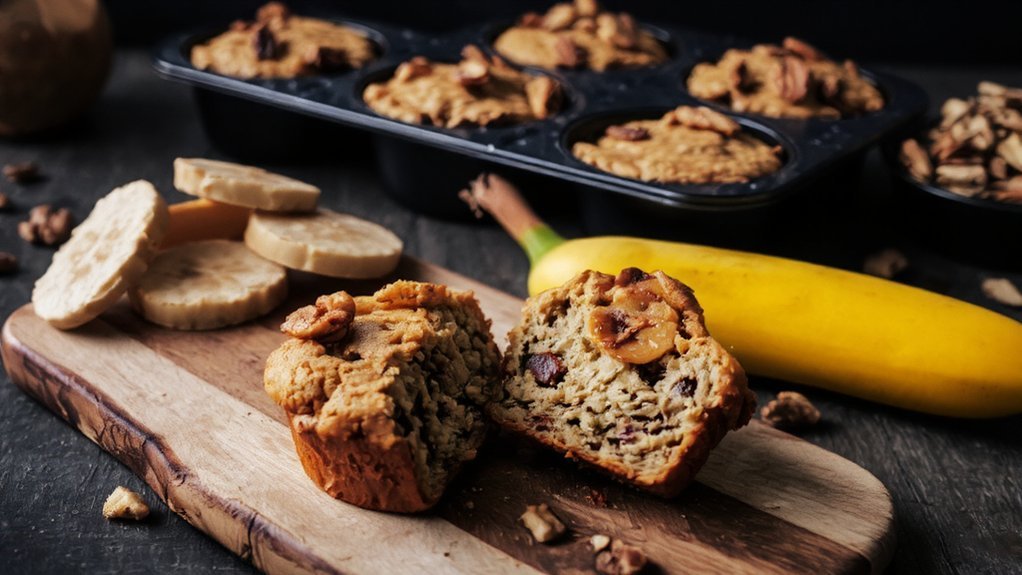
Why Banana Nut Muffins Are Perfect for Any Occasion

Whether you’re planning a quick breakfast or preparing for a formal gathering, banana nut muffins deliver consistent results with minimal preparation.
You’ll appreciate their versatility as a portable snack that fits any lifestyle. These muffins work equally well for casual weekday mornings or elegant brunch spreads, making them a true crowd pleaser.
Banana nut muffins transition seamlessly from casual weekday breakfasts to elegant brunch settings, proving themselves as the ultimate crowd-pleasing treat.
Each muffin provides approximately 250 calories with 8 grams of protein and 15 grams of fiber, supporting sustained energy without excessive sugar.
The precise ratio of ripe bananas to flour—typically 1:2—ensures ideal texture and moisture. You can customize nuts, swapping walnuts for pecans based on preference.
Their no-fuss preparation requires basic mixing techniques: combine dry ingredients separately, then fold in wet components.
This method takes roughly twenty minutes from bowl to oven. You’re not bound by rigid rules; these muffins adapt to your dietary choices and ingredient availability, offering genuine freedom in baking.
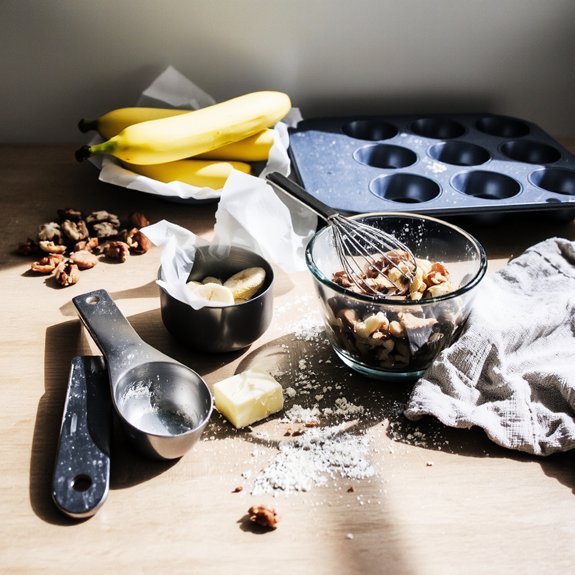
Essential Ingredients You’ll Need

You’ll combine 1¾ cups all-purpose flour, 1 teaspoon baking soda, ½ teaspoon salt, and ½ teaspoon cinnamon for your dry mixture, which provides structure and leavening while adding 15g protein per serving.
Your wet ingredients—three ripe bananas (about 1¼ cups mashed), ⅓ cup melted butter, ¾ cup sugar, one egg, and ½ teaspoon vanilla extract—create moisture and bind the batter while contributing essential fats and carbohydrates.
Fold in ¾ cup chopped walnuts or pecans last to distribute them evenly without overmixing, which’d result in dense, tough muffins.
Dry Ingredients Breakdown
Before you combine your wet ingredients, you’ll want to gather and measure your dry components with precision, as they’re the structural foundation of your muffins.
You’ll need to understand the critical balance of your dry ingredients:
- All-purpose flour varieties (1¾ cups) provide gluten structure, though whole wheat flour adds fiber and nutritional density if you’re willing to adjust your leavening ratios accordingly
- Leavening ratios demand exactness—2 teaspoons baking powder and ½ teaspoon baking soda create proper rise without metallic aftertaste
- Complementary dry components include ½ teaspoon salt for flavor enhancement and ¼ teaspoon nutmeg for depth
Whisk these elements together thoroughly before introducing wet ingredients.
Proper aeration of your dry mixture guarantees even distribution of leavening agents, preventing dense pockets.
Your muffins’ crumb structure depends entirely on respecting these measurements and mixing techniques.
Wet Ingredients Overview
Balancing moisture and fat creates the tender crumb structure that separates exceptional banana nut muffins from dense, heavy alternatives.
You’ll need ripe bananas—approximately three medium ones—providing natural sweetness and moisture.
Eggs serve as your emulsifier, binding ingredients while incorporating air for lift. Typically, you’ll use three large eggs per batch.
Vegetable oil or melted butter contributes richness; most recipes call for half a cup.
Buttermilk or yogurt adjusts your liquid ratios, ensuring proper hydration without excess density. You’re looking at roughly one cup total liquid content.
This combination of fats and liquids works synergistically, with eggs managing emulsifier roles that stabilize your batter.
Understanding these proportions gives you control over texture, allowing you to achieve consistently moist muffins that won’t crumble or dry out.
Selecting the Ripest Bananas for Maximum Flavor

You’ll want to select bananas displaying a yellow skin with brown speckles, which indicates peak ripeness and ideal sugar development for your muffins.
Conduct a gentle squeeze test and smell assessment—ripe bananas yield slightly to pressure and emit a sweet, fragrant aroma rather than a starchy odor. These sensory indicators confirm the fruit has converted starches into sugars, delivering maximum flavor and moisture to your batter.
Spotting Yellow With Brown Spots
How do you know when bananas have reached their peak ripeness for baking?
You’ll want bananas that display visual grading characteristics: mostly yellow skin with brown speckles throughout.
This coloration indicates ideal starch-to-sugar conversion, yielding approximately 90mg of potassium per medium fruit.
Here’s what you’re looking for:
- Color progression – Yellow base with brown spots signals peak ripeness; avoid green or fully brown specimens
- Firmness – Bananas should yield slightly to gentle pressure without mushiness, indicating proper postharvest handling
- Sugar content – Brown spotting reflects enzymatic breakdown, maximizing natural sweetness for your muffins
You’ve got freedom in your timing—bananas at this stage work perfectly within a 2-3 day window.
If you’re baking immediately, slightly less-spotted bananas work fine.
Store extras in your freezer for later use, peeled and sealed.
Smell Test for Ripeness
Beyond visual inspection, your nose provides crucial sensory data for selecting peak-ripeness bananas. You’ll notice that aroma intensity increases substantially as bananas mature, reaching ideal potency when the fruit’s sweet fragrance becomes unmistakable.
Use scent comparison by smelling multiple bananas simultaneously—ripe specimens emit a distinctly stronger, sweeter aroma than underripe counterparts.
Position the banana near your nose and inhale deeply. A pronounced fruity scent indicates peak ripeness, meaning maximum natural sugars have developed.
This matters for muffin quality because ripe bananas deliver superior sweetness and moisture to your batter, reducing added sugar requirements.
Trust this olfactory test alongside visual cues. You’re seeking bananas where aroma intensity overwhelms any green grass-like scent.
This combination guarantees ideal flavor development in your finished muffins while giving you complete control over your ingredient selection.
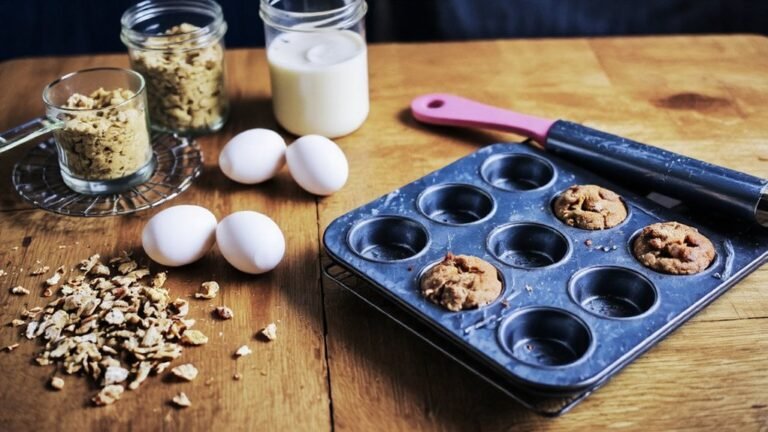
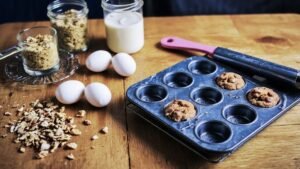
Gathering Your Baking Tools and Equipment
Assembling the right equipment guarantees consistent results and streamlines your muffin-baking process. You’ll need essential tools that won’t compromise your baking independence or quality.
- Measuring cups and spoons—precise portions guarantee proper ratios of flour, sugar, and leavening agents for ideal texture and rise
- A 12-cup muffin tin with parchment liners—prevents sticking and simplifies cleanup while promoting even heat distribution
- A sturdy whisk and mixing bowls—aerating ingredients incorporates oxygen, essential for light, fluffy muffins with superior crumb structure
Organize your workspace layout strategically: place dry ingredients on one side, wet ingredients on another. This arrangement prevents cross-contamination and expedites your workflow.
Keep safety tips front-and-center by securing your workspace away from distractions and maintaining clear counter space. Preheat your oven to 375°F before combining ingredients, maintaining thermal consistency throughout baking.
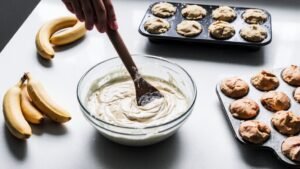
Step-by-Step Baking Instructions
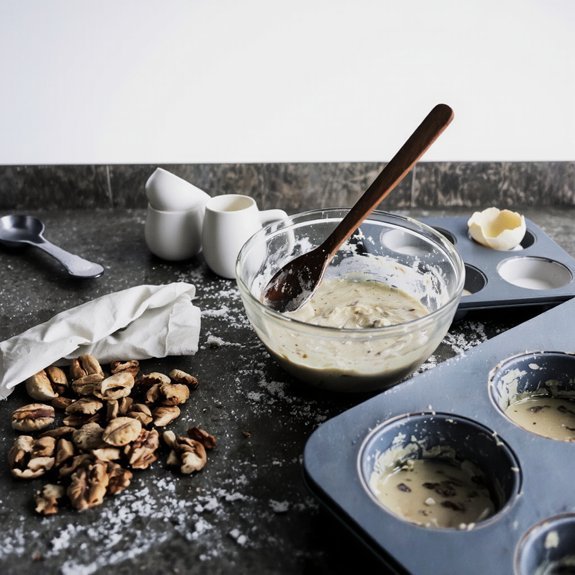
Once you’ve preheated your oven to 375°F and organized your workspace, you’re ready to combine your ingredients with precision.
In a large bowl, mash three ripe bananas until you’ve achieved a smooth consistency. Whisk together two cups all-purpose flour, one teaspoon baking soda, and half a teaspoon salt. In another bowl, cream together one-third cup butter and three-quarters cup sugar until light and fluffy, then incorporate two beaten eggs and one teaspoon vanilla extract.
Mash ripe bananas, whisk dry ingredients, and cream butter with sugar before combining with eggs and vanilla extract.
Fold the dry ingredients into the wet mixture, stirring until just combined. Add one cup chopped walnuts. Distribute the batter evenly among greased muffin cups, filling each three-quarters full.
Place your muffins in the preheated oven. Your bake monitoring should occur around the eighteen-minute mark—insert a toothpick into the center. When it emerges clean, you’ve achieved perfect golden-brown muffins packed with approximately 280 calories each.
Tips for Achieving Moist and Fluffy Muffins
You’ll achieve ideal texture by avoiding overmixing your batter—stir just until your dry and wet ingredients combine, as excessive mixing develops gluten and produces dense, tough muffins.
Room temperature ingredients blend more uniformly, ensuring even moisture distribution and allowing leavening agents to work more effectively throughout your batter.
These two techniques work together to create muffins with the light crumb structure and moisture retention you’re aiming for.
Don’t Overmix Your Batter
One of the most critical mistakes in muffin preparation is overmixing the batter, which activates gluten development and results in dense, tough crumbs rather than the light, tender texture you’re aiming for.
To master this technique, you’ll want to follow these guidelines:
- Mix dry ingredients separately, then fold wet components together until just combined—this preserves air incorporation and prevents excessive protein networks from forming
- Stop mixing immediately when you spot flour streaks; lumps will disappear during baking without compromising texture
- Use a spatula rather than an electric mixer for the final combination, giving you precise control over blending
Your muffins deserve the freedom from heaviness.
Use Room Temperature Ingredients
Because cold ingredients don’t blend uniformly into your batter, they compromise the emulsification process that traps moisture and creates lift. You’ll achieve superior results by bringing eggs, buttermilk, and butter to 68–72°F before mixing.
Strategic prep scheduling guarantees ideal texture and rise. Cold ingredients create uneven distribution, resulting in dense pockets and compromised crumb structure. Room temperature ingredients incorporate seamlessly, maximizing your muffins’ moisture retention and volume.
| Ingredient | Cold Temperature | Room Temperature |
|---|---|---|
| Eggs | Poor emulsification | Complete binding |
| Buttermilk | Separation risk | Uniform integration |
| Butter | Lumpy texture | Smooth incorporation |
This energy efficiency approach requires minimal intervention—simply remove ingredients 30 minutes before baking. You’ll gain consistent, professional-quality muffins without complicated techniques. Precise temperature control liberates you from guesswork, delivering fluffy results every time.
Creative Mix-In Ideas to Customize Your Batch
Elevating your banana nut muffins beyond the traditional recipe doesn’t require complicated techniques—simply incorporating strategic mix-ins can dramatically enhance both flavor profiles and nutritional content.
You’ll discover that texture contrasts and surprise centers transform ordinary muffins into extraordinary treats.
Consider these proven additions:
- Dark chocolate chips (60g per batch) – Deliver antioxidants while creating pockets of richness that complement banana’s natural sweetness.
- Greek yogurt swirl (2 tablespoons layered before baking) – Boosts protein content to 8g per muffin and creates creamy surprise centers.
- Toasted coconut flakes (45g mixed in) – Add crispy texture contrasts while introducing healthy fats and subtle tropical notes.
You’re free to experiment with hemp seeds, dried cranberries, or peanut butter ribbons. These customizations maintain structural integrity while maximizing nutritional value and flavor complexity.
Storage and Shelf Life Guidelines
After you’ve perfected your banana nut muffins with custom mix-ins, proper storage becomes the difference between peak freshness and disappointment.
Room temperature storage works for two days maximum in airtight containers.
For extended preservation, freezer storage extends shelf life up to three months, maintaining nutritional integrity and moisture content. Wrap individual muffins in parchment paper before placing them in freezer-safe containers to prevent freezer burn.
Always use labeling dates on your containers—noting both the preparation date and recommended consumption deadline prevents guesswork.
Thaw frozen muffins at room temperature for thirty minutes before serving. Refrigeration isn’t necessary unless your kitchen exceeds 72°F, as it accelerates staling. This methodical approach preserves the structural quality and flavor profile you’ve worked to achieve.
Troubleshooting Common Baking Problems
Why do your muffins sink in the middle or dome excessively?
You’re likely facing common baking pitfalls that undermine your results.
Sunken centers typically stem from three controllable factors:
- Overmixing batter – Excessive mixing develops gluten, causing muffins to rise then collapse; fold ingredients gently until just combined.
- Inaccurate oven temperature – Use an oven thermometer; if your temperature’s off, muffins won’t set properly before falling.
- Soggy bottoms from moisture – Position racks in the upper-middle section; reduce baking time slightly if needed.
You’ll also prevent doming by filling cups only two-thirds full.
Monitor your oven’s actual temperature rather than trusting its dial.
Precise measurements and professional technique eliminate guesswork.
Your freedom from failed batches comes through mastering these fundamentals.
Variations and Flavor Combinations to Try
Once you’ve mastered the basic banana nut muffin, you can transform the recipe by swapping ingredients and adjusting ratios to suit your preferences. Explore global inspirations and unexpected fusions to elevate your baking repertoire.
| Variation | Key Ingredients | Nutritional Impact |
|---|---|---|
| Chai Spiced | Cardamom, ginger, cloves | +15 antioxidants |
| Chocolate Swirl | Dark cocoa, 70% cacao | +8g fiber per muffin |
| Tropical Twist | Coconut oil, macadamia nuts | +12g healthy fats |
| Mediterranean | Olive oil, walnuts, orange zest | Enhanced polyphenols |
| Maple Bourbon | Bourbon extract, maple syrup | Caramelized depth |
You’ll maintain structural integrity by keeping your wet-to-dry ratio consistent. Adjust sweetness proportions when incorporating acidic elements like citrus or cocoa. These combinations offer freedom to customize your muffins while preserving their moist crumb and nutty foundation.
Frequently Asked Questions
Can I Make Banana Nut Muffins Without Eggs for Vegan Baking?
You can absolutely make vegan banana nut muffins by substituting eggs with flax eggs or silken tofu. Mix one tablespoon ground flaxseed with three tablespoons water per egg, letting it sit five minutes.
Alternatively, use one-quarter cup silken tofu blended smooth per egg. Both options provide binding structure while maintaining moisture content. Flax eggs deliver 2.3 grams omega-3 fatty acids per serving; silken tofu contributes 1.9 grams protein. You’ll achieve identical texture and rise without compromising nutritional integrity or flavor profile.
How Do I Convert This Recipe to Make Mini or Jumbo Muffins?
You’ll adjust your batter distribution based on pan sizes. Fill mini muffin cups two-thirds full; they’ll bake in 12-15 minutes at your standard temperature. Jumbo muffins need three-quarter-full cups and require 25-30 minutes. Monitor internal temperature—you’re targeting 200°F for doneness.
Precise measurements matter: mini batches yield 24 muffins, while jumbo produces 6-8. This flexibility lets you control portions and customize your baking freedom without altering the core recipe formula.
What’s the Best Way to Freeze Banana Nut Muffins for Later?
You’ll achieve ideal texture preservation by flash freezing your muffins first. Arrange cooled muffins on a baking sheet for two hours until solid, then transfer them to airtight freezer bags, removing excess air.
This method prevents moisture loss and ice crystal formation. You’re free to store them up to three months at 0°F.
Thaw at room temperature for one hour before serving, maintaining nutritional integrity and that fresh-baked quality you deserve.
Can I Substitute All-Purpose Flour With Gluten-Free Flour Alternatives?
You can absolutely substitute all-purpose flour with gluten-free alternatives.
Experiment with blend ratios—typically using a 1:1 replacement works well. However, you’ll need binding agents like xanthan gum or psyllium husk to replicate gluten’s structural properties.
Add 1/4 teaspoon xanthan gum per cup of gluten-free flour. This approach gives you complete control over your nutritional profile while maintaining the muffin’s texture and rise.
You’re free to choose quality blends that suit your dietary preferences.
How Do I Prevent Nuts From Sinking to the Bottom of Muffins?
You’ll prevent nuts from sinking by coating them lightly with flour before folding them into your batter.
This flour coating increases friction and keeps them suspended throughout.
You’ve also got to maintain proper batter consistency—it shouldn’t be too thin or too thick.
Aim for a medium, yogurt-like texture that’ll hold your nuts evenly distributed.
This technique guarantees you’re getting consistent nut distribution in every bite you take.


Leave a Comment