Key Takeaways
- Cream room-temperature butter and sugar for 2 minutes until light and fluffy for optimal cake structure and texture.
- Alternate adding eggs one at a time, then fold in dry ingredients and milk to avoid gluten overdevelopment.
- Gently fold rainbow sprinkles into batter just before dividing between pans to preserve color and distribution.
- Bake at 350°F for 28–32 minutes; cool in pans 10 minutes, then transfer to wire racks completely.
- Frost with American buttercream, cream cheese, or whipped cream; apply sprinkles immediately while frosting surface remains tacky.
Ingredients You’ll Need
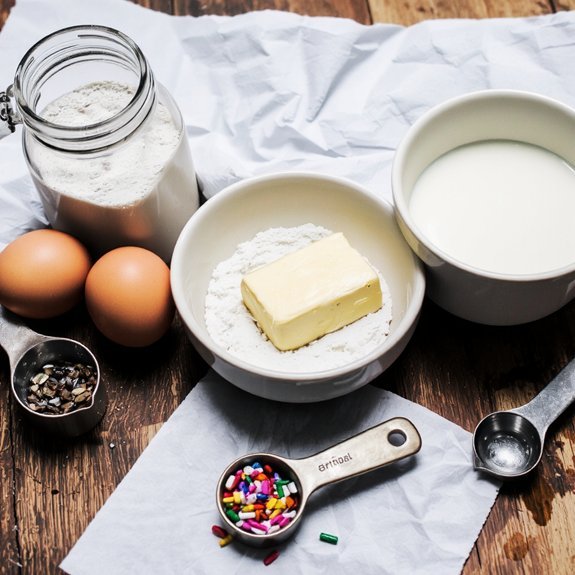
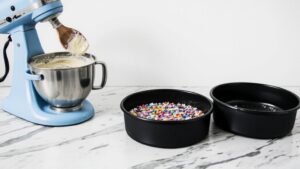
You’ll need two cups of all-purpose flour, two teaspoons of baking powder, half a teaspoon of salt, twelve ounces of unsalted butter at room temperature, one and three-quarter cups of granulated sugar, four large eggs, one teaspoon of vanilla extract, three-quarters cup of whole milk, and three-quarters cup of rainbow sprinkles.
For budget ingredients, you can substitute conventional all-purpose flour with organic options without compromising texture or rise. Room temperature butter’s critical—it’ll cream properly with sugar, creating the emulsion necessary for ideal crumb structure. Organic eggs aren’t required but enhance flavor complexity.
Room temperature butter creams properly with sugar, creating the emulsion necessary for ideal crumb structure and texture.
You’ll combine dry ingredients separately to distribute leavening agents evenly. The milk incorporates moisture while preventing overdevelopment of gluten. Rainbow sprinkles distribute throughout the batter, creating visual appeal and bursts of flavor.
Assemble everything before beginning—this mise en place approach makes certain you won’t miss components, guaranteeing consistent, reliable results every time you bake.
Step-by-Step Baking Instructions
Now that you’ve assembled your ingredients, it’s time to transform them into cake batter. Begin by preheating your oven to 350°F, ensuring proper oven calibration for even baking.
In a large bowl, cream together softened butter and sugar until light and fluffy, approximately two minutes.
Following the correct mixing order, alternate adding eggs one at a time, then incorporate your dry ingredients—flour, baking powder, and salt. Pour in vanilla extract and milk, mixing until just combined.
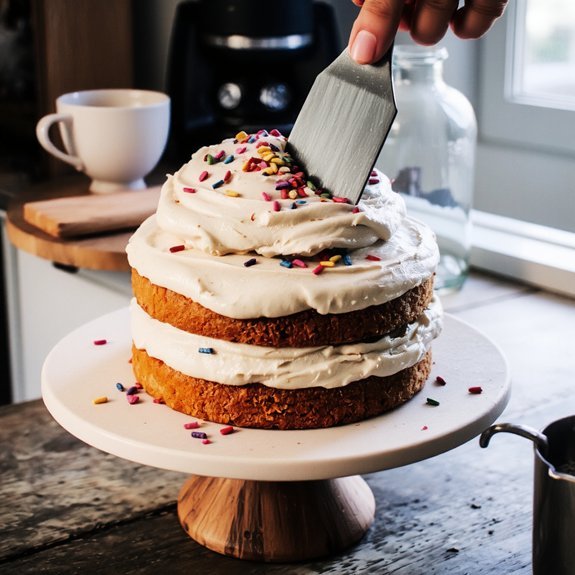
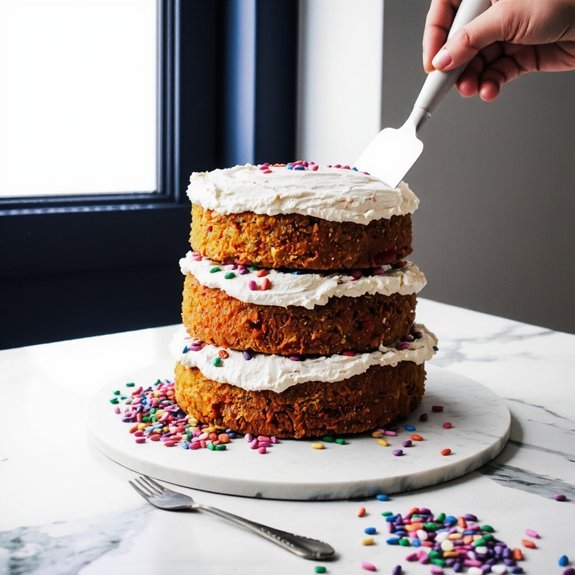
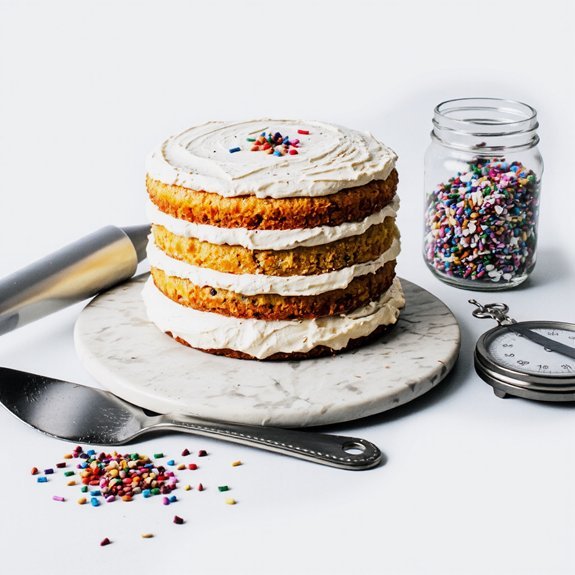
Fold in your sprinkles gently to maintain their vibrant color. Divide batter evenly between two greased, floured cake pans.
Bake for 28-32 minutes until a toothpick inserted in the center emerges clean. Cool in pans for 10 minutes before inverting onto wire racks for complete cooling.
Making the Perfect Frosting
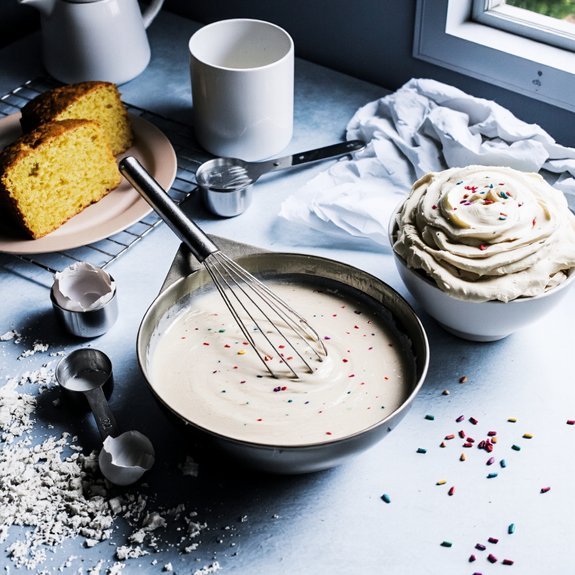
While your cake layers cool completely, you’ll prepare a classic American buttercream by creaming together 1 cup of softened unsalted butter and 3-4 cups of powdered sugar on medium speed for approximately three minutes until the mixture achieves a light, fluffy consistency with small air pockets throughout.
The texture chemistry here’s essential—you’re incorporating air to create a spreadable consistency.
Add 2-3 tablespoons of heavy cream and 1 teaspoon vanilla extract, beating until fully incorporated.
For ideal results, follow these steps:
- Maintain your mixer at consistent medium speed to prevent overworking the buttercream
- Clean your beaters between batches for equipment maintenance and prevent residue buildup
- Achieve a 45-degree angle consistency for easy application and smooth frosting coverage
You’re now ready to frost your funfetti cake with complete control over texture and flavor intensity.
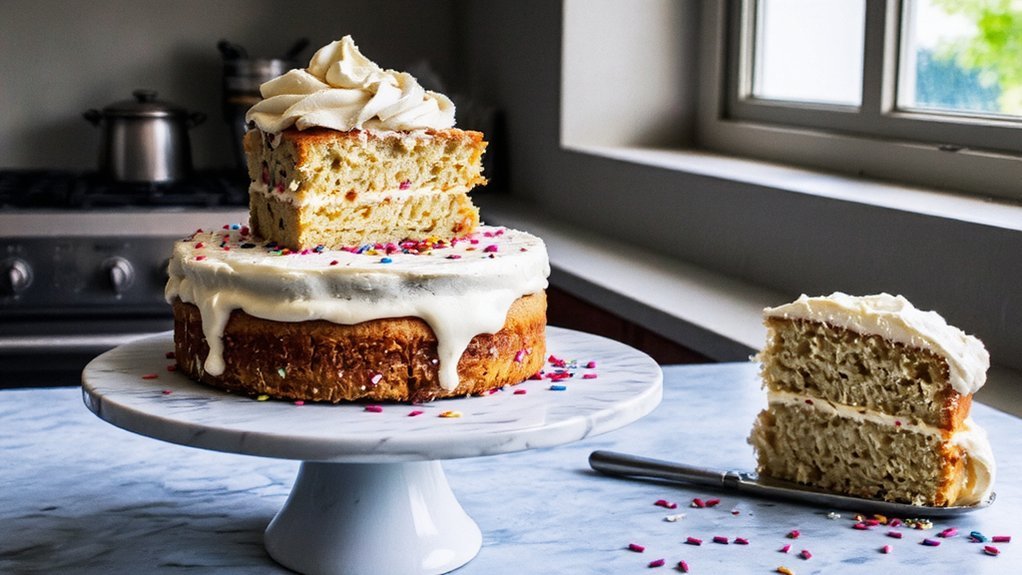
Decorating Your Funfetti Cake
You’ll want to select a frosting color that complements your cake’s aesthetic—consider pastel hues for a classic look or vibrant shades for bold contrast.
Apply your chosen frosting in an even layer using an offset spatula, then immediately distribute sprinkles across the surface in a uniform pattern to guarantee maximum adhesion before the frosting sets.
For precision placement, you can use tweezers to position larger sprinkles or hand-scatter smaller ones in deliberate sections rather than randomly tossing them across the entire cake.
Frosting and Color Choices
What’ll transform your cake from ordinary to spectacular? Your frosting and color selection.
You’ve got complete creative control here—don’t hold back.
Consider these frosting options:
- American buttercream: 2 cups powdered sugar, ½ cup softened butter, 2-3 tablespoons milk, and ½ teaspoon vanilla extract
- Cream cheese frosting: 8 oz cream cheese, ¼ cup butter, 2 cups powdered sugar for tangier richness
- Whipped cream frosting: 2 cups heavy cream, 3 tablespoons sugar, ½ teaspoon vanilla for lightness
Leverage color psychology strategically.
Bright yellows and pinks evoke joy and celebration.
Blues and purples suggest sophistication.
Design thematic palettes matching your party’s aesthetic—coordinate sprinkle hues with frosting tones for cohesion.
Apply frosting at 68°F for ideal spreadability.
Chill between layers.
Your color choices establish the cake’s entire visual impact.
Sprinkle Placement Techniques
Strategic sprinkle application transforms your frosted cake into a visually cohesive dessert.
You’ll control the final aesthetic by mastering placement geometry and distribution density.
Start by selecting your sprinkle type—rod-shaped jimmies or spherical nonpareils—as each responds differently to electrostatic placement techniques.
Apply sprinkles immediately after frosting while the surface remains tacky, ensuring ideal adhesion.
Work in quadrants, rotating your cake for consistent coverage.
Use a light hand with a pinch-and-scatter method, depositing sprinkles at 45-degree angles to create dimensional texture.
For concentrated accents, employ a small spoon to position individual elements.
Avoid over-application; restraint prevents a cluttered appearance.
Layer contrasting colors strategically at the cake’s perimeter and summit.
This methodical approach yields professional results while maintaining your cake’s structural integrity.
Pro Tips for Success
Nailing a picture-perfect Funfetti cake consistently requires attention to three critical factors: ingredient temperature, mixing technique, and timing.
You’ll achieve superior results by implementing these strategies:
- Organize your workspace with all ingredients and equipment within reach before you begin, eliminating mid-process scrambling
- Execute practice runs using your exact recipe and oven to identify necessary adjustments for your specific equipment
- Maintain precise temperatures by bringing eggs and dairy to 68-72°F before mixing, ensuring proper emulsification
You control the outcome through deliberate preparation.
You control the outcome through deliberate preparation and meticulous attention to the fundamentals of your craft.
Room-temperature ingredients incorporate more efficiently, creating uniform batter texture.
Use a stand mixer on medium speed for exactly 90 seconds after combining wet and dry components.
Don’t overbeat—excessive mixing develops gluten, resulting in dense crumb structure.
Your freedom to experiment comes after mastering fundamentals.
Document your results meticulously.
You’ll soon produce consistently exceptional Funfetti cakes that showcase your technical mastery.
Storage and Shelf Life
You’ll keep your Funfetti cake fresh at room temperature for up to 2 days when stored in an airtight container away from direct sunlight and heat sources.
For extended storage, you can refrigerate the cake for up to 5 days or freeze it for up to 3 months.
Wrap unfrosted layers tightly in plastic wrap and aluminum foil, or store frosted cake in an airtight container.
Watch for visible mold, off odors, or a dry, stale texture, which indicate spoilage and mean you should discard the cake immediately.
Room Temperature Storage Tips
Since Funfetti cake contains buttercream frosting and sprinkles that don’t require refrigeration,
you can store it at room temperature (68-72°F) for up to 2 days in an airtight container.
- Use a cake box for transport – Position your cake on a sturdy, level surface within a rigid cake box to prevent shifting and frosting damage during movement.
- Maintain best serve timing – Remove your cake from storage 30 minutes before serving to achieve ideal flavor development and frosting consistency at 72°F.
- Control humidity levels – Keep your cake away from moisture sources and direct sunlight, as excess humidity degrades frosting integrity and causes sprinkles to lose their vibrant color saturation.
Proper airtight containment prevents oxidation and preserves your cake’s structural integrity throughout the storage window.
Refrigerator and Freezer Methods
When you’re extending your Funfetti cake’s shelf life beyond 2 days, refrigeration and freezing become essential preservation techniques.
For refrigeration, store your cake in an airtight container at 35-40°F, maintaining ideal humidity levels to prevent moisture loss. This method extends shelf life to 5 days maximum.
Freezing demands precise temperature calibration at 0°F or below. Wrap individual cake layers in plastic wrap, then aluminum foil, creating a moisture barrier. Employ flash freezing by placing unwrapped layers on sheet trays for 2-3 hours before wrapping—this prevents frosting damage.
| Storage Method | Temperature | Duration | Container Type | Thaw Time |
|---|---|---|---|---|
| Refrigeration | 35-40°F | 5 days | Airtight | N/A |
| Frozen Layers | 0°F | 3 months | Wrapped | 4 hours |
| Frozen Assembled | 0°F | 2 months | Wrapped | 6 hours |
| Frozen Frosting | 0°F | 4 months | Sealed | 2 hours |
| Refrigerated Frosted | 35-40°F | 3 days | Covered | N/A |
Signs of Spoilage
Proper storage conditions alone won’t guarantee your Funfetti cake remains safe to eat—you’ll also need to identify spoilage indicators that signal when it’s time to discard the cake.
Inspect your cake regularly for these warning signs:
- Mold growth – Any visible fuzzy patches, regardless of color, indicate microbial contamination and require immediate disposal
- Odor changes – Sour, fermented, or off-putting smells signal bacterial proliferation and chemical degradation
- Texture deterioration – Excessive moisture, sliminess, or hardening beyond normal staling indicates spoilage
Trust your senses when evaluating your cake’s condition. Don’t compromise on food safety.
Even if storage duration falls within acceptable timeframes, discard your cake immediately upon detecting any spoilage markers. Your health depends on this vigilance.
Variations and Flavor Twists
While the classic vanilla-funfetti combination delivers timeless appeal, you can elevate this cake by experimenting with alternative flavor profiles and ingredient substitutions.
Consider incorporating fruit pairings—lemon zest, raspberry purée, or strawberry extract—to complement the sprinkles’ visual charm with complementary tartness.
For sophisticated palates, boozy options like rum extract, bourbon vanilla, or Champagne reduction add depth without overpowering the whimsical aesthetic.
You’ll modify your dry ingredients by substituting 2 tablespoons of cake flour with your chosen flavoring agent.
Adjust liquid ratios accordingly—reduce milk by 3 tablespoons when using fruit purées.
Layer these variations within your frosting too: incorporate fruit curd or liqueur into your buttercream for cohesive flavor development.
These substitutions maintain structural integrity while expanding your creative possibilities.
Frequently Asked Questions
Can I Make Funfetti Cake Without a Stand Mixer or Electric Mixer?
You can absolutely make funfetti cake without a mixer.
Use vigorous hand mixing with a whisk, incorporating your dry ingredients thoroughly. Cream butter and sugar by hand for 3-5 minutes until pale and fluffy.
Whisk eggs individually before adding them. Alternate dry ingredients with wet components, whisking after each addition.
Your effort replaces mechanical power—you’re in control of your baking destiny. This method gives you complete freedom and yields excellent results.
What’s the Best Way to Level Uneven Cake Layers Before Frosting?
You’ll want to chill your layers thoroughly—at least two hours or overnight—before leveling.
Using a serrated knife held parallel to your work surface, you’ll make shallow scoring marks around the cake’s perimeter as a guide.
Then, with steady, even pressure, you’ll slice horizontally through the dome.
Rotate the cake gradually, maintaining consistent blade angle throughout the cut.
This technique gives you precise, flat surfaces ready for frosting.
How Do I Fix a Cake That Sinks in the Middle?
You’ll fix a sunken cake by adjusting your oven temperature—it’s likely too low, causing an undercooked center.
Increase heat by 25°F and use an oven thermometer for accuracy.
Reduce baking time by 5-10 minutes, checking doneness with a toothpick at the center reaching 205-210°F.
Don’t open the oven door before 25 minutes.
You’ve got this—precise temperature control prevents that frustrating sink every time.
Can I Substitute All-Purpose Flour With Cake Flour in This Recipe?
You can substitute all-purpose flour with cake flour in your recipe. Cake flour contains lower protein content—around 7-8% versus all-purpose’s 10-12%—which reduces gluten development. This yields a more tender, delicate crumb structure.
You’ll need to adjust your measurements: use 1 cup plus 2 tablespoons cake flour for every cup of all-purpose flour called for. This compensation accounts for cake flour’s finer granulation and guarantees you’re not over-thickening your batter, maintaining proper moisture content and achieving that desirable, light texture you’re after.
What’s the Ideal Room Temperature for Frosting a Funfetti Cake?
You’ll want your kitchen environment between 68-72°F for ideal frosting application.
This temperature range guarantees your buttercream doesn’t soften excessively or become unworkable.
Lower humidity levels—ideally below 50%—prevent frosting from absorbing moisture and becoming greasy.
You’re free to frost confidently when you’ve achieved these precise conditions.
If humidity spikes, refrigerate your frosted cake for 15-20 minutes to set the crumb coat properly before final decoration.

Leave a Comment