Key Takeaways
- Use buttermilk instead of regular milk to create acidity that tenderizes gluten and produces a finer, moister crumb structure.
- Combine butter and oil in a 50/50 ratio to maximize tenderness, moisture retention, and shelf life without excessive density.
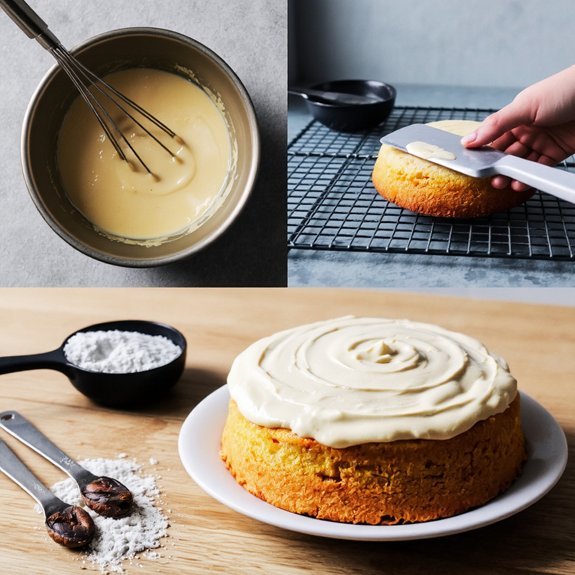
- Whisk wet ingredients thoroughly until emulsified, then fold gently into dry ingredients using minimal strokes to preserve aeration.
- Bake at 350°F for 30–35 minutes until a toothpick emerges clean; use internal temperature of 210–212°F for peak moisture.
- Use pure vanilla extract (2 teaspoons) with 35–40% ABV alcohol content for superior flavor complexity and antioxidant properties.
Why Buttermilk Makes All the Difference
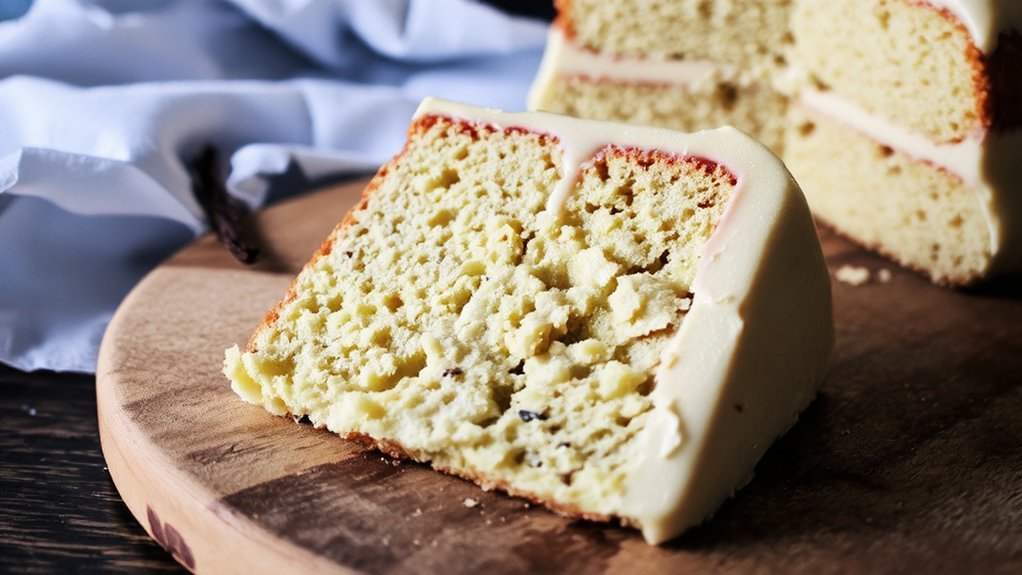
When you’re baking vanilla cake, buttermilk’s acidity—typically 0.9% lactic acid—reacts with baking soda to produce carbon dioxide, creating a fine, tender crumb structure.
Buttermilk’s 0.9% lactic acid reacts with baking soda, producing carbon dioxide for a fine, tender crumb structure in vanilla cake.
This acidic tenderizing process breaks down gluten strands, yielding a more delicate texture than all-purpose milk provides.
Enzyme activation occurs simultaneously.
The acid denatures proteins in your batter, weakening their bonds and promoting moisture retention.
You’ll notice improved browning on your cake’s exterior due to the Maillard reaction, which intensifies with acidic conditions.
Substitute buttermilk at a 1:1 ratio for regular milk in your recipe.
If you lack buttermilk, combine 1 tablespoon white vinegar with 1 cup whole milk; let it sit five minutes before using.
This method replicates buttermilk’s chemical composition, delivering identical results without compromise.
The Secret to Using Oil and Butter Together

Because you’ll want both richness and moisture in your vanilla cake, combining butter and oil creates an ideal fat structure that neither ingredient achieves alone. You’re harnessing emulsification techniques to stabilize your batter while maximizing hydration and tenderness.
Follow these ratio guidelines for best results:
| Fat Component | Percentage | Function |
|---|---|---|
| Butter | 50% | Flavor, structure |
| Neutral Oil | 50% | Moisture, crumb softness |
Use 4 ounces butter and 4 ounces oil per standard cake. Cream butter first to incorporate air, then gradually whisk in oil to maintain emulsification stability. This dual-fat approach prevents excessive density while ensuring your crumb stays moist for days. You’re not compromising—you’re strategically optimizing both tenderness and shelf life through deliberate fat engineering.
Selecting the Right Vanilla Extract
You’ll want to choose pure vanilla extract over imitation varieties, as it contains vanillin derived from actual vanilla beans and delivers superior flavor complexity to your cake.
Check the label for “pure” designation and alcohol content between 35-40% ABV, which indicates proper extraction and quality grading.
Real vanilla extract’s nuanced taste profile will noticeably enhance your cake’s depth compared to synthetic imitation alternatives, justifying the higher cost per teaspoon.
Pure Vanilla Extract Benefits
Quality matters profoundly when choosing vanilla extract for your cake.
You’ll want pure vanilla extract—not imitation—because it contains real vanilla bean solids that deliver superior flavor complexity.
Pure vanilla extract boasts antioxidant properties that protect your body’s cells from oxidative stress.
When you use genuine vanilla, you’re incorporating vanillin and other beneficial compounds that imitation versions simply can’t match.
Beyond physical benefits, vanilla offers mood enhancement through its aromatic compounds.
You’ll notice improved satisfaction when tasting cake made with authentic extract.
For ideal results, use one teaspoon of pure vanilla extract per standard cake recipe.
This precise measurement guarantees balanced vanilla notes without overpowering other ingredients.
You’re choosing quality, freedom from artificial additives, and genuine flavor that justifies the investment.
Imitation Versus Real Vanilla
When you’re selecting vanilla extract for baking, understanding the chemical differences between pure and imitation varieties will directly impact your cake’s flavor profile.
Pure vanilla contains vanillin derived from vanilla orchids, delivering complex flavor notes that imitation variants simply can’t replicate.
Imitation vanilla relies on synthetic vanillin, offering a one-dimensional taste at lower costs.
Market trends increasingly favor pure vanilla despite premium pricing, reflecting consumer preference for authenticity.
However, environmental impact considerations matter: vanilla orchid farming strains ecosystems, while lab-synthesized imitation reduces agricultural demand.
For your moist vanilla cake, you’ll want pure extract—typically 1 to 2 teaspoons per recipe—to achieve superior depth.
If budget constraints dictate otherwise, blend both varieties to maximize flavor while maintaining cost efficiency.
You’re choosing between compromise and excellence; pure vanilla guarantees the latter.
Quality Indicators and Grades
Once you’ve committed to pure vanilla extract, identifying high-quality products requires examining specific markers that distinguish premium grades from standard varieties.
You’ll want to evaluate your vanilla extract using these criteria:
- Color intensity: Premium extracts display deep amber hues indicating robust vanilla bean concentration
- Sensory grading: Assess aroma potency and flavor complexity through smell and taste testing
- Presentation scoring: Examine bottle labeling for bourbon, Madagascar, or Tahitian bean specifications
- Vanillin content: Verify minimum 35% vanillin concentration on product documentation
You’re not limited to price alone when selecting quality. Review third-party testing certificates and manufacturer extraction methods.
Look for glass bottles preserving potency, avoiding plastic containers that degrade extract integrity. You’ll achieve superior cake results by investing in extracts meeting these technical standards, ensuring your moist vanilla cake delivers authentic, nuanced vanilla flavor that justifies your ingredient investment.
Essential Ingredients You’ll Need
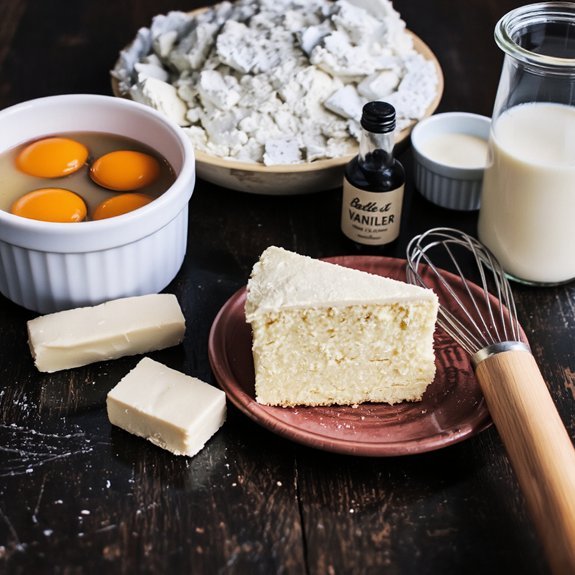
You’ll need to gather both dry and wet ingredients to build your vanilla cake’s structure and moisture.
Your dry ingredients—all-purpose flour, baking powder, baking soda, and salt—create the cake’s crumb matrix, while your wet ingredients—eggs, whole milk, melted butter, and vanilla extract—provide binding and richness.
Measuring these components accurately by weight or volume guarantees consistent results across batches.
Dry Ingredients Breakdown
The foundation of your vanilla cake relies on four essential dry components measured precisely to guarantee proper structure and rise. You’ll master leavening chemistry by understanding how each ingredient functions independently and collectively.
- All-purpose flour (2¼ cups) – Provides structural matrix and gluten development for ideal crumb formation
- Baking powder (2¼ teaspoons) – Initiates CO₂ release during mixing and heat application, creating lift
- Baking soda (½ teaspoon) – Accelerates browning and neutralizes acidic components for balanced pH
- Sea salt (1 teaspoon) – Enhances flavor perception and regulates gluten activity
Measuring accuracy isn’t negotiable here.
You’ll use dry measuring cups, leveling off excess with a knife’s edge rather than tapping or scooping directly. This precision guarantees consistent results every bake, giving you control over your cake’s final outcome.
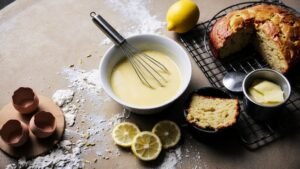
Wet Ingredients Guide
While your dry ingredients create the structural framework, the wet components bind everything together and establish moisture balance that determines your cake’s crumb texture.
You’ll need three large eggs at room temperature—this egg temperature promotes proper emulsification and best rise.
Add one cup whole milk and two teaspoons vanilla extract for flavor depth.
The acid interactions occur when you incorporate one and a half teaspoons of baking powder with your wet mixture, creating carbon dioxide bubbles that establish lift.
Include half a teaspoon of salt to enhance vanilla notes and regulate fermentation.
Finally, whisk in one-third cup melted butter for richness and tenderness.
These precise wet ingredients work synergistically, creating a batter that yields consistently moist, tender crumb structure when baked properly.
Step-by-Step Baking Instructions
Preheat your oven to 350°F (175°C) and position the rack in the center.
Then prepare two 9-inch round cake pans by greasing them with butter and dusting with flour or using cooking spray.
Your mise en place and equipment checklist guarantee seamless execution:
- Combine dry ingredients (flour, baking powder, salt) in one bowl
- Whisk wet ingredients (eggs, vanilla, oil, buttermilk) separately until emulsified
- Fold wet into dry ingredients using minimal strokes to preserve aeration
- Distribute batter evenly between prepared pans using an offset spatula
Pour batter into pans, then tap them gently on the counter to release air pockets.
Bake for 30-35 minutes until a toothpick inserted in the center emerges clean.
You’ve got complete control over achieving that perfectly moist crumb structure.
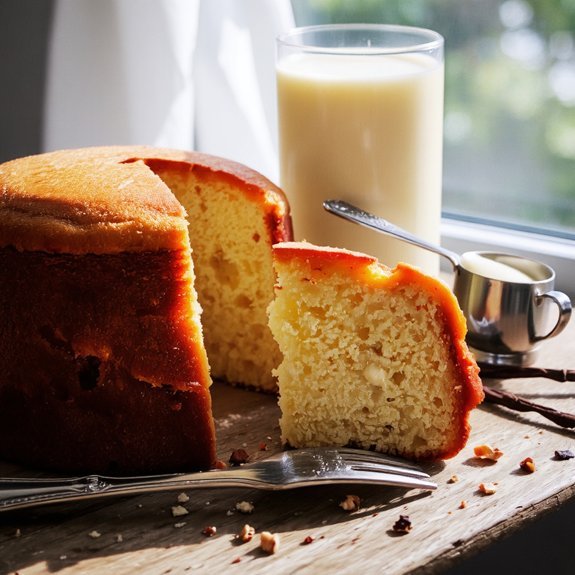
How to Test for Doneness
How do you know when your vanilla cake’s reached ideal doneness? You’ve got reliable methods at your disposal.
Use the Toothpick Technique first.
Insert a wooden pick into the cake’s center. If it emerges clean or with minimal moist crumbs—not wet batter—your cake’s done. Wet batter indicates underbaking; excessive crumbs suggest overbaking.
Next, employ the Spring Back test.
Gently press the cake’s surface with your fingertip. Properly baked cake springs back immediately, leaving no indentation. If your finger leaves a depression, bake longer.
Monitor internal temperature using a meat thermometer.
Vanilla cake reaches doneness at 210-212°F (99-100°C).
Finally, observe the edges.
They’ll pull slightly from the pan’s sides and turn golden-brown when ready.
These techniques guarantee you’ll extract your cake at peak moisture and structure, preventing dry or undercooked results.
Cooling and Storage Tips for Maximum Freshness
You’ll transfer your cooled cake to an airtight container within two hours of removing it from the cooling rack, which halts moisture loss and prevents staleness.
Store the sealed container at room temperature for up to three days, or refrigerate it for up to one week if your kitchen exceeds 70°F.
For extended preservation, you can freeze your vanilla cake in an airtight freezer-safe container for up to three months, then thaw it at room temperature for two to four hours before serving.
Cooling Rack Methods
Transferring your cake to a wire cooling rack immediately after removing it from the oven is essential for preventing moisture buildup and achieving an even crumb structure.
You’ll want to choose the right cooling solution for your needs:
- Stainless steel racks offer superior durability and resist warping better than aluminum alternatives
- Elevate your cake 2-3 inches above countertops to guarantee efficient airflow circulation
- Implement regular rack maintenance by washing with hot soapy water and drying thoroughly between uses
- Avoid direct sunlight exposure during cooling to prevent uneven moisture evaporation
This material comparison helps you select equipment that withstands repeated use.
Position your cake in the rack’s center, allowing 360-degree air exposure for approximately 15-20 minutes before transferring to storage.
You’re maximizing structural integrity and texture quality through precise cooling methodology.
Airtight Container Storage
Once your vanilla cake’s internal temperature drops to room temperature—approximately 70°F—transferring it to an airtight container becomes critical for preserving moisture content and preventing staling.
You’ll want to prioritize material selection based on your storage duration. Glass containers with silicone gaskets offer superior odor prevention compared to plastic alternatives, which can absorb cake aromatics. For short-term storage (2-3 days), plastic food-grade containers work adequately.
Layer parchment paper between cake layers to prevent sticking and moisture migration. Verify your container’s seal is completely airtight by pressing all edges firmly.
Store at 65-72°F away from direct sunlight and heat sources. This methodology maintains ideal texture and flavor while maximizing shelf life efficiently.
Freezing for Later
Because freezing halts microbial growth and enzymatic degradation, it’s the best method for extending your vanilla cake’s shelf life beyond a week.
You’ll achieve ideal results by wrapping your cooled cake in plastic wrap, then aluminum foil, to prevent freezer burn and maintain moisture content.
Consider these freezing strategies:
- Wrap unfrosted cake layers individually for flexible thawing options
- Store frosted cakes in rigid containers to protect structural integrity
- Label packages with freeze dates for inventory management
- Plan gift freezing timelines—cakes remain viable for three months
For shipping logistics, thaw your cake in its original packaging at room temperature for two to three hours before transit.
This controlled defrosting preserves crumb structure and prevents condensation damage during transport, ensuring recipients receive pristine product quality.
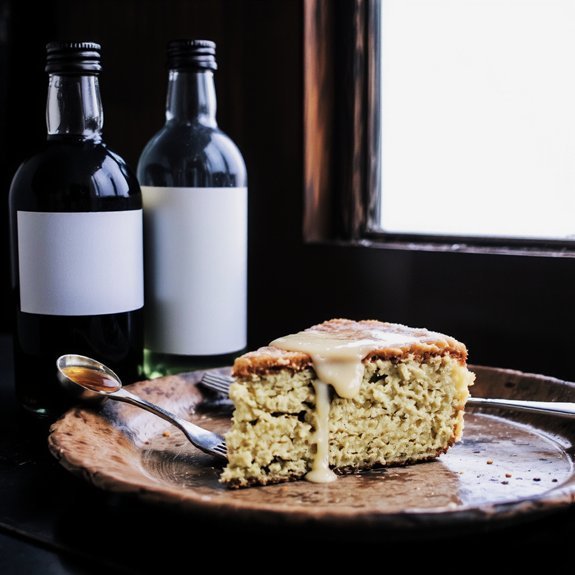
Frosting and Topping Ideas
The right frosting transforms your vanilla cake from simple to spectacular.
The right frosting transforms your vanilla cake from simple to spectacular.
You’ll want to take into account your flavor preferences and desired aesthetic when selecting your topping.
Cream cheese frosting pairs excellently with vanilla, offering a tangy contrast.
For decadence, salted caramel drizzle creates sophisticated depth—apply it while your frosting sets to achieve ideal adhesion.
You can also incorporate salted caramel into your frosting base by whisking two tablespoons into your buttercream.
Edible flowers elevate presentation dramatically.
Crystallized violets, pansies, or rose petals provide visual interest and subtle floral notes.
Position them strategically across your frosted surface before the frosting hardens completely.
Consider piping techniques for texture variation—rosettes, shells, or basket-weave patterns add dimension.
Dust with powdered sugar or cocoa powder for finishing touches.
These choices let you customize your cake while maintaining structural integrity and taste balance.
Common Mistakes to Avoid
Even with careful attention to frosting techniques and decorative elements, you can still compromise your vanilla cake’s quality through preventable errors.
You’ll want to sidestep these critical mistakes:
- Overmixing batter – Excessive mixing develops gluten, creating a dense, tough crumb structure rather than the tender texture you’re after
- Poor oven calibration – An uncalibrated oven causes uneven baking; verify your oven’s actual temperature with a thermometer before baking
- Incorrect ingredient ratios – Deviating from precise measurements throws off the chemical balance, affecting rise and moisture retention
- Opening the oven door prematurely – Disrupting the baking environment causes collapse and uneven cooking
Master these fundamentals, and you’ll produce consistently moist, tender vanilla cakes.
Don’t rush your process.
Respect the technical requirements.
Your results depend on this disciplined approach.
Variations to Try Next Time
Once you’ve mastered the foundational vanilla cake, you can explore flavor variations that build on your technical skills without compromising the cake’s structural integrity.
A citrus twist involves incorporating 2 tablespoons of lemon or orange zest into your dry ingredients and substituting 3 tablespoons of juice for an equal volume of milk. This adjustment maintains your cake’s moisture content while introducing bright acidity.
For an espresso infusion, dissolve 1.5 teaspoons of instant espresso powder in your liquid ingredients before mixing. This technique deepens vanilla’s complexity without creating competing flavors.
Both variations require you to preserve your original ratios—don’t exceed these measurements. These modifications demonstrate how precision allows creative freedom. You’re manipulating flavor profiles while respecting the chemistry that makes your cake structurally sound.
Frequently Asked Questions
Can I Substitute Buttermilk With Regular Milk or Yogurt in This Recipe?
You can substitute buttermilk with regular milk or yogurt, but you’ll need acidity adjustment.
Add one tablespoon of lemon juice or vinegar per cup of regular milk and let it sit five minutes.
Yogurt works directly without modification, though it’ll create denser texture impact. Use equal parts yogurt by volume.
Both alternatives will alter your cake’s crumb structure slightly—milk produces lighter results, while yogurt yields moistness and tang. Adjust your leavening agents accordingly for ideal rise.
How High Should I Fill the Cake Pans With Batter?
You’ll want to fill your cake pans two thirds full to allow proper oven spring during baking.
This measurement gives you ideal rise without overflow.
Don’t skimp on batter—underfilled pans produce thin, dense layers.
You’re free to adjust slightly based on your pan size, but two thirds full remains the industry standard.
This precision guarantees even baking and professional results you’ll control entirely.
What Altitude Adjustments Are Necessary for Baking This Cake?
You’ll need to reduce leavening agents by 25% per 3,000 feet elevation gained.
Increase oven temperature by 15-25°F to compensate for faster moisture evaporation.
Decrease sugar slightly—roughly 1-2 tablespoons per cup—to prevent over-rising and structural collapse.
Add an extra egg for improved structure.
Reduce baking time by 5-10 minutes.
These adjustments give you control over your cake’s outcome, ensuring consistent results regardless of your location.
Can This Cake Be Made Ahead and Frozen Before Frosting?
You can absolutely freeze your unfrosted cake layers.
Wrap each cooled layer tightly in plastic wrap, then aluminum foil for maximum protection.
You’ve got a storage duration of up to three months in your freezer.
When you’re ready to frost, employ proper thawing techniques by transferring layers to your refrigerator for four to six hours, allowing gradual temperature equalization.
This prevents condensation buildup and maintains your cake’s structural integrity.
How Do I Prevent My Cake From Sinking in the Middle?
You’ll prevent cake sinking by maintaining precise oven temperature—don’t open the door during baking.
Avoid overmixing batter, which develops excess gluten and causes structural collapse.
Use an oven thermometer for accuracy.
Fill your pan only two-thirds full.
Make sure your leavening agents aren’t expired.
Bake until a toothpick inserted in the center comes out clean.
You’ve got the control to master this technique.


Leave a Comment