Key Takeaways
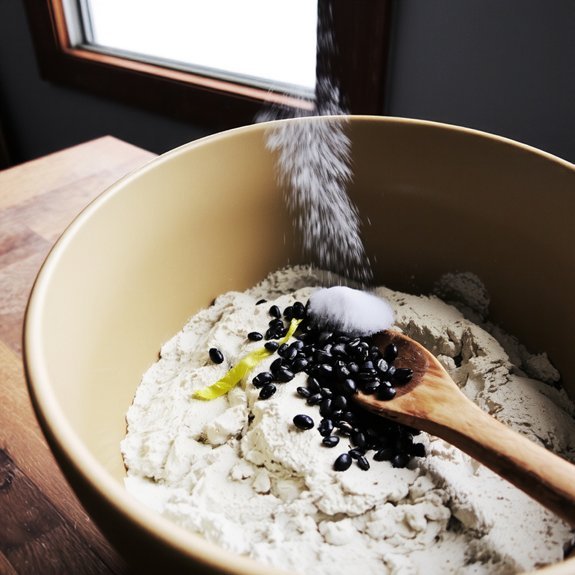
- Sift flour, baking powder, and salt together, then whisk in poppy seeds and lemon zest for uniform distribution throughout dry ingredients.
- Vigorously whisk room-temperature eggs, chilled lemon juice, and melted butter for two minutes until pale and homogeneous before combining with dry mix.
- Fold wet ingredients into dry components using eight to ten gentle strokes until batter appears slightly lumpy with visible dry streaks.
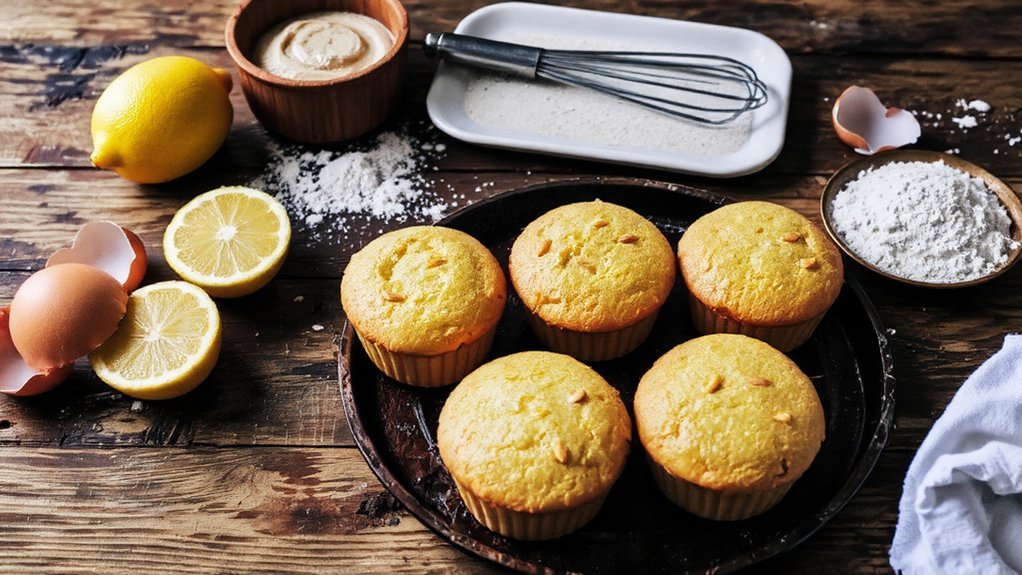
- Fill muffin cups two-thirds full using an ice cream scoop, then bake at 375°F for 18–22 minutes until toothpick comes out clean.
- Cool muffins in tin for five minutes, transfer to wire rack for 30–45 minutes, then store in airtight containers up to three days.
Ingredients You’ll Need
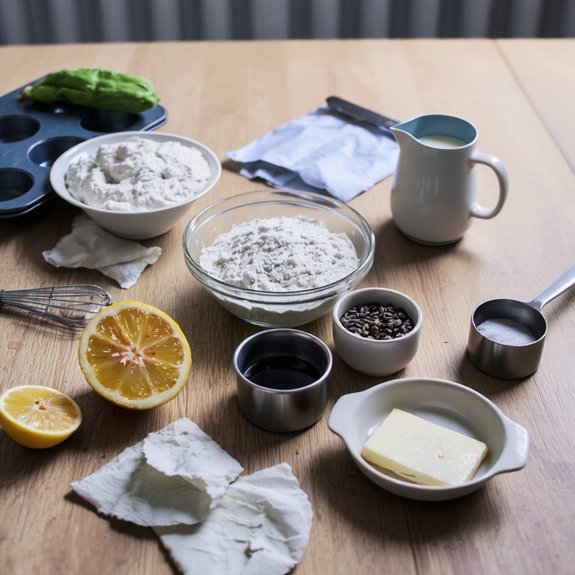
You’ll need 2 cups all-purpose flour, 1½ teaspoons baking powder, ½ teaspoon baking soda, ¼ teaspoon salt, ¾ cup granulated sugar, ⅓ cup poppy seeds, 2 tablespoons lemon zest, ½ cup fresh lemon juice, ⅓ cup vegetable oil, 2 large eggs, and ¾ cup sour cream.
For ingredient substitutions, you can replace vegetable oil with melted butter for richness, or swap sour cream with Greek yogurt for tang.
Consider using almond flour for partial flour replacement if you’re experimenting with texture variations.
Flavor variations expand your creative options. Add ½ teaspoon vanilla extract for depth, or incorporate ⅛ teaspoon ground cardamom for sophisticated warmth.
Some bakers include blueberries alongside poppy seeds for complexity. Adjust lemon zest and juice ratios based on your citrus preference—increase zest for stronger lemon character without excess moisture.
3. Essential Equipment and Tools
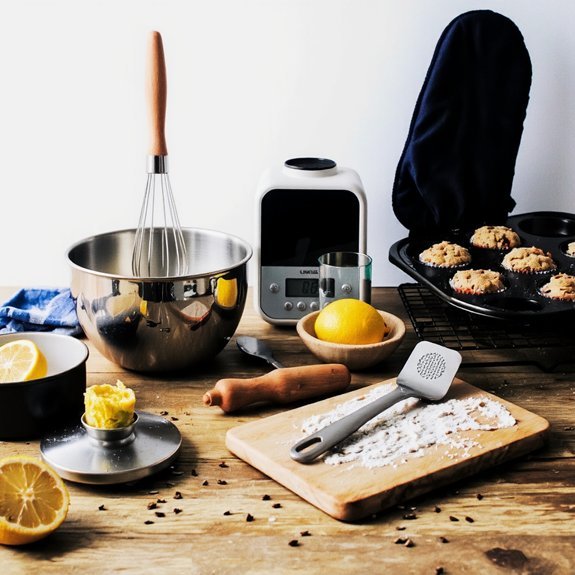
You’ll need two mixing bowls to combine your dry and wet ingredients separately, along with a whisk or wooden spoon for thorough incorporation.
Prepare a standard 12-cup muffin tin lined with paper liners to prevent sticking and guarantee even baking.
Gather measuring cups and spoons to accurately portion your ingredients, as precise measurements directly affect your muffins’ texture and rise.
Mixing Bowls and Utensils
The proper mixing-bowl setup guarantees efficient ingredient combination and even distribution throughout your batter.
You’ll need two bowls: one for dry ingredients and one for wet components.
Select bowls with color coordination to distinguish between them, reducing mixing errors.
For handling ergonomics, choose bowls with curved sides and sturdy bases that won’t slip during vigorous whisking.
You’ll require a whisk for aerating dry ingredients and blending wet components thoroughly.
A silicone spatula scrapes bowl sides completely, ensuring no pockets of unmixed flour remain.
Use measuring spoons and cups for precise ingredient portions—critical for consistent results.
A wooden spoon works well for initial dry-ingredient combining.
Keep all utensils within arm’s reach before you start mixing.
This organized setup streamlines your workflow and prevents cross-contamination between ingredient groups, ultimately producing superior muffins with uniform texture and flavor distribution.
Muffin Tins and Liners
What separates perfectly shaped muffins from irregular, collapsed results? Your choice of muffin tin and liners.
You’ll want a standard 12-cup muffin tin with deep wells that support batter expansion.
Opt for heavy-gauge steel construction—it conducts heat uniformly and resists warping.
Select silicone or paper liners matching current design trends featuring non-stick coatings that reduce sticking without added grease.
Position liners snugly into each cup before filling.
Paper liners work well for easy removal; silicone reusable liners offer recycling options and long-term cost savings.
Fill each liner two-thirds full with batter, ensuring consistent rise and texture.
This setup gives you complete control over your baking outcomes.
Quality equipment empowers better results, liberating you from disappointing batches and wasted ingredients.
Measuring Cups and Spoons
Accurate measurements form the foundation of consistent lemon poppy seed muffins, making quality measuring cups and spoons indispensable tools.
You’ll want to invest in reliable equipment that won’t compromise your baking results.
When selecting measuring tools, consider these options:
- Stainless steel sets offer durability and resistance to corrosion, maintaining accuracy through repeated use
- Plastic alternatives provide lightweight convenience, though they’re susceptible to warping from heat exposure
- Digital scales deliver precision beyond traditional measuring, eliminating volume inconsistencies entirely
For material comparison, stainless steel outperforms plastic in longevity and reliability.
You should establish calibration methods by regularly testing your cups and spoons against known weights.
This helps guarantee your measurements remain accurate over time, preventing recipe failures.
Don’t settle for worn or dented equipment—replace tools showing signs of wear immediately.
4. Preparing Your Muffin Tin
You’ll need to decide whether you’re greasing your muffin tin directly or using paper liners, as each method affects baking results differently.
If you’re greasing directly, you’ll apply a thin, even coating of butter or cooking spray to all interior surfaces, including the bottom and sides of each cup.
Alternatively, you can insert paper or silicone liners into each cup, which eliminates the greasing step and simplifies cleanup.
Greasing Your Tin Properly
Preventing sticking starts with properly preparing your muffin tin before adding batter.
You’ll achieve the best results by following these sequential steps:
- Apply a thin, even coating of vegetable oil or melted butter to each cup’s interior walls and bottom using a pastry brush
- Distribute a light dusting of flour across all greased surfaces, tapping out excess to prevent flavor transfer
- Alternatively, insert paper liners into each cup for straightforward cleanup tips and effortless muffin removal
This dual-layer approach creates a reliable non-stick barrier that liberates you from frustrating sticking situations.
The flour coating fills microscopic surface gaps, ensuring your muffins release cleanly without tearing.
When you skip this critical preparation, you’ll waste perfectly baked muffins and face tedious cleanup afterward.
Invest these few minutes upfront for guaranteed success and freedom from baking disappointments.
Liners vs. Direct Contact
Paper liners and direct greasing each offer distinct advantages depending on your priorities. Liners provide convenience and easy cleanup, requiring minimal effort post-baking. However, consider the environmental impact of disposable paper—they’re single-use waste that accumulates quickly.
Direct greasing with butter or cooking spray eliminates waste entirely, reducing your environmental footprint substantially. This method demands precision: apply an even 1/8-inch coating to all interior surfaces, including the top rim and cup bottoms.
From a cost analysis perspective, direct greasing wins decisively. One stick of butter greases approximately 24 cups, costing pennies per muffin. Liners cost considerably more per use.
You’ll choose based on your values. Prioritize sustainability and savings? Grease directly. Prefer streamlined cleanup and foolproof release? Use liners. Both methods yield equally excellent lemon poppy seed muffins.
5. Mixing the Dry Ingredients
Combining your dry ingredients guarantees even distribution of leavening agents and poppy seeds throughout the batter.
Properly combining dry ingredients ensures even distribution of leavening agents and poppy seeds throughout your batter.
You’ll want to take control of your mixing process by following these steps:
- Sift your flour, baking powder, and salt together into a large bowl—sift benefits include clump prevention and aeration of your flour.
- Whisk in your poppy seeds and lemon zest, ensuring uniform dispersion throughout the dry mixture.
- Set your combined dry ingredients aside while you prepare your wet components.
This methodology prevents dense pockets where leavening agents concentrate unevenly.
By sifting, you’re eliminating lumps that’d compromise your muffins’ crumb structure.
You’re not bound by conventional mixing; precise separation of wet and dry ingredients gives you the freedom to control your batter’s consistency and rise.
This technical approach guarantees superior results every time.
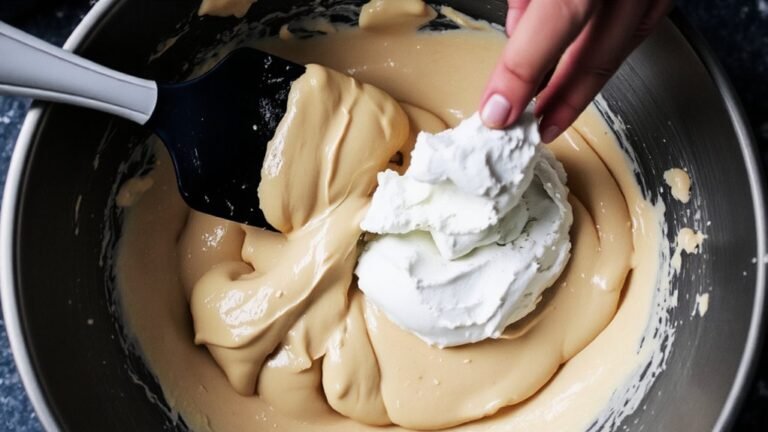
6. Combining the Wet Ingredients
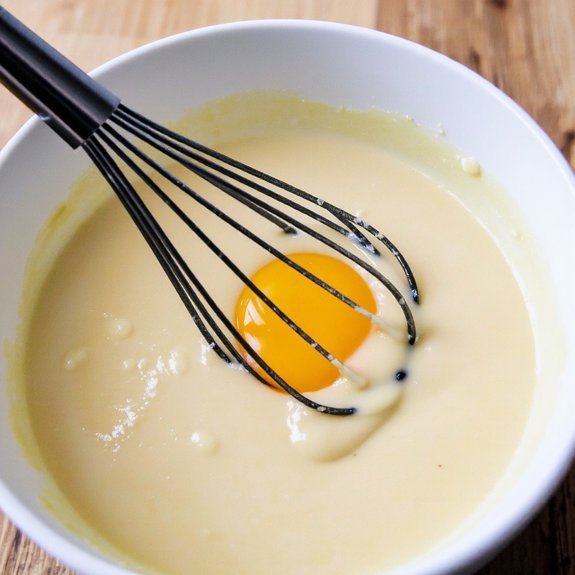
Whisking together your wet components guarantees proper emulsification and creates the foundation for your batter’s structure. You’ll combine three large eggs, one-third cup of fresh lemon juice, and one-third cup of melted butter in a medium bowl. The emulsification technique requires vigorous whisking for approximately two minutes until the mixture achieves a pale, homogeneous consistency.
| Ingredient | Temperature | Volume |
|---|---|---|
| Eggs | Room temperature | 3 large |
| Lemon juice | Chilled | 1/3 cup |
| Melted butter | 110°F | 1/3 cup |
Maintain proper temperature balance—eggs and lemon juice should reach room temperature while butter stays warm enough for seamless integration. Whisk continuously, incorporating air throughout the process. Once fully combined, you’re liberated to fold this wet mixture into your dry ingredients without overmixing, preserving your muffins’ tender crumb structure.
7. Bringing It All Together
Now that you’ve achieved the proper emulsification of your wet ingredients, you’ll create the final batter by folding them into your dry mixture. This timing coordination guarantees ideal flavor balancing and texture development. Use these sequential steps:
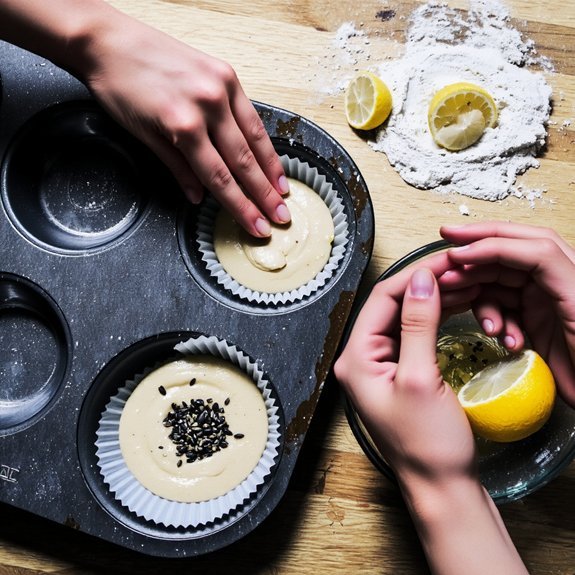
- Pour your wet mixture into the dry ingredients, folding gently with a spatula using eight to ten strokes
- Add poppy seeds and fold two additional times until just combined—avoid overmixing, which develops gluten and creates dense muffins
- Divide batter evenly among greased cups, filling each three-quarters full
Work deliberately but efficiently. This controlled approach prevents overdevelopment while maintaining leavening power.
Your batter should appear slightly lumpy with visible dry streaks—this indicates proper restraint. Proceed immediately to baking to capture the chemical reactions at peak performance. You’ve earned the freedom to create exceptional muffins through precision and respect for the process.
8. Filling the Muffin Cups
Before you transfer your batter to the muffin tin, you’ll want to make sure of even distribution for consistent baking.
Fill each cup approximately two-thirds full—this measurement prevents overflow while allowing adequate rise.
Use an ice cream scoop for precision and spill prevention.
Position your muffin tin on a stable surface before dispensing batter.
Work methodically from one cup to the next, maintaining consistent fill levels.
Watch for visual cues indicating proper fullness: the batter shouldn’t reach the cup’s rim.
If you’re using a piping bag instead of a scoop, hold it perpendicular to each cup and apply steady pressure.
This technique gives you greater control over portioning.
Wipe any drips from the tin’s exterior immediately.
This keeps your oven clean and prevents smoke during baking.
9. Baking to Perfection
Once you’ve filled your muffin tin, you’ll want to preheat your oven to 375°F (190°C) if you haven’t already done so.
Temperature control is critical for achieving consistent results.
Insert your tin into the center rack, ensuring proper heat circulation around each cup.
Bake for 18-22 minutes, monitoring closely during the final stages.
You’ll know they’re done when a toothpick inserted into the center comes out clean with minimal crumbs.
Consider these altitude adjustments for ideal outcomes:
- Increase oven temperature by 15-25°F at elevations above 3,000 feet
- Reduce baking time by 5-8 minutes at high altitudes due to faster moisture evaporation
- Decrease sugar slightly and increase liquid to compensate for rapid rising
Remove your muffins immediately after baking to prevent overcooking.
Let them cool in the tin for five minutes before transferring to a wire rack.
10. Cooling and Storage Tips
As your muffins cool on the wire rack, they’ll continue to set internally while their exteriors firm up, typically requiring 30-45 minutes for complete cooling.
Once cooled, store them in airtight containers at room temperature for up to three days.
For extended shelf life, you’ll want to use freezer storage.
Wrap each muffin individually in plastic wrap, then place them in freezer-safe bags, removing excess air to prevent freezer burn.
They’ll maintain best quality for up to three months frozen.
When you’re ready to enjoy them, thaw muffins at room temperature for approximately one hour, or microwave individual muffins for 20-30 seconds.
This approach preserves moisture and flavor while maximizing your storage flexibility and freedom to enjoy your baked goods on your schedule.
Frequently Asked Questions
Can I Substitute Regular Poppy Seeds With Other Seeds or Ingredients?
You can absolutely substitute poppy seeds with chia seeds or sesame seeds at a 1:1 ratio.
Chia seeds add nutritional density and create a gelatinous texture when hydrated.
Sesame seeds deliver a nuttier flavor profile.
Both alternatives require no additional adjustments to your ingredient measurements or baking procedure.
Measure precisely, incorporate your chosen substitute directly into the dry mixture, and proceed with standard mixing and baking protocols.
You’ve got complete freedom to customize your muffins according to your preferences.
How Do I Prevent My Muffins From Sinking in the Middle?
You’ll prevent sinking by mastering two critical factors: proper mixing and oven temperature. First, don’t overmix your batter—fold ingredients until just combined to avoid deflating air pockets.
Second, verify your oven temperature with an independent thermometer; insufficient heat causes structural collapse. Fill muffin cups three-quarters full, position them on the center rack, and bake at the precise temperature specified. These technical adjustments give you complete control over your results.
What’s the Best Way to Zest a Lemon for Maximum Flavor?
You’ll maximize flavor using the microplane technique—it extracts the zest’s essential oils without the bitter white pith.
Grip your lemon firmly, then glide it across the microplane’s sharp surface with controlled, downward strokes.
Work systematically around the fruit’s circumference.
This method captures the oil extraction that delivers intense lemon intensity to your muffins, giving you superior flavor control over traditional box graters, letting you command your baking results.
Can I Make This Batter Ahead of Time and Bake Later?
Yes, you can prepare your batter in advance. For refrigeration time, you’ll want to store your mixed batter in an airtight container for up to 24 hours.
Alternatively, freezing batter extends your flexibility considerably—portion your batter into muffin cups, freeze solid for 2-3 hours, then transfer frozen portions to freezer bags for up to three months.
When you’re ready to bake, add 3-5 minutes to your standard baking time without thawing.
Why Did My Muffins Turn Out Dry, and How Do I Fix It?
You’ve likely overdeveloped your gluten through overmixing effects, creating a dense, dry crumb structure.
To fix this, fold your wet and dry ingredients together with minimal stirring—just until combined. Incorporate moisture add-ins like sour cream or yogurt at a 1:1 ratio with your liquid ingredients.
Reduce oven temperature by 25°F and check doneness at 16 minutes using a toothpick. Store muffins in an airtight container immediately after cooling to retain moisture.


Leave a Comment