
Key Takeaways
- Heat water and butter together, stir in flour, cool slightly, then add eggs one at a time while beating thoroughly.
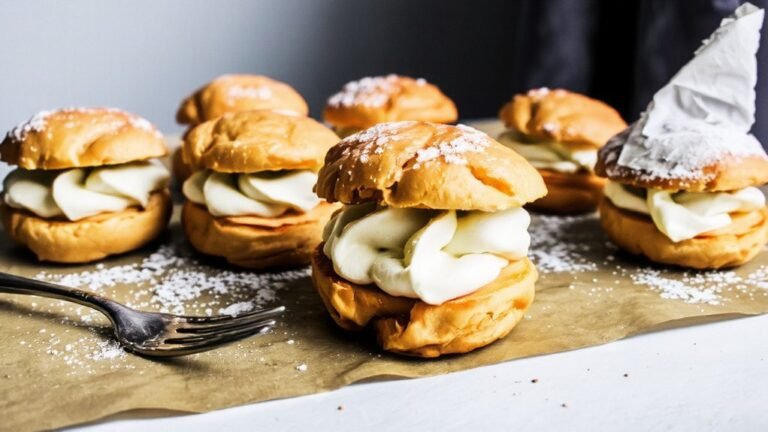
- Pipe 4-inch dough strips onto parchment paper spaced 2 inches apart and smooth peaks with a wet finger.
- Bake at 400°F for 15 minutes, then reduce to 350°F and bake 25–30 minutes until golden and crispy.
- Crack oven door slightly during final 5 minutes to release steam and prevent shells from collapsing.
- Cool shells completely on wire racks before filling with pastry cream and applying chocolate glaze.
Mastering the Choux Pastry Dough

Creating choux pastry requires precision and understanding of how heat transforms your ingredients. You’ll combine water, butter, flour, and eggs in a specific sequence to achieve the perfect consistency.
Start by heating water and butter together until the mixture boils, then remove it from heat and stir in flour completely. This creates a paste that you’ll cool slightly before incorporating eggs.
Egg incorporation is critical—you’ll add them one at a time, beating thoroughly after each addition. This process develops the proper hydration ratios that enable your pastry to puff during baking.
The dough should be smooth and glossy, falling from your spoon in a V-shape. You’re in control of the texture; adjust by adding eggs gradually if needed. Master these fundamentals, and you’ll command exceptional éclair results every time.
Piping and Baking the Shells
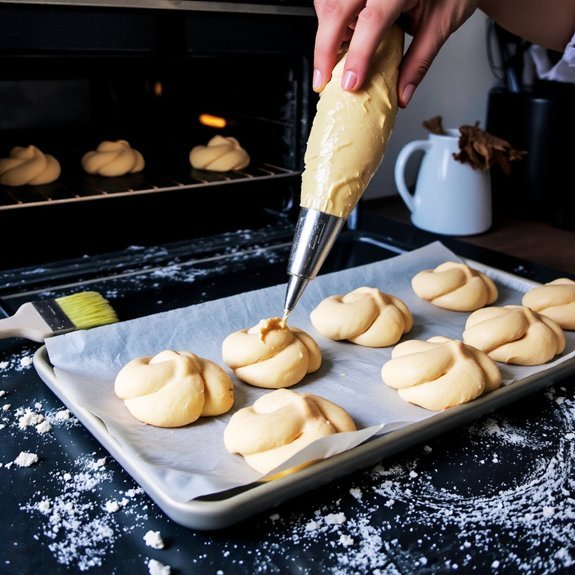
With your choux pastry dough perfected, you’re ready to shape and bake the éclair shells.
Load your pastry bag with a large star or plain nozzle selection, then pipe 4-inch-long strips onto parchment-lined baking sheets, spacing them 2 inches apart.
Smooth any peaks with a wet finger to promote even rising.
Bake at 400°F for 15 minutes without opening the oven door.
Then reduce heat to 350°F and continue baking for 25-30 minutes until golden and crispy.
Manage oven humidity by cracking the door slightly during the final 5 minutes to release steam and prevent shells from collapsing.
Cool completely on wire racks before filling.
Preparing the Pastry Cream Filling

To achieve a silky, stable filling, you’ll need to master the fundamental technique of tempering egg yolks while gradually incorporating hot milk. Heat whole milk with your chosen flavor infusions—vanilla bean, coffee, or liqueur—until steaming.
Whisk egg yolks with sugar until pale, then slowly add the hot milk while whisking continuously to prevent curdling. Return the mixture to heat, stirring constantly until it thickens and coats the back of a spoon.
Remove from heat and stir in butter for richness. For stabilizer options, consider cornstarch or gelatin to prevent weeping during storage.
Strain through fine mesh to eliminate lumps. Cool completely before piping into your baked éclair shells. This precise method guarantees professional-quality results.
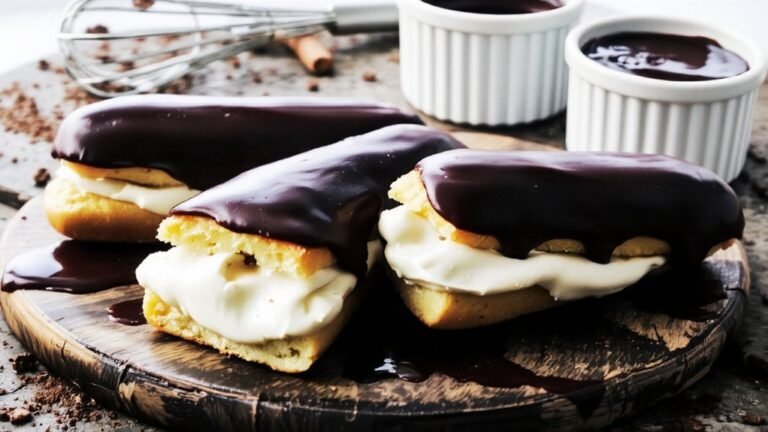
Assembling Your Éclairs
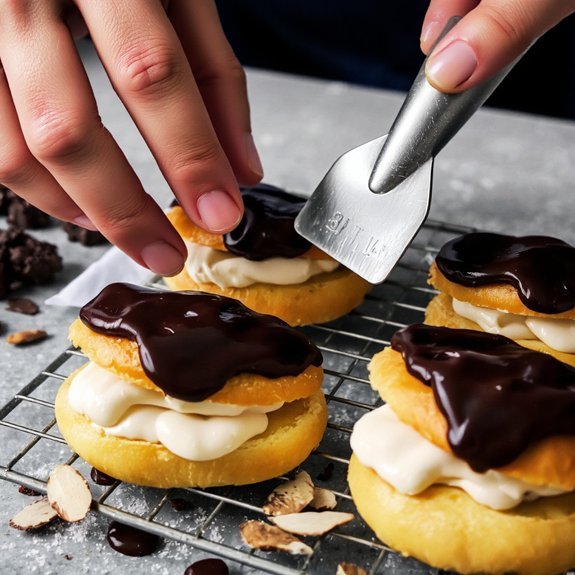
Once your pastry cream’s cooled completely, you’re ready to fill and finish your éclairs.
Using a pastry bag fitted with a small round tip, inject the cream directly into each éclair’s base.
Apply even pressure to distribute filling uniformly without oversaturating the pastry.
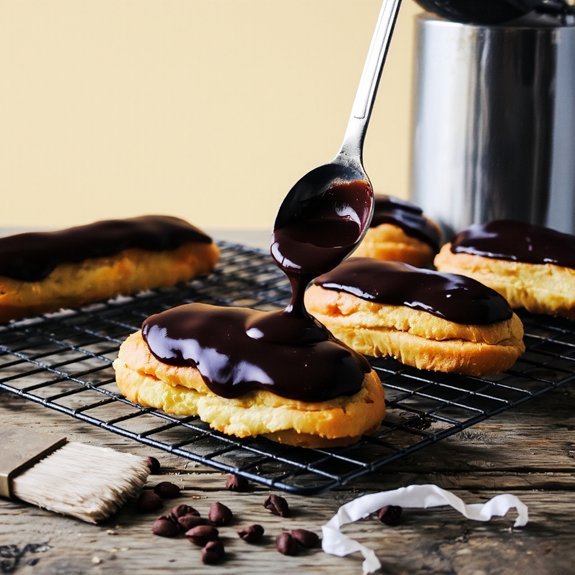
Next, prepare your glaze—typically chocolate ganache or fondant—and dip the top of each éclair at a slight angle for complete coverage.
Allow excess glaze to drip off before placing on parchment paper to set.
For serving suggestions, present éclairs within two hours of assembly for ideal texture.
If you need transport tips, arrange them in a single layer within an airtight container, avoiding stacking that compromises structural integrity.
Keep refrigerated until serving.
Creating the Perfect Chocolate Glaze
The chocolate glaze you’ll create should achieve a consistency that’s fluid enough to coat smoothly yet thick enough to cling without sliding off.
Master tempering chocolate by heating it to precise temperatures—around 113-122°F for dark chocolate—then cooling and reheating to stabilize the cocoa butter crystals.
This technique produces a glossy finish and satisfying snap.
Understanding ganache ratios gives you complete control.
A 1:1 chocolate-to-cream ratio yields thick ganache; adjust toward more cream for pourable consistency.
For éclairs, aim for a 2:1 ratio, creating an ideal coating that sets properly without brittleness.
Incorporate your tempering technique with proper ganache ratios, and you’ll achieve professional results.
Allow the glaze to cool slightly before dipping your assembled éclairs, providing even coverage and a refined appearance that showcases your baking mastery.
Frequently Asked Questions
Can I Make Eclairs Ahead of Time, and How Should I Store Them?
You can absolutely prepare eclairs in advance by separating your assembly timeline strategically.
Bake shells up to two days ahead, storing them in airtight storage containers at room temperature.
Fill them no more than four hours before serving to prevent sogginess.
Alternatively, freeze unfilled shells for up to three months.
You’ve got the flexibility to customize your preparation schedule based on your preferences and available time.
What Are Common Mistakes to Avoid When Making Eclairs at Home?
You’ll want to avoid several critical pitfalls when crafting eclairs.
Don’t overwork your choux pastry—overmixed dough won’t rise properly, compromising your structure.
Resist opening the oven prematurely; this causes immediate collapse.
Maintain precise oven temperature throughout baking.
Underfilled eclairs lack appeal and satisfaction.
Make sure your pastry bag maintains consistent pressure for uniform shapes.
Don’t skip cooling completely before filling, as residual heat compromises your fillings.
Master these fundamentals and you’ll achieve consistently excellent results.
Can I Freeze Eclairs, and for How Long Will They Stay Fresh?
You can freeze eclairs for up to three months.
Flash freezing them individually on a baking sheet before packaging prevents clumping and maintains structural integrity.
Use airtight containers or vacuum-sealed bags for maximum protection against freezer burn.
This method preserves your culinary independence, allowing you batch preparation without compromising quality.
Thaw eclairs at room temperature for two hours before serving to restore their intended texture and flavor profile.
What Flavor Variations Can I Try Beyond Chocolate and Vanilla?
You’ll find remarkable depth exploring matcha pistachio combinations, which deliver sophisticated, earthy profiles.
Passionfruit mango eclairs provide vibrant tropical notes that challenge conventional expectations.
Consider coffee-cardamom pairings, salted caramel infusions, or lavender-honey variations.
You’re free to experiment with Earl Grey-lemon blends, raspberry-rose dynamics, or chai-spiced fillings.
Each variation demands precise temperature control and quality ingredients to achieve ideal flavor integration and textural contrast in your final product.
How Do I Fix Eclairs That Collapse or Don’t Puff Properly?
You’ll fix collapsed eclairs by mastering dough texture and steam control. Don’t open your oven door during baking—that releases critical steam.
Make sure your dough’s consistency is smooth, not lumpy. Bake at 400°F initially, then reduce to 350°F to set the structure.
Your oven must maintain consistent temperature. Pipe uniform portions; inconsistent sizes prevent even rising.
Let eclairs cool completely before filling—premature handling causes deflation and ruins your hard work.


Leave a Comment