
Key Takeaways
- Keep all ingredients and tools cold throughout mixing to maintain distinct fat particles that create steam pockets for flakiness.
- Mix dough minimally by cutting cold butter into pea-sized pieces and adding ice water gradually until it just comes together.
- Chill dough for at least 30 minutes at 40°F or longer for superior texture; overnight chilling at 34°F yields best results.
- Roll dough to uniform 1/8-inch thickness from center outward, then carefully transfer to pan and crimp edges firmly without puncturing.
- Apply egg wash evenly, position rack in lower third, maintain oven temperature at 375–425°F, and monitor continuously for peak browning.
Gathering Your Ingredients
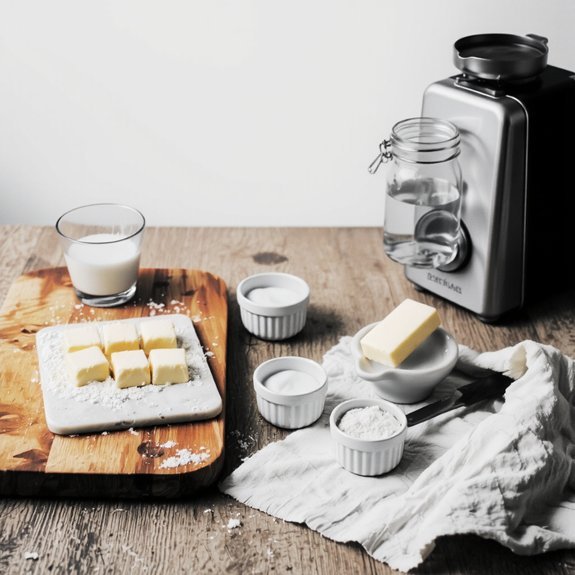
Before you’ll need to assemble your dry and wet components with precision.
You’ll require all-purpose flour, cold butter, salt, and ice water—the foundational elements that’ll determine your crust’s texture.
All-purpose flour, cold butter, salt, and ice water—the foundational elements that’ll determine your crust’s texture.
For ingredient sourcing, seek high-quality butter from local dairies when possible, ensuring superior fat content.
Consider seasonal substitutions; summer might offer fresh cultured butter, while winter demands reliable shelf-stable options.
You’ll need precisely measured flour—don’t pack it.
Gather your tools: a mixing bowl, pastry cutter or fork, and a measuring system.
Keep everything cold; warm ingredients compromise your crust’s flakiness.
Stock ice water separately—you’ll add it gradually as needed.
This preparation phase demands attention.
You’re establishing control over your baking outcome by respecting each ingredient’s role.
Take charge of your ingredients now, and you’ll master the fundamentals that define excellent pie crusts.
2. Mixing the Perfect Dough
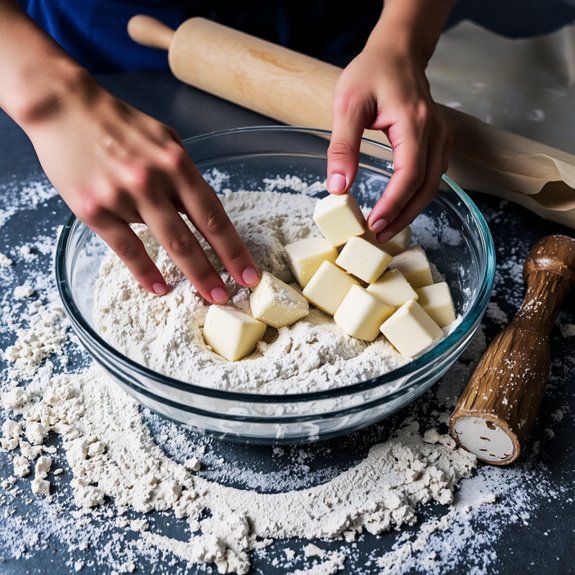
Combining your ingredients requires a methodical approach to develop the ideal dough structure.
You’ll work your cold butter into the flour mixture until you achieve proper fat distribution—this creates those desirable flaky layers.
Control your hydration carefully; add ice water gradually while mixing until the dough just comes together without becoming sticky.
Key techniques for success:
- Cut butter into pea-sized pieces before incorporating it into your dry ingredients
- Use your fingertips or a pastry cutter to maintain cold fat separation throughout mixing
- Add water incrementally, mixing minimally to prevent gluten overdevelopment
You’re building a foundation that respects your ingredient choices and rewards precision. Don’t overwork the dough—restraint here directly translates to superior texture and flakiness in your finished crust.
3. Chilling and Resting Your Dough
Resting your dough allows the gluten network you’ve developed to relax while the fat re-solidifies throughout the mixture, both essential for achieving ideal flakiness. You’ll wrap your dough tightly in plastic wrap and refrigerate it for best results.
| Chill Duration | Temperature | Protein Relaxation |
|---|---|---|
| 30 minutes | 40°F | Partial gluten unwinding |
| 1 hour | 38°F | Moderate network relaxation |
| 2 hours | 36°F | Substantial tension relief |
| 4 hours | 35°F | Maximum gluten flexibility |
| Overnight | 34°F | Complete protein restructuring |
You’ll notice that longer resting periods yield superior texture and easier handling. The cold temperature keeps your fat particles distinct, preventing them from melting prematurely. This separation creates steam pockets during baking, generating those coveted flaky layers. You’re not just waiting—you’re engineering superior crust structure through controlled cold exposure and protein relaxation.
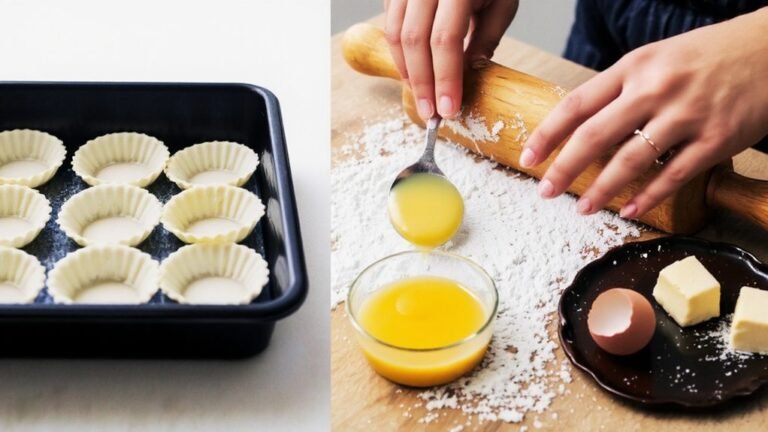
4. Rolling Out Your Crust
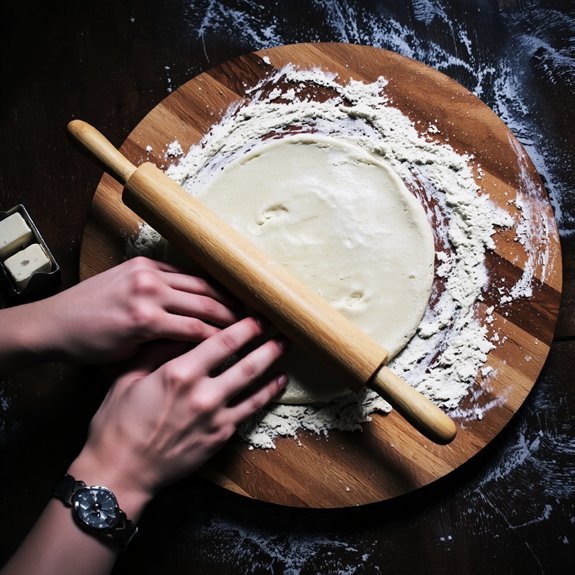
You’ll want to flour your work surface generously to prevent sticking, using just enough to coat without creating excess buildup that’ll toughen your dough.
Begin rolling from the center outward in all directions, rotating the dough a quarter turn after each few strokes to maintain an even, circular shape and consistent thickness throughout.
Aim for a uniform thickness of about 1/8 inch, checking periodically by eye and feel to make sure you’re not creating thin spots that’ll tear or thick areas that won’t bake evenly.
Flour Your Work Surface
Before transferring your chilled dough to the work surface, dust both the countertop and your rolling pin generously with flour to prevent sticking.
This counter protection layer creates a barrier against adhesion, enabling smooth, unrestricted dough manipulation.
Apply flour strategically:
- Use all-purpose flour in controlled amounts to avoid over-drying your dough
- Brush excess flour from the dough surface before transferring to your pie pan
- Maintain a small flour reserve nearby for quick touch-ups during rolling
The flour cleanup process becomes manageable when you’re deliberate about application.
Excessive flour compromises your crust’s texture and creates unnecessary mess.
Work efficiently by rotating your dough every few passes, ensuring even thickness while minimizing flour dependency.
Your methodical approach grants you complete control over the final product’s quality and your workspace’s cleanliness.
Achieve Even Thickness
With your dough properly floured and positioned on the work surface, you’re ready to begin the rolling process.
Apply even pressure from the center outward, rotating the dough a quarter turn after each pass. This technique prevents uneven thickness that compromises baking results.
For precision, use thickness gauges or caliper measurement tools to verify uniform depth throughout. Target a quarter-inch thickness for standard pie crusts. Check multiple points—center, edges, and corners—ensuring consistency.
Work deliberately but don’t overhandle the dough, which develops gluten and toughens your crust. If the dough resists rolling, let it rest five minutes before continuing. Maintain control over your rolling pin pressure to achieve the exact specifications your recipe demands. This disciplined approach guarantees superior pie crusts.
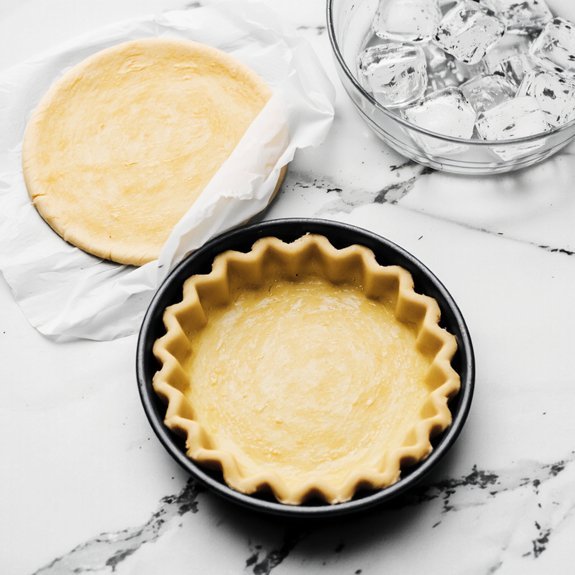
5. Fitting Into Your Pie Pan
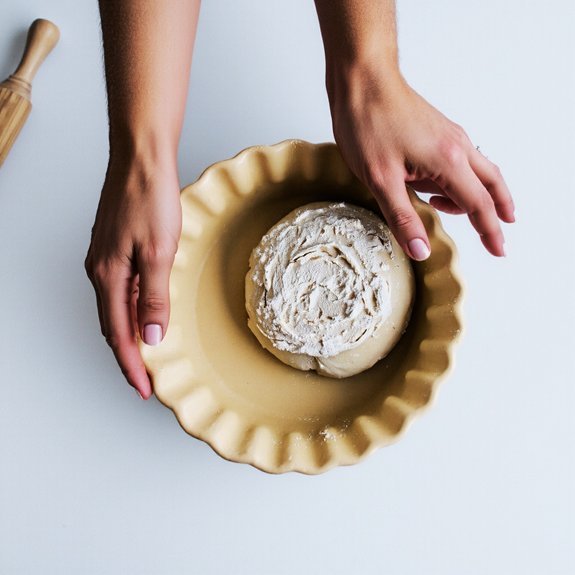
You’ll need to carefully stretch your dough into the pan without creating tears that’ll compromise your crust’s structural integrity.
Once you’ve fitted it snugly into the bottom and sides, you’ll crimp the edges using your thumb and forefinger to create that characteristic fluted border that both seals the crust and adds visual appeal.
Stretching Without Tearing
Once your dough’s rested and you’ve rolled it to roughly 1/8-inch thickness, you’ll need to carefully transfer it into your pie pan without compromising its structure.
Here’s how to maintain integrity:
- Use gentle tugging from the center outward, allowing the dough to naturally stretch rather than force it
- Support the dough with both hands underneath, distributing pressure evenly across the surface
- Work methodically around the pan’s perimeter, settling dough into corners without pulling excessively
If tears appear during stretching, don’t panic.
Small rips respond well to patching tears with reserved dough scraps. Press patches firmly into place, smoothing edges seamlessly.
This hands-on approach gives you complete control over your crust’s fate. You’re building structural integrity while respecting the dough’s limitations, ensuring a sturdy foundation for your filling without unnecessary waste or frustration.
Crimping the Edges
Now that your dough’s settled into the pan, the edges need finishing work to create both a functional seal and an attractive border. You’ll crimp the perimeter by pinching dough between your thumb and forefinger at regular intervals, creating uniform ridges that seal the edge and enhance aesthetics.
| Technique | Method | Result |
|---|---|---|
| Finger Crimp | Pinch dough rhythmically | Classic fluted edge |
| Fork Impressions | Press fork tines downward | Uniform dotted pattern |
| Decorative Patterns | Custom pinching sequences | Personalized finish |
Press firmly but don’t puncture the dough. Work systematically around the entire perimeter, maintaining consistent spacing and depth. Fork impressions offer an alternative approach—simply press your fork perpendicular to the edge, creating parallel lines. These decorative patterns serve functional purposes too, strengthening structural integrity while preventing edge shrinkage during baking.
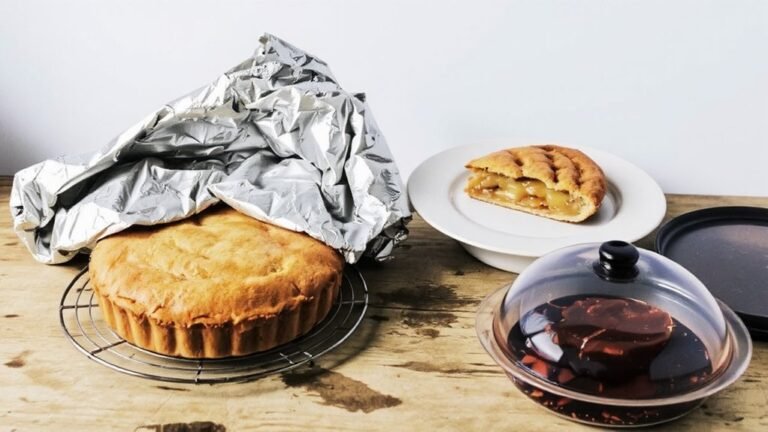
6. Achieving a Golden, Flaky Texture
The flakiness that characterizes an exceptional pie crust stems from distinct layers of butter and dough that create steam pockets during baking.
You’ll achieve that coveted golden-brown exterior by applying egg wash—a mixture of beaten egg and water—before baking, which promotes even browning and creates a professional appearance.
Control your oven temperature precisely at 375-425°F, depending on your recipe.
This range guarantees the crust sets properly without burning.
Here’s what you need to know:
- Brush egg wash evenly across the entire surface for consistent color
- Maintain steady oven temperature using an oven thermometer for accuracy
- Position your rack in the lower third to crisp the bottom crust
Monitor your pie throughout baking.
You’ve earned the freedom to adjust timing based on your oven’s characteristics, guaranteeing your crust reaches peak texture and color.
Frequently Asked Questions
Can I Make Pie Crust Ahead of Time, and How Should I Store It?
You can absolutely make pie crust ahead.
For short-term storage, wrap it tightly and refrigerate for up to two days—this actually improves texture by allowing gluten to relax.
For longer storage, you’ve got complete freedom with freezer storage; it’ll last three months wrapped securely.
When you’re ready to bake, thaw refrigerated crust thirty minutes before rolling.
Frozen crusts need one to two hours thawing.
This advance preparation gives you flexibility and eliminates last-minute stress.
What Should I Do if My Dough Becomes Too Warm While Working?
You’ve got to act fast when your dough warms up.
Implement frequent chilling intervals—wrap it and refrigerate for 15-30 minutes.
Work on a cold workstation; chill your counter or use a marble slab.
Keep your hands cool by running them under cold water.
Work quickly and deliberately.
If it’s still too warm, you’ll lose that essential fat separation, compromising your crust’s flakiness and structural integrity.
How Do I Prevent My Crust From Shrinking During Baking?
You’ll prevent crust shrinkage by ensuring proper chilling before baking—refrigerate your lined pie shell for at least 30 minutes.
Avoid stretching the dough during fitting, as this creates tension that contracts during heat exposure.
Additionally, you’re free to dock the bottom with fork holes, reducing air pockets.
Blind bake with parchment and weights if desired, maintaining structural integrity throughout your baking process.
Can I Use a Food Processor Instead of Mixing by Hand?
You can absolutely use a food processor—it’s faster and gives you more control.
The speed comparison shows processors cut butter into flour in seconds versus minutes by hand.
You’ll notice texture differences: processors create finer, more uniform crumbs, which some bakers prefer.
However, you’ve got to pulse carefully to avoid overworking the dough.
Stop when you’ve got pea-sized pieces.
This method gives you the freedom to achieve consistent results without hand fatigue.
What’s the Best Way to Fix Cracks or Tears in Dough?
You’ll fix cracks by creating a flour paste—mix flour and water into a thick consistency. Apply it directly into the damaged area, pressing firmly.
For larger tears, craft a butter patch by cutting a small dough piece from your scraps. Press it over the tear, sealing edges thoroughly with your fingers.
Chill the repaired section before baking to preserve structural integrity and prevent further splitting.


Leave a Comment