Key Takeaways
- Heat sugar and water to 240°F (soft-ball stage) in a heavy-bottomed saucepan without stirring to avoid crystallization.
- Pour hot syrup in a thin, steady stream into stiffly beaten egg whites while the mixer runs at medium-high speed.
- Continue beating for 3–4 minutes after pouring until meringue cools to room temperature and reaches glossy, stiff peaks.
- Ensure mixing bowl and whisk are completely grease-free; even microscopic yolk traces or oil prevent proper foam formation.
- Store finished meringue in an airtight container at room temperature for up to three days or freeze for three months.
What Sets Italian Meringue Apart
While French meringue relies on whipping raw egg whites with sugar, Italian meringue’s defining characteristic is its use of hot sugar syrup—heated to the soft-ball stage (240°F/115°C)—that you’ll pour into beaten egg whites to cook them through.
This technique gives you superior stability chemistry: the heat pasteurizes your eggs while the syrup’s moisture content creates a denser, more resilient foam that won’t weep or collapse.
The historical origins trace back to 18th-century Italian confectionery traditions, where cooks discovered this method produced meringues that held their structure for days.
You’ll find Italian meringue won’t separate or crystallize like its French counterpart. Its glossy, marshmallow-like texture remains stable at room temperature, making it ideal for Italian buttercream, pavlovas, and piped decorations. You’ve effectively created a thermally stable emulsion that grants you complete freedom in application timing.
Ingredients You’ll Need
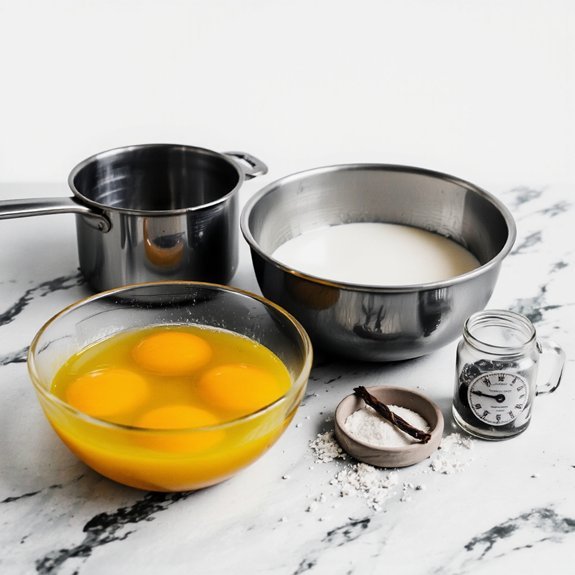
You’ll need granulated sugar, water, and cream of tartar as your essential pantry staples to build the foundation of Italian meringue.
Fresh, room-temperature egg whites—ideally aged 24 hours for maximum volume—are critical to achieving stable peaks and proper incorporation of your hot sugar syrup.
Consider vanilla extract, lemon zest, or almond flavoring as optional additions to customize your meringue’s profile without compromising its structural integrity.
Essential Pantry Staples
Just three core ingredients—egg whites, granulated sugar, and water—form the foundation of Italian meringue, though their precise ratios and quality determine your success.
You’ll want to stock these essentials:
- Egg whites: Use fresh, room-temperature eggs; pasteurized versions work if you’re concerned about safety
- Granulated sugar: Choose fine crystals that dissolve uniformly without grittiness
- Filtered water: Eliminates mineral content that interferes with crystallization
- Cream of tartar: Optional but stabilizes your foam structure
- Vanilla extract: Enhances flavor complexity without affecting texture
When bulk buying these staples, you’ll save considerably.
Maintain rigorous expiration tracking—egg whites degrade quickly, and old sugar crystallizes.
Store sugar in airtight containers away from humidity.
Your meringue’s stability depends entirely on ingredient quality and freshness, so don’t compromise on either front.
Quality Egg Whites
Among those three core ingredients, egg whites demand the most scrutiny because they’re where success or failure begins.
You’ll need eggs at room temperature, as they whip into greater volume and stability than cold ones.
Fresh, high-quality eggs contain superior protein composition that creates stronger foam structures essential for Italian meringue’s success.
You’ve got two viable options: use pasteurized eggs from your grocer, which eliminate salmonella risk without compromising performance, or purchase pasteurized alternatives specifically designed for raw consumption.
Both deliver reliable results.
Avoid using liquid egg white substitutes; they won’t perform adequately for this application.
Separate your whites meticulously—even microscopic traces of yolk sabotage whipping.
Guarantee your bowl and whisk are grease-free.
You’ll achieve ideal results when you prioritize egg quality and proper separation technique.
Optional Flavor Additions
While Italian meringue‘s basic formula of egg whites, sugar, and water creates a stable foundation, incorporating flavor elevates it from functional to exceptional.
You’ll discover that strategic additions transform your meringue into a sophisticated component that commands attention.
Consider these potent options:
- Liqueur Swirls: Fold in small amounts of Grand Marnier, Chambord, or amaretto for depth
- Herb Infusions: Incorporate lavender, basil, or rosemary-infused simple syrup during cooking
- Citrus Zest: Add lemon, lime, or orange zest for brightness without excess moisture
- Vanilla or Almond Extract: Use sparingly—a quarter teaspoon delivers maximum impact
- Espresso Powder: Dissolve one teaspoon for rich, complex undertones
You’ll maintain meringue’s stability while expanding its versatility.
These additions integrate seamlessly during the whipping process, ensuring even distribution and consistent flavor throughout your final product.
Essential Equipment and Tools
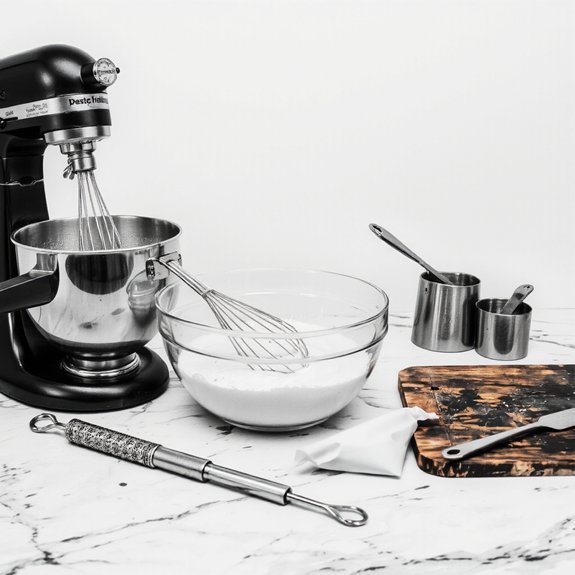
You’ll need specific equipment to make Italian meringue successfully, as precision and safety are paramount when working with hot sugar syrup.
Invest in a reliable candy thermometer to monitor temperatures accurately—this prevents crystallization and guarantees proper consistency.
A stand mixer with a whip attachment handles the vigorous beating required without tiring your arm.
Use a heavy-bottomed saucepan for even heat distribution when cooking your sugar mixture.
Protect yourself with heat-resistant apron styles that shield your torso and legs from potential splashes.
A heatproof spatula and wooden spoon prevent burns during stirring.
Quality tool maintenance extends equipment life substantially; wash immediately after use and store in dry conditions.
You’ll also need measuring cups, a whisk, and a timer for precision.
These essentials give you complete control over your meringue’s quality.
Preparing Your Egg Whites

You’ll want to bring your egg whites to room temperature before whisking, as warmer proteins whip more efficiently and create finer, more stable peaks.
Separate your whites meticulously, ensuring no yolk contaminates the bowl, since even trace amounts of fat will prevent proper volume development.
Keep your mixing bowl and whisk scrupulously clean and grease-free, as any residual oils or debris will sabotage meringue formation and collapse your efforts.
Room Temperature Matters
Since egg whites won’t reach their full volume potential when cold, you’ll need to bring them to room temperature before whipping—typically 65–70°F (18–21°C).
Thermal equilibration guarantees ideal protein denaturation during beating, creating stable foam structures essential for Italian meringue’s success.
Cold egg whites resist incorporation of air because their proteins remain rigid and inflexible.
When you allow ambient humidity and temperature to naturally adjust your eggs, the proteins relax, enabling maximum volume expansion.
Key considerations for proper temperature management:
- Remove eggs from refrigeration 30–45 minutes before use
- Place them in a warm water bath for faster thermal equilibration
- Monitor ambient humidity levels—high moisture affects beating performance
- Test temperature with a thermometer for precision
- Allow beaten whites to rest briefly before cooking with hot sugar syrup
Separating Whites Perfectly
Once your eggs have reached the ideal 65–70°F range, proper separation becomes your next critical task. You’ll want to crack each egg into a separate bowl before transferring the white to your mixing vessel.
This two-bowl method prevents a single broken yolk from ruining your entire batch.
Historic methods relied on hand-separation techniques, but you’ve got better tools available. Use egg separators or simply cradle the yolk in the shell halves, letting whites drip into your bowl below.
Confirm complete yolk salvage by inspecting each white for any trace of yolk or shell fragments.
Even microscopic yolk particles will sabotage your meringue’s stability, preventing proper volume development. Remove any contamination immediately with a spoon or clean shell piece.
This diligence guarantees you’re starting with pristine egg whites, setting the foundation for perfect Italian meringue.
Cleanliness Prevents Failure
After separating your whites, the next critical step involves thorough cleaning of your mixing bowl and whisk.
You can’t afford contamination if you’re serious about Italian meringue success.
Even microscopic traces of fat, yolk, or residue will sabotage your volume. Here’s what you’re protecting against:
- Oil and grease prevent proper protein coagulation
- Egg yolk particles destabilize foam structure
- Detergent residue interferes with whipping action
- Surface sanitization eliminates bacterial growth
- Allergen control prevents cross-contamination risks
You’ll want to wash everything with hot, soapy water, then rinse thoroughly.
Some professionals use vinegar for final sanitization.
Dry with lint-free cloths—you’re not introducing fiber either.
Your bowl’s interior must be spotless.
This isn’t overthinking; it’s respecting the chemistry that creates perfect Italian meringue.
Your results depend on this foundation.
Cooking Sugar to Soft-Ball Stage
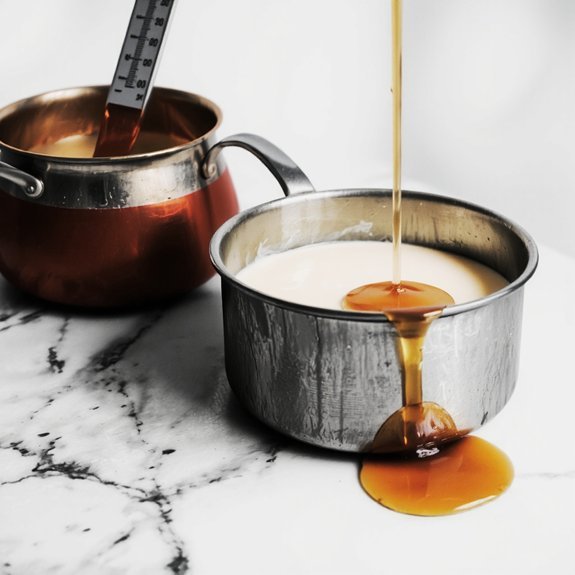
To create Italian meringue, you’ll need to cook your sugar mixture to the soft-ball stage, which occurs at 240°F (116°C).
This temperature represents a critical threshold in sugar chemistry where sucrose molecules begin restructuring into a pliable solid.
Combine equal parts sugar and water in a heavy-bottomed saucepan.
Heat without stirring to avoid crystallization.
Monitor heat gradients carefully—use a candy thermometer for accuracy, positioning it away from the pan’s sides where temperature variations occur.
As your mixture approaches 240°F, you’ll notice subtle color shifts and increased viscosity.
Don’t rely on visual cues alone; they’re unreliable.
When the thermometer hits your target temperature, immediately remove the pan from heat.
The residual warmth will continue cooking slightly, so precision timing matters.
You’re now ready to slowly stream this syrup into your whipped egg whites.
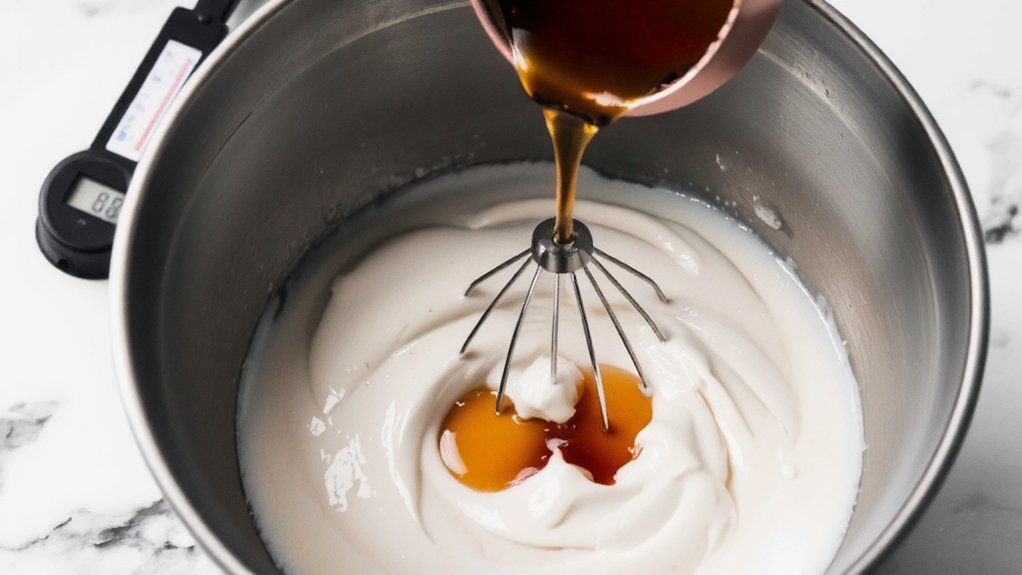
The Critical Pouring Technique
While your hot syrup reaches the ideal temperature, you’ll begin whisking your egg whites to stiff peaks—this timing’s essential because you can’t pause mid-pour.
Timing is everything—whisk your egg whites to stiff peaks while syrup heats, since you cannot pause mid-pour.
Control your pouring angle at 45 degrees, allowing the syrup to flow in a thin, steady stream width. This gradual incorporation prevents scrambled eggs and guarantees smooth incorporation.
Key pouring principles:
- Maintain constant mixer speed on medium-high throughout the pour
- Position the bowl at a slight angle for even syrup distribution
- Keep your stream pencil-thin for temperature control
- Pour in one continuous motion without stopping
- Allow 3-4 minutes for complete incorporation
Your meringue transforms as hot syrup cooks the whites, creating a glossy, voluminous masterpiece.
The residual heat stabilizes the structure without compromising texture.
You’ve now mastered the technique that separates amateur from professional results.
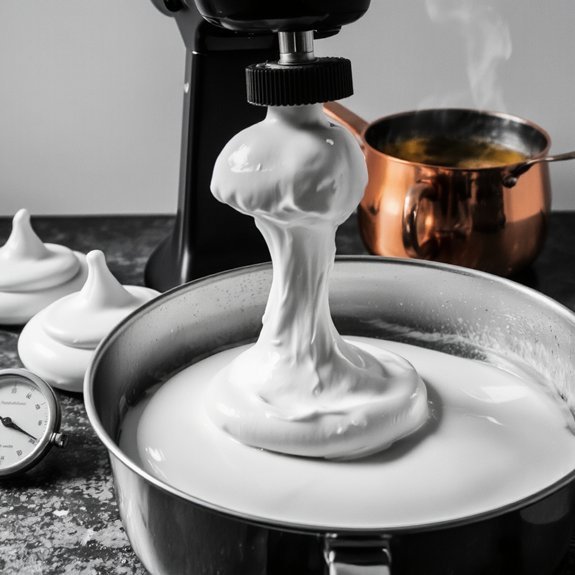
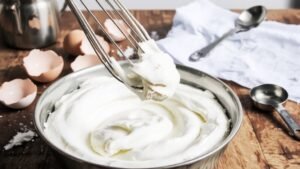
Whipping to Perfect Peaks
How do you know when your egg whites have reached the ideal consistency for receiving hot syrup? You’ll recognize perfect peaks when the meringue holds its structure without drooping.
Start whisking at medium speed, then gradually increase to high speed for maximum volume and stability. Adjust your bowl angles periodically to guarantee even whipping and prevent dead zones where egg whites remain underbeaten.
As you progress, you’ll notice the texture transform from foamy to glossy and finally to stiff peaks that stand upright without collapsing. This transformation typically takes five to seven minutes with an electric mixer.
The meringue should appear bright white and dense. Once you’ve achieved this consistency, you’re ready to receive the hot sugar syrup without deflating your carefully constructed foam.
Achieving the Ideal Texture
Achieving the ideal texture requires understanding the critical balance between egg white stability and sugar syrup temperature.
You’ll create a meringue with superior mouthfeel contrast—silky yet structured—by maintaining precise conditions throughout incorporation.
- Syrup temperature must reach 240°F (soft-ball stage) for proper protein denaturation
- Cool syrup slightly before pouring to prevent egg white deflation
- Whip continuously during syrup addition for uniform microstructure analysis
- Stabilize whites to stiff peaks before introducing heat
- Continue beating post-incorporation until meringue cools to room temperature
You’re manipulating protein networks at a molecular level, creating air cells stabilized by denatured egg proteins and sugar.
This precision determines whether your meringue achieves that desirable glossy finish and dense yet airy consistency.
Temperature control isn’t negotiable—it’s fundamental to success.
Storage and Make-Ahead Tips
Once you’ve perfected your meringue’s texture through precise temperature control, you’ll want to understand how to preserve that quality over time. Italian meringue maintains ideal quality for up to three days when stored in an airtight container at room temperature, though you’ll achieve extended shelf life through freezer storage.
Freeze your meringue in portions using parchment-lined trays before transferring to freezer bags, preventing clumping and enabling flexible usage. Frozen meringue retains its stability for three months without degradation.
Thaw frozen portions at room temperature for two hours before incorporating into buttercreams or other applications. This approach grants you complete freedom to prepare meringue ahead, streamlining your baking workflow.
Avoid refrigeration, as moisture exposure compromises structural integrity and creates weeping.
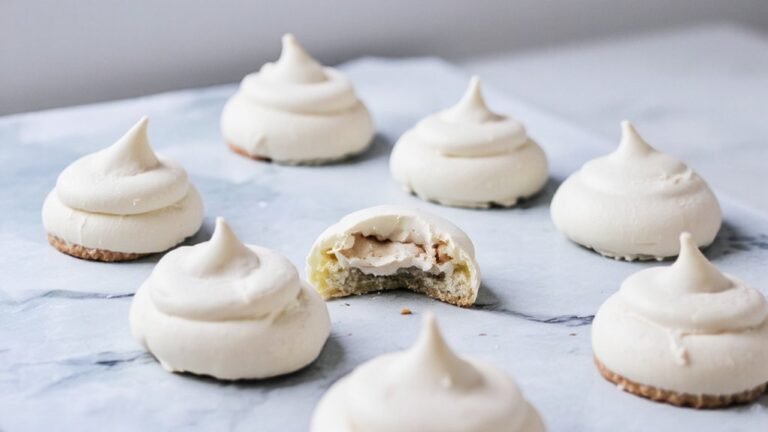
Creative Uses and Applications
You’ll find Italian meringue’s stability and glossy finish make it ideal for cake frosting and filling applications, where it won’t weep or separate during refrigeration.
Its silky texture also excels as a dessert topping—you can torch it for a caramelized exterior or pipe decorative garnishes that maintain their shape and structure.
These applications leverage meringue’s superior moisture retention compared to French or Swiss varieties, giving you professional results across multiple dessert platforms.
Cake Frosting and Filling
Italian meringue’s silky texture and stable structure make it exceptionally versatile beyond traditional frosting applications.
You’ll find it performs exceptionally well as cake frosting and filling, delivering superior stability compared to Swiss or French meringues.
Consider these applications:
- Layer between sponge cake tiers for elegant wedding cakes
- Pipe decorative borders and rosettes without compromising structure
- Combine with seasonal flavors like passion fruit or chestnut for autumn celebrations
- Create vegan fillings by substituting aquafaba for egg whites
- Blend with fruit purées for vibrant, naturally colored layers
You can adjust consistency by controlling heat application during whipping.
The meringue’s thermally-stabilized proteins create a buttercream-like texture that resists weeping.
You’ll appreciate how it maintains peaks under refrigeration, enabling you to frost days ahead.
This reliability makes Italian meringue your go-to choice for ambitious cake designs and time-sensitive events.
Dessert Toppings and Garnishes
Beyond its role as a structural component within cake layers, Italian meringue transforms into a stunning decorative element that elevates dessert presentations through its architectural possibilities.
You can pipe it into elegant peaks and swoops, creating visual drama that commands attention. Layer edible flowers directly into the meringue before it sets, embedding vibrant color and delicate texture.
Dust citrus zests across the surface, their bright oils catching light while delivering sophisticated flavor complexity. You’re not bound by convention—experiment with torching the peaks for caramelized contrast, or dust with cocoa powder and crushed pistachios for depth. The meringue’s neutral base accepts virtually any garnish, allowing you complete creative control over your dessert’s final presentation while maintaining structural integrity and professional polish.
Frequently Asked Questions
Can I Use Pasteurized Eggs for Italian Meringue, or Do I Need Raw Eggs?
You can absolutely use pasteurized eggs for Italian meringue. Pasteurization doesn’t cause significant protein denaturation that’d compromise your meringue’s structure.
You’ll achieve excellent whipping performance since the heat treatment doesn’t substantially alter egg white proteins’ ability to trap air bubbles. Pasteurized eggs eliminate foodborne pathogen risks without sacrificing the stability or volume you need for proper meringue formation.
This choice gives you safety without compromising your culinary results.
What Should I Do if My Meringue Breaks or Becomes Grainy During Preparation?
If your meringue breaks or becomes grainy, you’ve got rescue techniques at your disposal. Stop whisking immediately and let it rest for five minutes.
You can salvage it by slowly incorporating a fresh egg white while whisking gently. For texture troubleshooting, make sure your syrup reaches 240°F precisely—temperature deviations cause graininess.
Never rush the incorporation process. If salvage fails, start fresh; you’re in control of your results.
How Do I Fix Italian Meringue That’s Too Soft or Won’t Hold Peaks?
You’ve got options for stiffening techniques. Whip longer at high speed—you’ll incorporate more air and achieve firmer peaks.
Add stabilizer additions like cornstarch or cream of tartar to reinforce structure. If you’re using a stand mixer, make sure your bowl and whisk attachments are perfectly clean and grease-free.
Cold equipment helps too. You can also reduce heat slightly when cooking your sugar syrup—lower temperatures create gentler coatings that whip more easily into stable peaks.
Can I Make Italian Meringue Ahead and Freeze It for Later Use?
You can freeze Italian meringue, but you’ll encounter freezing texture changes that compromise stability.
When you thaw it using room temperature methods, the meringue often weeps and separates.
For best results, freeze it in airtight containers for up to three months.
However, you’ll need to re-whip it after thawing to restore its structure and peaks, making advance preparation less practical than making it fresh.
What’s the Difference Between Italian and Swiss Meringue in Terms of Safety?
You’ll find Italian meringue’s superior safety profile stems from syrup sterilization—you’re heating sugar to 240°F, which eliminates Salmonella risk inherent in Swiss meringue’s gentler 160°F heating method.
Italian meringue’s cooked syrup thoroughly pasteurizes your egg whites upon incorporation, whereas Swiss meringue relies on lower-temperature whisking, leaving potential pathogen vulnerability.
You’re basically choosing between guaranteed thermal elimination and calculated risk mitigation when selecting your meringue method.


Leave a Comment