Key Takeaways
- Make choux dough by boiling water and butter, stirring in flour, then adding eggs one at a time until glossy and elastic.
- Pipe uniform mounds onto parchment-lined baking sheets using a large round tip (#12), maintaining steady pressure between puffs.
- Bake at 425°F for 15 minutes without opening the door, then reduce to 375°F for 20–25 minutes until golden and firm.
- Cool completely on a wire rack for at least 30 minutes before filling to prevent condensation and maintain a crisp exterior.
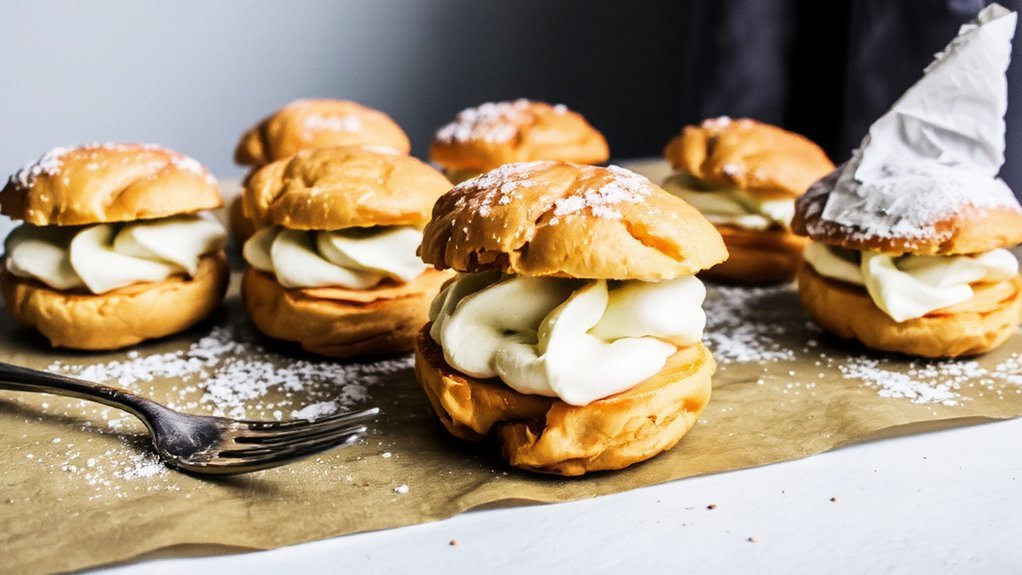
- Fill each cooled puff with 2–3 tablespoons of pastry cream, whipped cream, or custard using a medium round tip positioned one-third into the side.
Ingredients You’ll Need
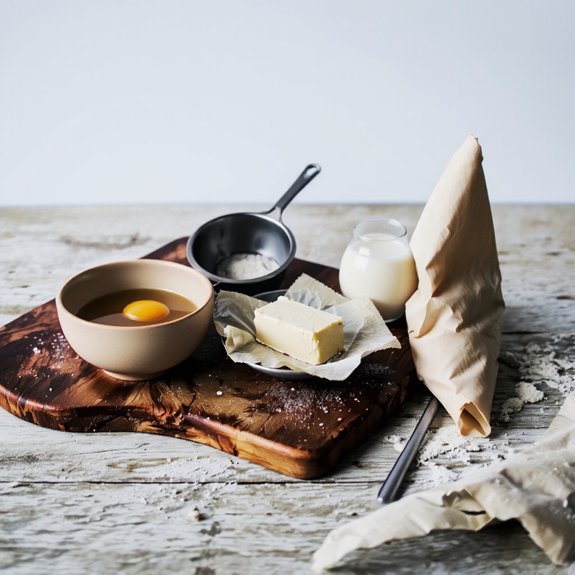
You’ll need one cup of water, half a cup of butter, one cup of all-purpose flour, and four large eggs for the choux pastry base.
These foundational ingredients create the signature hollow structure that defines cream puffs.
The foundational ingredients create the signature hollow structure that defines cream puffs and ensures bakery-quality results.
For the filling, you’ll want two cups of heavy cream, three tablespoons of powdered sugar, and one teaspoon of vanilla extract.
You’re free to explore substitute options—Greek yogurt works for a tangier profile, or you can use whipped mascarpone for richness.
Consider seasonal variations when selecting your filling flavors.
Spring calls for lemon zest.
Summer favors fresh berries.
Autumn welcomes cinnamon and nutmeg.
Winter suits chocolate and peppermint additions.
For dusting, gather powdered sugar or cocoa powder based on your chosen flavor profile.
These precise measurements guarantee consistent results every time.
Essential Equipment and Tools
You’ll need baking pans that conduct heat evenly—either standard baking sheets or dedicated cream puff pans with molds.
Piping bags with large round tips (size 12 or larger) are essential for dispensing the choux dough uniformly onto your pans.
Selecting quality equipment guarantees consistent results and prevents the frustration of unevenly baked or poorly shaped cream puffs.
Essential Baking Pans
Baking sheet-pans form the foundation of cream puff preparation, and you’ll need at least two sturdy, flat-bottomed steel pans measuring 18 by 13 inches to accommodate proper spacing between piped dough portions.
Material comparison reveals that commercial-grade aluminum conducts heat more evenly than standard steel, preventing uneven browning.
Dark nonstick surfaces absorb excessive heat, so opt for lighter finishes.
Pan maintenance directly impacts your results—hand-wash immediately after use to prevent baked-on residue, and avoid dishwashers that degrade nonstick coatings. Store pans flat to prevent warping.
Parchment paper or silicone liners protect surfaces and simplify cleanup. Inspect regularly for dents or damage that compromises heat distribution. Quality pans justify their investment through consistent, reliable baking performance.
Piping Bags and Tips
How does one achieve those signature puffs’ uniform shape and height?
You’ll need a piping bag and the right tip.
Piping bags have undergone historical evolution from cloth designs to modern disposable plastic options.
You’ve got flexibility choosing reusable pastry bags or single-use alternatives—both deliver consistent results.
Select a large round tip, typically #12, which creates uniform mounds of choux dough.
Cultural variations influence tip preferences globally.
French bakers traditionally favored specific tip sizes for their regional cream puff styles.
You’ll find that tip diameter directly affects puff volume and baking time.
Fill your bag three-quarters full, maintaining control without overflow.
Apply steady pressure, releasing completely between puffs.
This methodical approach guarantees you’re not confined to inconsistent shapes.
Quality equipment grants you the freedom to produce professional pastries consistently, regardless of your skill level.
Making the Choux Pastry Dough
Since choux pastry’s success depends on precise technique and proper ingredient ratios, you’ll want to combine water, butter, salt, and sugar in a saucepan over medium heat.
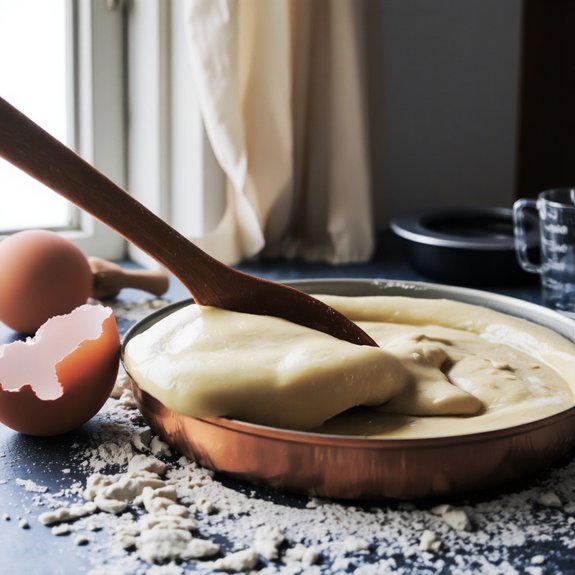
Once the mixture boils, remove it from heat and stir in flour until you’ve achieved panade formation—a thick, paste-like consistency that pulls away from the pan’s sides.
Stir in flour until the mixture forms a thick, paste-like panade that pulls cleanly away from the pan’s sides.
Let this panade cool for several minutes before beginning egg incorporation.
Add eggs one at a time, beating vigorously after each addition until fully integrated.
This methodical approach guarantees your dough develops proper structure and elasticity.
The finished dough should be smooth, glossy, and pipe easily.
You’ll know you’ve succeeded when it holds peaks without deflating.
This dough is now ready for piping onto your baking sheet.
Preparing Your Baking Sheets
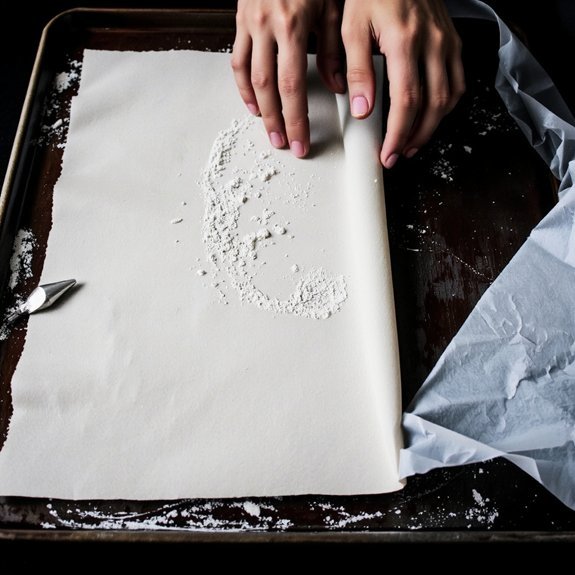
Once you’ve perfected your choux dough, you’ll need properly prepared surfaces to pipe it onto.
You’re free to choose your preferred lining method—parchment paper offers the standard approach, while silicone baking mats provide a reusable alternative that reduces waste. Both materials prevent sticking and promote even heat distribution.
Position your racks strategically for ideal baking. You’ll want to place one rack in the upper-middle section and another in the lower-middle, allowing you to rotate sheets halfway through baking for uniform browning. This rack positioning prevents uneven cooking and eliminates burnt bottoms.
Secure your lining material firmly to prevent shifting during piping. You can lightly dampen the sheet’s underside or use small dabs of dough at corners. This simple preparation step saves you from frustrating mishaps and guarantees professional results.
Baking Your Cream Puffs
Transfer your piped choux onto the prepared baking sheets and place them into a preheated 425°F oven.
Bake for 15 minutes without opening the door—this initial high heat generates steam, creating the characteristic hollow structure you need.
Reduce the temperature to 375°F and continue baking for 20-25 minutes until the puffs turn golden brown and feel firm to the touch.
Consider oven calibration, as temperature variance affects rise and browning.
For altitude adjustments above 3,000 feet, increase your initial temperature by 25°F and reduce baking time by 5 minutes.
Once done, transfer puffs to a cooling rack.
They’ll firm up completely as they cool.
Don’t skip the cooling stage—premature filling creates soggy cream puffs.
You’re now ready for filling and finishing.
Cooling and Storage Tips
You’ll achieve ideal results by cooling your cream puffs completely on a wire rack before storing them, which prevents moisture buildup that softens the shells.
Transfer cooled puffs to airtight containers or freezer bags, where they’ll maintain quality for up to two days at room temperature or three months when frozen.
Thaw frozen puffs at room temperature for 30 minutes before filling to restore their structural integrity and crisp texture.
Proper Cooling Techniques
Allowing your cream puffs to cool completely before filling or storing them’ll prevent condensation from making the pastry soggy.
You’ll achieve ideal results by following these cooling strategies:
- Place puffs on wire racks at ambient temperature for at least 30 minutes
- Position racks near windows to establish cross ventilation and expedite cooling
- Avoid stacking warm puffs, which traps steam and compromises texture
- Never refrigerate warm puffs, as temperature fluctuations create moisture
This methodical approach guarantees your pastry shells maintain their crisp exterior and delicate structure.
Once cooled to room temperature, you can confidently fill them with your chosen cream filling or store them in airtight containers.
Proper cooling directly determines whether your cream puffs’ll deliver that satisfying crunch you demand.
Airtight Storage Methods
Once your cream puffs have reached room temperature, storing them properly’ll preserve that crisp texture you’ve worked to achieve.
Place cooled puffs in airtight containers, ensuring minimal air exposure. For extended storage, consider vacuum sealing, which removes excess oxygen that degrades quality. Alternatively, use oxygen scavengers—small packets that absorb remaining air and moisture inside sealed containers. These methods prevent staleness and maintain structural integrity for up to three days at room temperature.
Store containers away from heat and humidity sources.
If you’re preparing ahead, refrigerate vacuum-sealed puffs for five days or freeze them for three months. Before serving refrigerated puffs, allow them to acclimate to room temperature for ideal texture. This methodical approach guarantees your cream puffs remain crispy and ready to fill whenever you choose.
Shelf Life Duration
Proper cooling establishes the foundation for your cream puffs’ longevity, as the choux pastry’s structural integrity depends on gradual temperature reduction.
You’ll maximize shelf life by understanding how temperature effects directly impact preservation.
Your cream puffs remain fresh when you:
- Store unfilled shells at room temperature for up to two days in airtight containers
- Refrigerate filled puffs at 40°F or below for maximum one day
- Freeze unfilled shells for three months in freezer bags
- Keep filled puffs frozen for two weeks, thawing in the refrigerator before serving
Microbial growth accelerates rapidly above 40°F, particularly in cream-filled pastries.
You’re protecting both flavor and food safety by maintaining consistent, cool temperatures.
Don’t leave assembled puffs unrefrigerated beyond two hours, as custard fillings create ideal conditions for bacterial development.
Preparing Your Filling Options
Selecting your filling’s base ingredient sets the foundation for your cream puff’s flavor profile and texture.
You’ll choose between pastry cream, whipped cream, or custard—each offering distinct characteristics.
Pastry cream delivers richness and stability; whipped cream provides lightness; custard offers velvety smoothness.
Consider your flavor pairings carefully. Vanilla pairs with chocolate or fruit. Coffee complements hazelnut or almond. You’re free to experiment boldly.
Regional inspirations guide your decisions too. French éclairs traditionally use chocolate ganache and pastry cream. Italian versions incorporate zabaglione. Spanish preparations feature dulce de leche.
Prepare your base from scratch using quality ingredients: whole eggs, full-fat milk, real vanilla, and premium chocolate.
Cook pastry cream to precise temperatures—around 180°F—ensuring proper thickening. Cool completely before filling. This methodical approach guarantees professional results and unlocks creative possibilities.
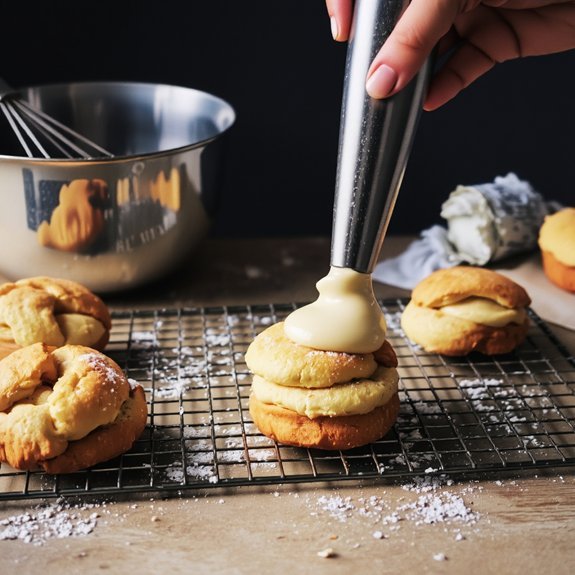
Assembling and Filling Your Puffs
Filling your cooled puffs requires a steady hand and a piping bag fitted with a medium round or pastry tip.
Master your assembly choreography by establishing a consistent workflow that maximizes efficiency without compromising quality.
For ideal portion consistency, apply these techniques:
- Fill each puff with approximately 2-3 tablespoons of your chosen cream filling
- Position the tip one-third into the puff’s side for even distribution
- Apply steady pressure to avoid overfilling or underfilling individual puffs
- Wipe the bag’s exterior between each puff to maintain control
Work methodically through your batch, maintaining uniform pressure and angle throughout.
This precision guarantees every puff delivers the same balanced cream-to-pastry ratio.
Your filling technique directly influences the final product’s structural integrity and eating experience, so practice deliberate, controlled movements that prioritize consistency over speed.
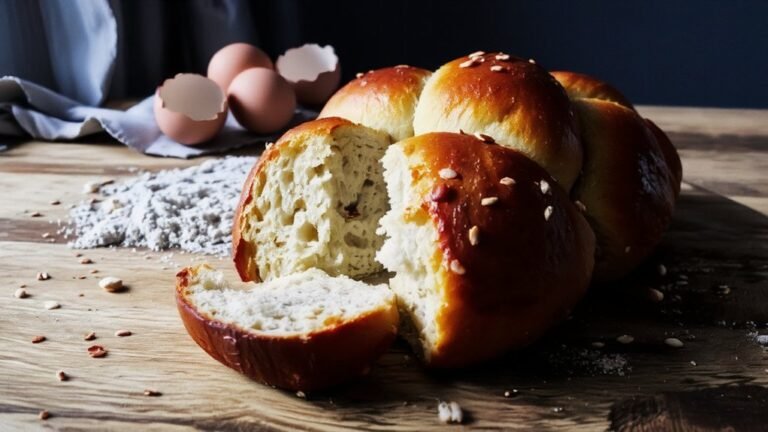
Serving and Presentation Ideas
Once you’ve perfected your filling technique, you’ll want to present your cream puffs in ways that showcase their delicate construction and appeal.
You can arrange them on minimalist plating styles—stack them pyramidally for dramatic effect or scatter them across white ceramic for understated elegance.
Your garnish pairings determine the final impression: dust with powdered sugar for classic refinement, drizzle dark chocolate for richness, or add fresh berries for vibrant color contrast.
Consider dusting cocoa powder around the plate’s perimeter or incorporating edible flowers for sophisticated flair.
You’ll find that restraint serves you best—each element you choose should amplify, not compete with, your cream puffs’ delicate nature. These presentation choices transform your technically executed puffs into memorable dessert experiences that reflect your culinary precision and creative vision.
Frequently Asked Questions
Can I Make Cream Puffs Ahead of Time and Freeze Them for Later?
You can absolutely freeze cream puffs for later freedom in your baking schedule. After baking, cool them completely, then use flash freezing by placing unfilled puffs on a tray for two hours before bagging them. They’ll stay fresh for three months.
When you’re ready, thaw tips include leaving them at room temperature for 30 minutes to restore their crispy exterior before filling with your desired cream components.
What Causes Cream Puffs to Collapse or Fail to Rise Properly?
You’ll experience collapse or poor rise when you don’t achieve proper steam formation—this requires adequate moisture in your dough.
Insufficient egg incorporation creates weak structure; you’re not building enough protein matrix to support expansion. Conversely, over-mixing develops gluten excessively, restricting rise.
Oven temperature fluctuations prevent consistent steam generation. You’ve got the autonomy to control these variables: measure precisely, incorporate eggs methodically, maintain steady heat, and avoid opening the oven door prematurely.
How Do I Fix Cream Puff Dough That Seems Too Thick or Thin?
You’ll fix dough consistency through precise egg adjustment and refined mixing technique.
If your dough’s too thick, incorporate eggs one at a time until you’ve achieved a smooth, glossy paste that drops slowly from a spoon.
When it’s too thin, you’ve likely overbeaten—don’t add flour.
Instead, refrigerate the mixture for thirty minutes, allowing it to firm up naturally while maintaining structural integrity for proper rise.
Can I Use Store-Bought Pastry Cream Instead of Making Homemade Filling?
You can absolutely use store-bought pastry cream, giving you freedom from scratch preparation.
Check ingredient labels for allergen considerations—many commercial versions contain dairy, eggs, or nuts.
You’ll sacrifice customization in flavor variations, but quality brands deliver reliable results.
Confirm you’re selecting true pastry cream rather than pudding mix. Whip it lightly before piping to achieve ideal consistency.
This shortcut works excellently when you’re prioritizing convenience over complete control.
Why Are My Cream Puffs Greasy or Oily After Baking?
You’re experiencing fat separation—your oven temperature’s too low. When you don’t bake at the precise 400°F required, moisture doesn’t evaporate properly, leaving greasy residue.
You’ve got the freedom to fix this: calibrate your oven, make sure it’s fully preheated, and maintain consistent heat throughout baking. High enough temperature creates steam that sets the choux properly, preventing oil from pooling on your puffs’ exterior.


Leave a Comment