Key Takeaways
- Maintain a 1:2 butter-to-flour ratio by weight and keep butter cold for optimal pastry flakiness and lamination.
- Blind bake pastry shell at 375°F for 12–15 minutes with pie weights to prevent shrinkage and puffing.
- Temper egg yolks with hot milk at 180°F, then heat custard to 160°F before straining and cooling.
- Refrigerate filled tart at 40°F for minimum 4 hours; overnight chilling ensures ideal custard texture and firmness.
- Select vibrant, seasonal fruit with slight give; pat dry, cut uniformly into ¼-inch slices, then arrange with varying heights.
Ingredients You’ll Need
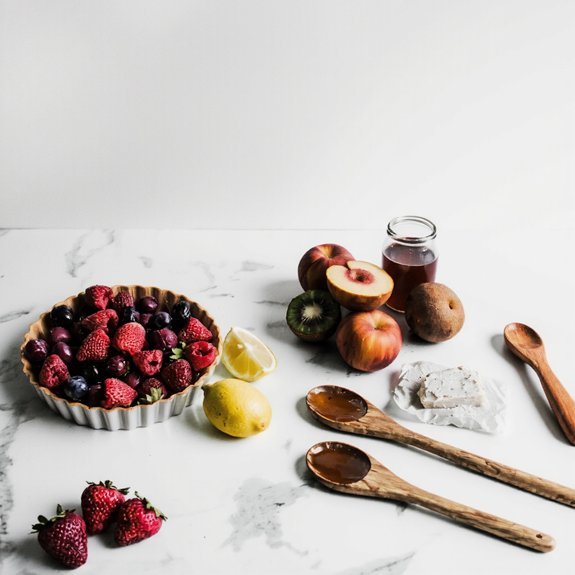
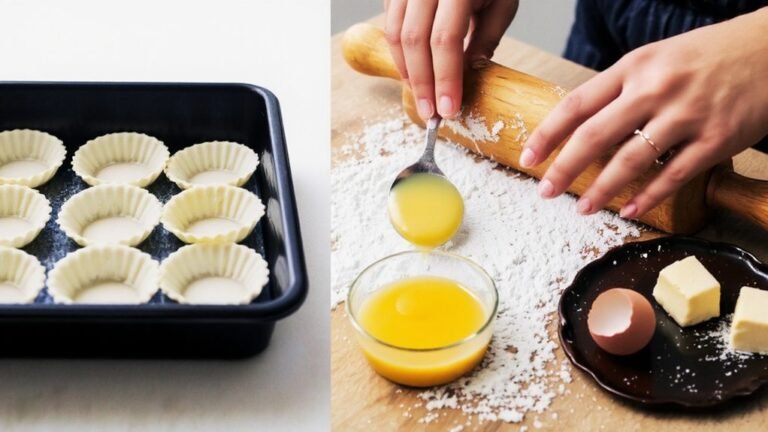
You’ll need several key components to construct this fruit tart: 1 cup all-purpose flour, ½ cup unsalted butter (softened), ¼ cup granulated sugar, 1 large egg yolk, ½ teaspoon vanilla extract, a pinch of kosher salt.
1 cup whole milk, 3 tablespoons cornstarch, 2 tablespoons granulated sugar, 4 large egg yolks, 1 teaspoon vanilla extract, 2 tablespoons unsalted butter, and 2 cups assorted fresh fruit (such as strawberries, blueberries, kiwi, and raspberries).
These pantry staples form your foundation for both the pastry shell and custard filling.
Your pantry staples form the foundation for both the pastry shell and custard filling.
You’ll find most ingredients in your kitchen already. If you’re seeking substitute options, you can replace all-purpose flour with whole wheat flour or use salted butter if unsalted isn’t available. For the fresh fruit component, select whatever’s in season to maximize flavor and freshness.
Making the Perfect Pastry Shell
You’ll need to maintain a precise butter-to-flour ratio of 1:2 by weight to achieve the ideal pastry texture and flakiness.
Blind baking your shell at 375°F for 15 minutes with parchment and pie weights prevents soggy bottoms and guarantees structural integrity before filling.
This technique creates a crisp, stable foundation that’ll support your fruit tart without compromising its texture.
Butter and Flour Ratio
The foundation of a superior fruit tart shell relies on maintaining a precise 1:2 ratio of butter to flour by weight, typically 100g butter to 200g flour. This ratio’s historical evolution across European patisserie demonstrates why it’s remained standard—you’ll achieve ideal flakiness and structural integrity.
You’re free to explore regional variations that suit your preferences. French pâte brisée employs this classical proportion, while some Mediterranean techniques incorporate slightly higher butter percentages for richness. You’ll notice that deviating from this benchmark compromises texture; too little butter yields a crumbly, brittle shell, whereas excess butter creates greasiness and shrinkage.
Precision matters here. You’ll want to weigh ingredients rather than estimate—volume measurements introduce inconsistency. Maintain cold butter temperatures throughout mixing to guarantee your pastry develops the laminated layers you’re pursuing for that coveted crisp, golden crust.
Blind Baking Techniques
Before your meticulously prepared pastry shell can hold a vibrant filling, you’ll need to blind bake it—a critical step that prevents a soggy bottom and guarantees structural stability.
This technique employs several essential methods:
- Line your pastry with parchment paper and fill with ceramic weights or dried beans to distribute heat evenly
- Prebake at 375°F for 15 minutes, then remove weights for final crisping
- Consider steam injection during initial baking to promote even browning
Altitude adjustments modify baking time—higher elevations require reduced temperatures by 25°F and extended duration by 5-10 minutes.
Monitor your shell’s color carefully; you’re targeting pale golden tones, not deep browning.
Remove the shell when edges firm but centers remain slightly yielding.
This precision guarantees your tart foundation won’t compromise your filling, giving you complete control over your baking outcome.
Blind Baking Your Crust
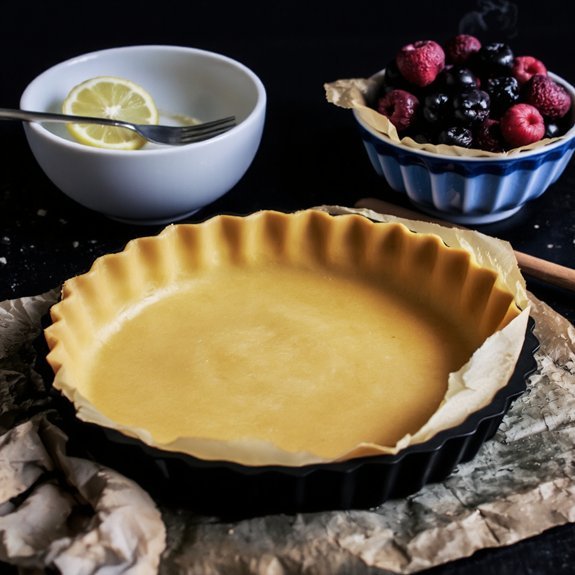
You’ll line your pie shell with parchment paper and fill it with pie weights or dried beans to prevent the bottom from puffing during the initial bake.
This technique keeps your crust from shrinking at the edges while ensuring even heat distribution across the surface.
You’ll know your crust has reached the proper stage when the edges turn light golden and the bottom feels set when you gently lift the parchment.
Preparing Your Pie Shell
Blind baking your crust prevents a soggy bottom and guarantees even cooking throughout your tart shell.
You’ll achieve professional results by following these essential steps:
- Line your shell with parchment paper and fill with ceramic weights or dried beans to maintain structural integrity during baking
- Bake at 375°F for 12-15 minutes until the edges achieve light golden coloration
- Remove weights carefully and cool completely before filling
Proper shell sizing helps your tart maintain its form without shrinkage.
Dock the bottom with a fork to prevent air pockets from forming.
Monitor rim decoration edges—they’ll brown faster than the base, so shield them with aluminum foil if needed.
This technique gives you complete control over your tart’s foundation, eliminating variables and delivering consistent, reliable results every time.
Preventing Crust Shrinkage
Why does your tart shell shrink during baking? Thermal expansion causes your dough to contract as it cools, compromising your final product’s structural integrity.
You’ll prevent shrinkage through blind baking—a technique where you pre-bake your crust partially or fully before adding filling.
Line your pan material (preferably aluminum, which conducts heat uniformly) with parchment paper, then fill it with pie weights or dried beans. This counteracts upward dough movement during heating.
Bake at 375°F for 12-15 minutes until the edges turn golden, then remove weights carefully.
If your recipe demands full blind baking, continue for another 5-8 minutes until the base firms completely.
You’ll achieve a stable, professional-quality crust that maintains its shape throughout filling and final baking. This straightforward method eliminates the frustration of collapsed sides and uneven thickness.
Testing for Doneness
How can you determine when your partially or fully blind-baked crust has reached ideal doneness?
You’ll rely on visual cues and tactile feedback to achieve proper results.
- Color Assessment: Look for golden-brown edges and a light tan base; darker spots indicate over-baking
- Firmness Test: Gently press the crust’s center—it should feel set but retain slight give
- Sound Check: Tap the bottom; a hollow sound confirms structural integrity
Account for Oven Calibration variations by using an independent thermometer.
Altitude Adjustment requires reducing baking time by 5-10% at elevations above 3,000 feet.
Remove your crust when it’s just underbaked rather than overdone—residual heat completes the process.
You’ll transfer it immediately to a cooling rack, preventing moisture accumulation that compromises your final tart’s structural integrity and texture.
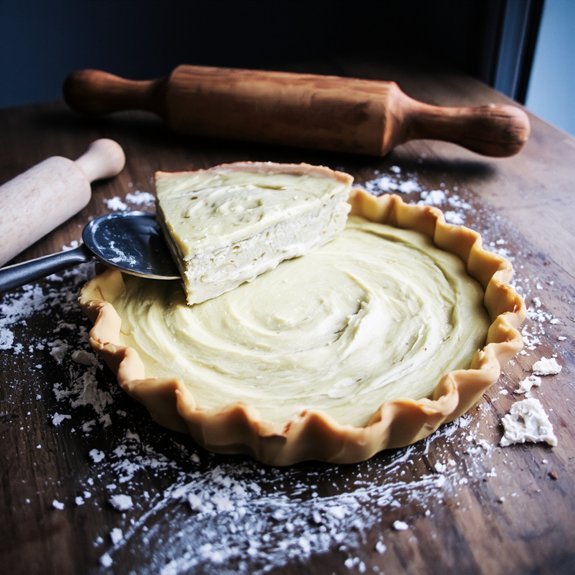
Preparing the Custard Filling
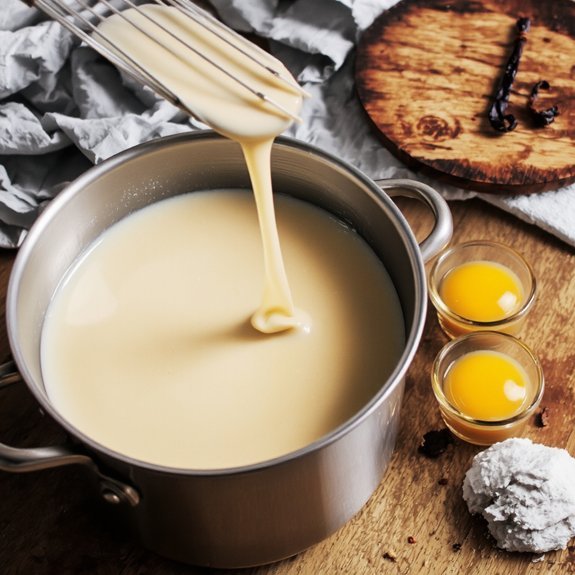
Whisking together egg yolks, sugar, and cornstarch creates the foundation for a silky custard that’ll hold its structure within your tart shell.
Heat milk to 180°F, then slowly incorporate it into your egg mixture while whisking continuously—this tempering eggs process prevents curdling.
Return the combined mixture to medium heat, stirring constantly until it reaches 160°F for food safety.
The custard aeration you’ve created through vigorous whisking introduces air pockets, yielding a lighter texture.
Once thickened, strain the custard through fine mesh to eliminate lumps and achieve smoothness.
This step’s non-negotiable for professional results.
Cool your custard to 120°F before filling your pre-baked shell.
You’re now ready to showcase your fruit without compromise.
Cooling and Setting Your Tart
Once you’ve poured the 120°F custard into your pre-baked tart shell, you’ll need to refrigerate it at 40°F for a minimum of 4 hours—though overnight chilling produces ideal results.
This chilling time allows the custard to set properly and develop ideal texture.
Control your environment carefully:
- Maintain 40-45°F refrigeration temperature for consistent gelatin activation
- Monitor humidity control at 50-55% to prevent crust sogginess
- Store tart on the middle shelf away from door drafts
During this critical phase, the custard’s protein structure stabilizes through gradual cooling, creating a firm yet creamy consistency.
Avoid temperature fluctuations that compromise structural integrity.
Once fully set, you’re ready to arrange fresh fruit atop the custard layer, completing your professional-quality tart without compromising your culinary independence.
Selecting the Best Fresh Fruit
You’ll want to select fruit that displays ideal ripeness indicators—vibrant color saturation and slight give when gently pressed—rather than relying on appearance alone. Prioritize seasonally available produce, which guarantees peak flavor profiles and superior nutritional density compared to out-of-season alternatives.
Before purchasing, inspect each piece systematically for blemishes, soft spots, mold, or bruising that’ll compromise both aesthetics and taste in your finished tart.
Ripeness and Color Indicators
How can you identify fruit that’s reached peak ripeness for your tart?
You’ll want to trust your independent judgment by understanding the science behind ripeness indicators.
Ethylene signalling triggers pigment chemistry changes that visibly transform your fruit’s exterior.
These biochemical processes determine ideal flavor and texture for your dessert.
Monitor these essential indicators:
- Color saturation: Deep, vibrant hues signal advanced maturation stages
- Firmness response: Gentle pressure should yield slightly without collapsing
- Aromatic intensity: Concentrated fragrance indicates peak volatile compound development
Different varieties require specific assessment strategies.
Berries demand visual inspection for consistent coloration, while stone fruits need tactile evaluation for slight give.
Don’t rely solely on appearance; combine multiple sensory evaluations.
You’ll maximize your tart’s flavor profile by selecting fruit at its precise ripeness window, ensuring superior results without compromising your culinary autonomy.
Seasonal Availability Matters Most
Because seasonal cycles determine fruit’s nutritional density and flavor compounds, timing your harvest selection directly impacts your tart’s quality.
You’ll discover that local sourcing provides superior flavor profiles compared to off-season imports, which often rely on extended cold storage that degrades volatile aromatic compounds.
You should understand price fluctuation patterns—peak seasons offer ideal cost-effectiveness and peak ripeness simultaneously.
You’re free to choose berries in summer, stone fruits in July through September, and citrus during winter months when these varieties achieve maximum sugar concentration and acidity balance.
You’ll notice that purchasing within your region’s natural growing calendar makes certain you’re acquiring fruit at peak phenolic and anthocyanin levels.
This strategic timing eliminates compromise and guarantees your tart delivers exceptional sensory characteristics that showcase pristine fruit quality.
Inspecting for Quality Defects
Once you’ve identified peak-season fruit availability, the next step involves systematically evaluating individual specimens for structural integrity and physiological soundness.
You’ll want to inspect each piece thoroughly before committing your ingredients to the tart.
Key inspection points:
- Examine skin surfaces for bruising, soft spots, or mold—defects that compromise flavor and shelf stability
- Verify packaging integrity and label accuracy to confirm harvest dates and origin
- Assess firmness through gentle pressure; fruit shouldn’t yield excessively or feel hollow
You’re responsible for selecting specimens that’ll deliver ideal results.
Don’t settle for compromised produce. Check the stem attachment, color uniformity, and any off-odors indicating fermentation.
You’ll gain confidence recognizing quality markers that distinguish premium fruit from substandard alternatives, ensuring your tart achieves professional-caliber results.
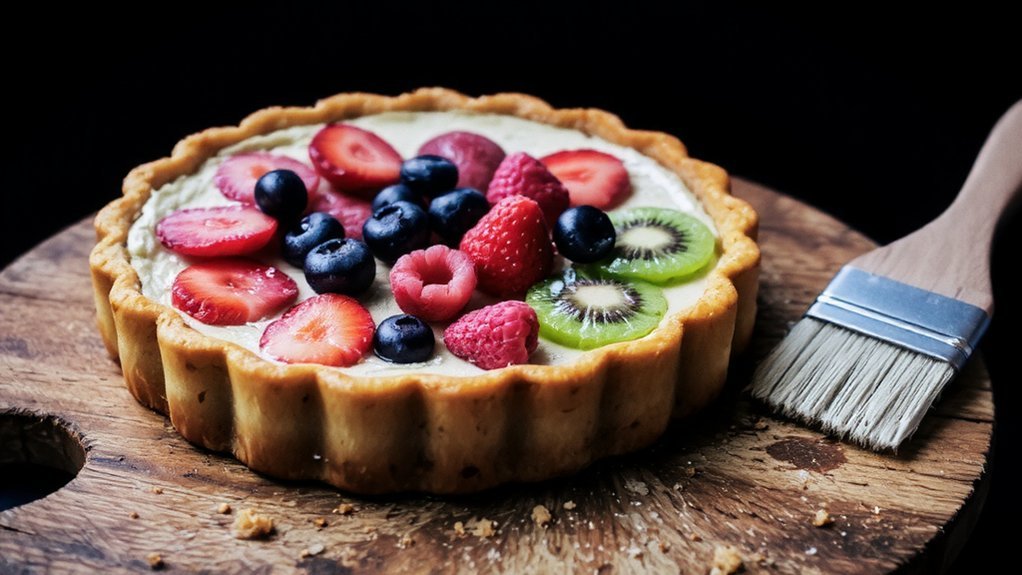
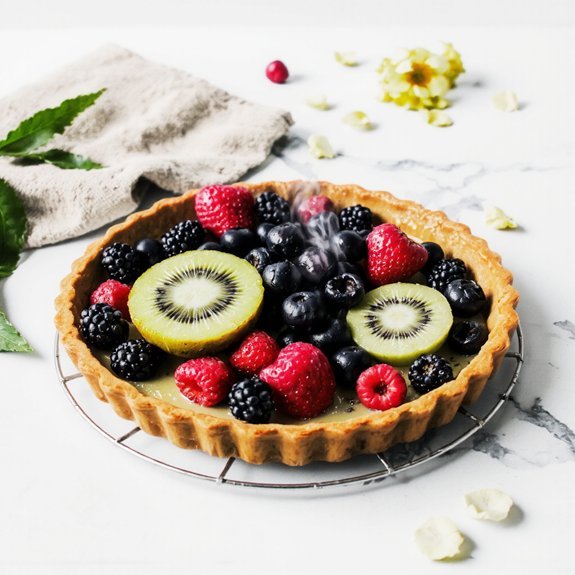
Preparing Your Fruit Toppings
To achieve ideal flavor and visual appeal, you’ll want to select ripe fruits that complement your tart’s flavor profile while maintaining structural integrity during assembly.
Cut your selections into uniform thickness—approximately 1/4 inch—ensuring consistent cooking and presentation.
Uniform 1/4 inch cuts ensure consistent cooking and polished presentation throughout your fruit tart assembly.
Consider herb infusions like basil or mint to enhance subtle flavor dimensions. Apply citrus zesting sparingly across delicate fruits to brighten aromatics without overwhelming the palate.
Pat dried fruits thoroughly to eliminate excess moisture that compromises crust texture.
Arrange toppings strategically, positioning denser fruits toward the tart’s perimeter where they’ll anchor lighter specimens.
Brush berries with a light egg wash or neutral glaze to enhance visual definition and prevent oxidation.
Execute these preparations immediately before baking to maximize freshness and prevent enzymatic browning that degrades aesthetic quality and taste.
Arranging Fruit for Visual Impact
While you’ve prepared your fruit components with precision, their arrangement determines whether your tart achieves visual distinction or appears haphazard.
Strategic placement transforms your creation from ordinary to extraordinary.
Position your focal point—typically your largest or most vibrant fruit—slightly off-center to guide the viewer’s eye naturally across the tart’s surface. Distribute complementary fruits in graduated sizes, creating rhythm and movement.
Key principles for maximum impact:
- Use negative space deliberately; avoid overcrowding that diminishes individual fruit characteristics
- Layer fruits at varying heights to establish depth and visual complexity
- Arrange colors in complementary sequences that enhance contrast without clashing
Follow these technical guidelines, and you’ll command complete control over your tart’s presentation.
The result? A dessert that’s both artfully composed and unmistakably professional.
Adding the Finishing Glaze
After you’ve positioned your fruit with deliberate care, you’ll apply the finishing glaze to seal flavors and enhance visual sheen. Your application technique determines the final outcome’s quality and appearance.
| Glaze Type | Composition | Setting Time |
|---|---|---|
| Apricot | Strained jam + water | 15 minutes |
| Neutral | Gelatin + stock | 20 minutes |
| Berry | Reduced coulis | 10 minutes |
Use a pastry brush to apply glaze evenly across fruit surfaces, working systematically from center outward. This visual enhancement creates a professional lacquer finish while protecting against oxidation. Maintain consistent brush strokes to avoid streaking. Allow adequate setting time before serving—premature slicing compromises glaze integrity. Your precision in execution distinguishes an artisanal tart from mediocre results, delivering both aesthetic sophistication and flavor preservation that rewards your technical mastery.
Storage and Serving Tips
Your fruit tart demands immediate refrigeration at 35-40°F within two hours of completion to maintain structural integrity and prevent bacterial growth.
This refrigeration timing prevents custard degradation and preserves pastry crispness.
For transport packaging, use rigid containers with secure lids to prevent shifting during movement.
Avoid plastic wrap, which traps moisture and compromises texture.
Your storage options include:
- Refrigerate up to 48 hours in airtight containers away from odorous foods
- Freeze unfilled shells separately for up to two weeks for maximum flexibility
- Store glazed fruit components separately to maintain individual structural integrity
Serve your tart directly from refrigeration at 40°F for ideal flavor development and structural stability.
Allow five minutes of ambient temperature acclimation before plating.
This approach preserves your culinary investment while delivering superior sensory experience.
Frequently Asked Questions
Can I Make the Tart Ahead of Time, and How Long Before Serving?
You can prepare your fruit tart strategically across two phases. Assemble the pastry shell and pastry cream filling up to 24 hours prior, maintaining refrigeration timing at 40°F or below.
Add your fresh fruit garnish within 2-4 hours before serving to prevent moisture degradation. This assembly timing approach maximizes your flexibility while preserving structural integrity and flavor complexity.
You’re empowered to control preparation without sacrificing quality.
What Are Good Substitutes if I Don’t Have All Ingredients?
You’ve got flexibility with substitutions.
For nut alternatives, swap almonds with pistachios or hazelnuts in equal ratios.
Citrus replacements work seamlessly—replace lemon zest with lime or orange zest at 1:1 proportions.
You can substitute all-purpose flour with almond flour at 0.9:1 ratio.
Swap butter with coconut oil using identical measurements.
These modifications preserve structural integrity while allowing you creative control over your tart’s flavor profile without compromising baking chemistry.
How Do I Prevent the Pastry From Shrinking During Baking?
You’ll prevent shrinkage by chilling your dough for at least 30 minutes before baking.
Apply the docking technique—pierce the pastry surface with a fork at quarter-inch intervals to release steam evenly.
This stabilizes the structure and maintains dimensional integrity.
You’re also free to use parchment paper and pie weights during blind baking for ideal results.
These methods guarantee your tart shell retains its intended dimensions throughout the baking process.
Can I Use Frozen Fruit Instead of Fresh Fruit?
You can substitute frozen fruit, though you’ll encounter texture differences and excess moisture complications.
Thaw your fruit completely and drain it thoroughly on paper towels to eliminate liquid accumulation.
Frozen varieties lose cellular integrity during freezing, resulting in softer, mushier consistency compared to fresh specimens. Pat them dry before arranging on your tart shell to prevent a soggy crust and maintain structural integrity throughout your final product.
What’s the Best Way to Reheat Leftovers Without Ruining Texture?
You’ll achieve ideal results through oven revival at 325°F for 8-12 minutes, prioritizing moisture control by covering your tart loosely with foil.
This technique prevents your crust from becoming brittle while gently reheating the filling.
Avoid microwaving, which’ll compromise textural integrity.
You’re maintaining your independence by controlling every variable—temperature, duration, and coverage—ensuring your leftover tart tastes as fresh as when you originally crafted it.


Leave a Comment