Key Takeaways
- Combine 1½ lb hulled strawberries with 1 lb rhubarb; macerate with ¾ cup sugar for 30 minutes to concentrate flavors.
- Heat filling to 220°F with 2 tbsp cornstarch, stirring gently until thickened; cool completely for 2 hours before filling.
- Blind-bake crust at 425°F for 8 minutes; maintain ¾-inch clearance from rim and create steam vents one inch apart.
- Bake at 425°F for 20 minutes, then reduce to 375°F for 25–30 minutes until filling bubbles at edges and crust browns.
- Verify filling center reaches 190°F with instant-read thermometer; cool on wire rack minimum 4–6 hours for proper gel development.
Ingredients You’ll Need
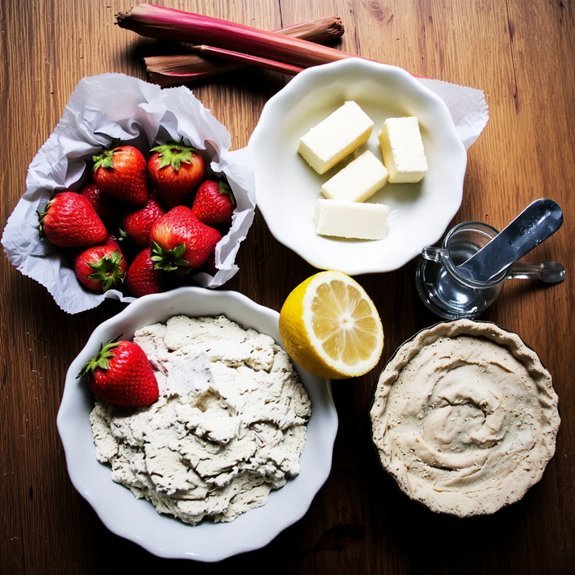
You’ll combine 1½ pounds of fresh strawberries, hulled and halved, with 1 pound of rhubarb, cut into ¾-inch pieces, as your fruit base.
Combine 1½ pounds fresh strawberries, hulled and halved, with 1 pound rhubarb cut into ¾-inch pieces for your fruit base.
Add ¾ cup granulated sugar, 2 tablespoons cornstarch, and ¼ teaspoon salt to balance sweetness and control moisture.
For seasonal substitutions, swap strawberries with raspberries or blackberries at peak ripeness.
Replace rhubarb with tart apples or cranberries when unavailable.
Regarding allergy alternatives, substitute cornstarch with tapioca starch or arrowroot powder for thickening.
Use coconut sugar or maple syrup if refined sugar poses concerns.
You’ll need one unbaked pie crust, egg wash for browning, and ½ teaspoon vanilla extract to enhance flavor depth.
These precise measurements guarantee ideal texture and taste without compromising your culinary objectives.
2. Preparing Your Pie Crust
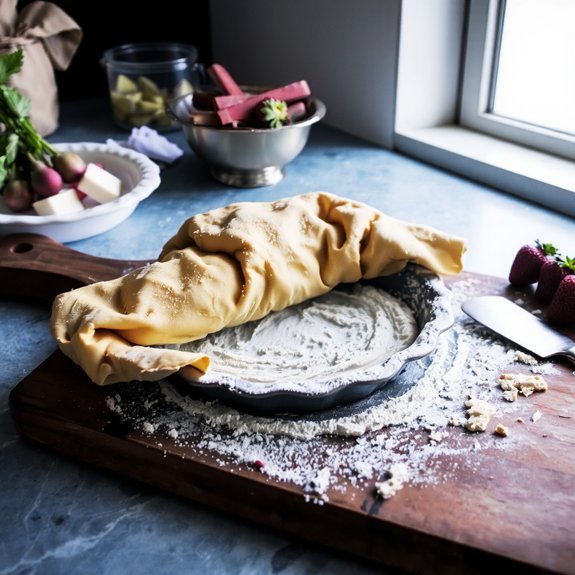
With your fruit filling measured and set aside, the pie crust becomes your structural foundation—one that’s equally demanding in its construction.
You’ll master this by controlling two critical variables: butter temperature and dough hydration.
Keep your butter at 65–68°F—cold enough to create distinct pockets, warm enough to work without shattering. Mix your dry ingredients, then cut butter into pea-sized pieces. Add ice water gradually, achieving a dough that just holds together without becoming tacky.
Key steps for success:
- Chill dough for at least 30 minutes to relax gluten and prevent shrinkage
- Roll between parchment sheets to maintain even thickness and control moisture loss
- Pre-bake at 425°F for 8 minutes to set structure before filling
This precision prevents soggy bottoms and guarantees your crust delivers both structural integrity and flaky texture.
3. Making the Filling
Transforming your prepared strawberries and rhubarb into a cohesive filling requires balancing three core elements: pectin activation, sugar dissolution, and acid equilibrium.
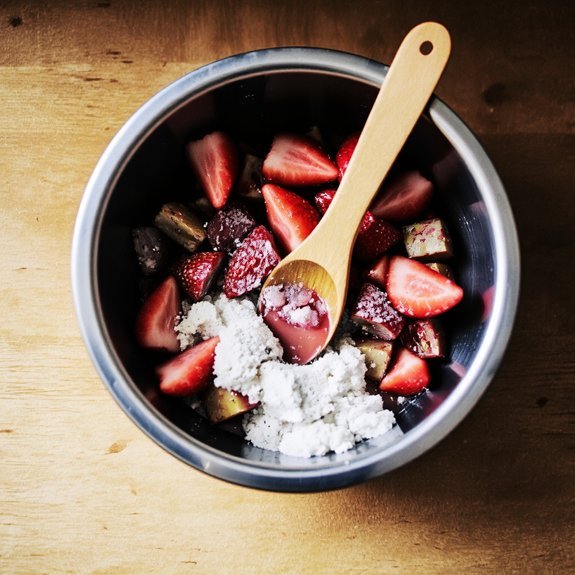
Begin with fruit maceration by combining your berries and rhubarb with sugar, allowing them to release their juices over thirty minutes.
This process extracts moisture and concentrates flavors.
Next, incorporate thickening agents.
You’ll choose between cornstarch, tapioca, or natural pectin based on your desired consistency.
Add approximately two tablespoons per four cups of fruit.
The rhubarb’s natural acidity activates the thickening process, while lemon juice reinforces this reaction.
Heat your mixture gently, stirring constantly until it reaches 220°F.
This temperature promotes proper gel formation without overcooking your fruit.
Cool completely before filling your crust—this critical step prevents a soggy bottom and guarantees structural integrity for your finished pie.
4. Assembling Your Pie
You’ll pour your cooled strawberry-rhubarb filling into the prepared crust, distributing it evenly to achieve consistent texture throughout.
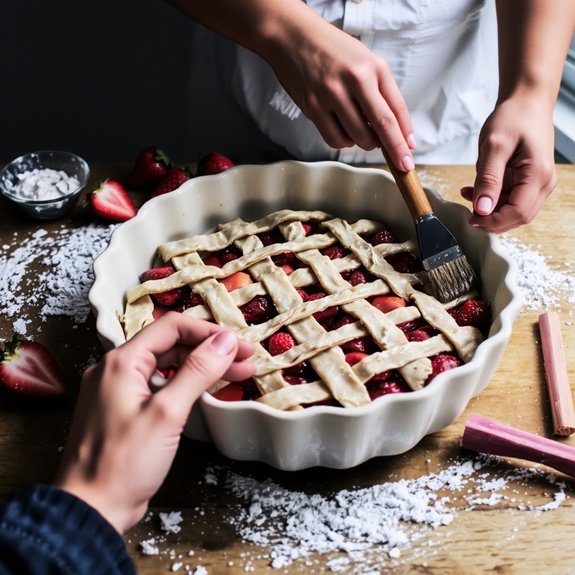
Next, you’ll crimp the pie edges by pressing the dough between your thumb and forefinger at quarter-inch intervals, creating a hermetic seal that prevents filling from leaking during baking.
Finally, you’ll position your top crust over the filling, trim excess dough to a half-inch overhang, and fold it under the bottom crust edge before crimping again for structural integrity.
Layering Filling and Crust
Once your pie shell’s been blind-baked to a light golden finish, it’s time to build the structural foundation of your strawberry-rhubarb pie.
Pour your filling strategically, maintaining layer stability by alternating fruit components.
The rhubarb’s natural pectin content activates during baking, creating a binding matrix that supports clean slice aesthetics.
Distribute strawberries evenly across the middle layer, ensuring ideal visual presentation when cut.
- Maintain a 60/40 rhubarb-to-strawberry ratio for proper gel formation and structural integrity
- Leave ¾-inch clearance from the crust rim to prevent overflow during baking
- Sprinkle cornstarch directly onto fruit surfaces for enhanced thickening without compromising flavor
Your layering technique determines both texture and presentation.
Precision here eliminates weeping and guarantees defined, professional-looking slices.
Position your top crust carefully, sealing edges firmly to contain moisture and maximize structural support throughout the baking process.
Crimping the Pie Edges
Sealing your pie’s perimeter requires deliberate technique that transforms a simple edge into a functional and visually refined border. You’ll choose between a fork, your fingers, or specialized crimping tools—each offering distinct advantages. A fork creates uniform, parallel ridges with minimal effort, while finger-crimping produces traditional fluted edges requiring practice for consistency. Specialized crimping tools deliver precise, repeatable patterns with less fatigue.
Press your thumb and forefinger against the outer rim, then push the dough inward with your opposite hand’s knuckle. Maintain even pressure throughout to prevent cracking. Your decorative finishes serve dual purposes: they seal moisture inside while creating visual appeal.
Work methodically around your pie’s circumference, maintaining uniform depth and spacing. This technical approach guarantees both structural integrity and professional-quality decorative finishes that distinguish your strawberry rhubarb creation.
Adding the Top Crust
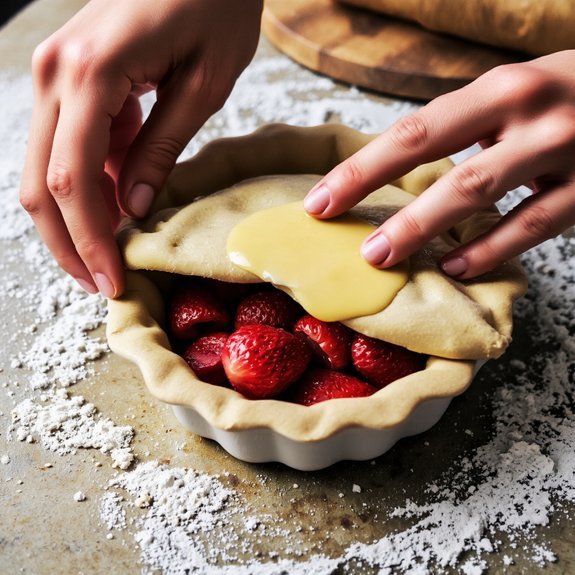
After you’ve filled your bottom crust with the strawberry-rhubarb mixture, it’s time to seal your pie with the top layer.
Position your second dough circle over the filling, guaranteeing it’s centered. Press the edges firmly to create an airtight seal that prevents filling from escaping during baking.
Create vent designs by slicing small slits into the top crust—these channels release steam and prevent a soggy bottom. Incorporate decorative cutouts using cookie cutters for visual appeal while maintaining functionality.
Key considerations for your top crust:
- Brush with egg wash (one egg beaten with one tablespoon water) for golden-brown finish
- Space vent designs evenly across the surface for consistent steam release
- Guarantee decorative cutouts don’t compromise structural integrity of the crust
This approach delivers ideal results and respects your culinary autonomy.
5. Crimping and Sealing the Edges
To create a professional-looking pie with a secure seal, you’ll want to work with dough that’s been chilled to 45-50°F and hasn’t begun to warm.
Work with dough chilled to 45-50°F for a professional pie seal that holds during baking.
Press the top crust’s edges firmly against the bottom crust using your fingertips or a fork, ensuring complete contact around the perimeter.
You’re free to choose your crimping style—decorative patterns range from simple fork indentations to fluted edges that demand more precision.
Regional variations influence technique; some bakers prefer a rope pattern, while others employ a classic fork method.
Cut vents into the top crust before sealing, spacing them one inch apart in a deliberate pattern.
This prevents steam buildup and structural failure.
Brush the sealed edge with egg wash for golden browning.
Your crimping reinforces the seal while preventing filling leakage during the 45-minute bake.
6. Baking Instructions
Position your oven rack to the lower-middle position and preheat to 425°F for 15 minutes before baking.
Proper oven calibration guarantees your crust achieves that coveted golden-brown finish while the filling sets correctly.
Place your crimped pie on a baking sheet to catch any drips.
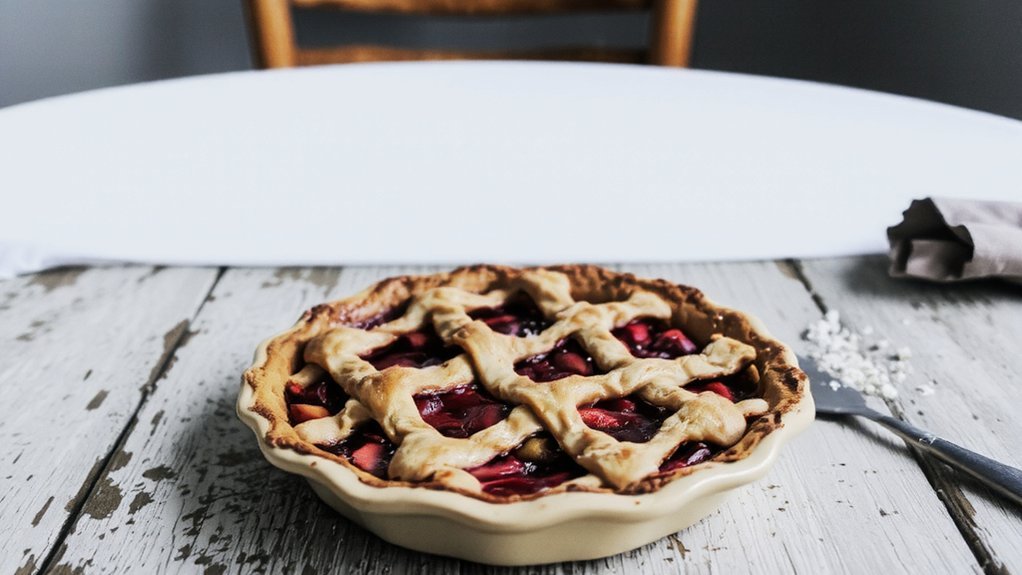
Bake for 20 minutes at 425°F, then reduce heat to 375°F and continue baking for 25-30 minutes until the filling bubbles at the edges and the crust reaches deep amber.
- Monitor the crust’s color progression—tent with foil if browning too quickly
- Listen for gentle bubbling sounds indicating proper filling gelatinization
- Use an instant-read thermometer to verify filling reaches 190°F at center
Cool your pie completely on a wire rack before slicing.
This cooling period allows pectin to set, giving you clean, structured slices instead of a runny filling.
7. Cooling and Setting Time
While your pie emerges golden from the oven, you’re not yet finished—the cooling phase is critical to your pie’s structural integrity.
Allow your pie to cool at ambient cooling temperatures for a minimum of two hours before slicing. This timeframe permits gel development within the filling, where pectin chains cross-link and stabilize the strawberry-rhubarb mixture. Rushing this process results in a runny filling that’ll collapse when portioned.
For ideal results, you can refrigerate your pie after the initial ambient cooling period. This accelerates gel development and firms the crust’s butter content, enhancing structural stability.
The filling’s viscosity will reach its peak after four to six hours of total cooling time. This patience rewards you with clean slices that maintain their integrity—the hallmark of a professionally executed pie.
8. Serving Suggestions
Your strawberry rhubarb pie’s flavor profile pairs exceptionally well with cool, creamy accompaniments that counterbalance its tart fruit composition.
You’ll maximize your dessert experience by selecting complements that enhance rather than mask the filling’s complexity.
Consider these serving strategies:
- Whipped cream: Dollop unsweetened whipped cream (1:1 ratio of heavy cream to powdered sugar) to soften the pie’s acidity while adding textural contrast
- Wine pairing: Serve alongside a dry Riesling or Albariño; the wine’s minerality cuts through richness and echoes the rhubarb’s tangy notes
- Temperature contrast: Present your pie chilled or at room temperature with vanilla bean ice cream, allowing flavors to develop without competition
You’re free to experiment with these combinations, adjusting proportions based on your preference for tartness versus sweetness.
9. Storage and Make-Ahead Tips
You can refrigerate your strawberry rhubarb pie in an airtight container for up to four days, though the crust will soften after forty-eight hours due to moisture migration from the filling.
For extended storage, you’ll want to freeze the pie either before or after baking—unbaked pies retain superior crust texture when thawed and baked fresh, while fully baked pies require thawing at room temperature for two to three hours before serving. Wrap your pie tightly in plastic wrap followed by aluminum foil to prevent freezer burn and maintain quality for up to three months.
Refrigerator Storage Methods
Storing your strawberry rhubarb pie in the refrigerator requires careful attention to moisture control and temperature stability.
You’ll want to protect your pie from absorbing excess humidity while maintaining ideal flavor integrity.
Refrigerator Storage Guidelines:
- Container materials: Use airtight glass or food-grade plastic containers rather than cardboard boxes, which absorb moisture and compromise crust texture
- Shelf placement: Position your pie on middle shelves away from the back wall where temperature fluctuates, maintaining a consistent 35-40°F environment
- Covering method: Wrap slices individually in parchment paper before containerizing to prevent condensation buildup on filling surfaces
Your properly stored pie stays fresh for up to four days.
You’ll maximize structural integrity by letting it cool completely before refrigerating.
Don’t stack items on top of your container—pressure damages both crust and fruit filling consistency.
Freezing for Later Use
Freezing strawberry rhubarb pie extends its shelf life to three months while preserving the delicate balance of fruit acidity and structural integrity that fresh storage can’t match.
You’ll want to cool your pie completely before wrapping it tightly in plastic wrap, then aluminum foil, to prevent crystal formation that compromises texture.
For ideal texture preservation, don’t freeze unbaked pies—baked versions maintain superior structural integrity.
You can freeze individual slices in airtight containers separated by parchment paper for convenient portioning.
When you’re ready to enjoy it, thaw your pie in the refrigerator overnight rather than at room temperature.
This controlled thawing method prevents moisture loss and maintains the filling’s precise fruit-to-thickener ratio, ensuring your pie tastes as exceptional as when you first baked it.
Frequently Asked Questions
Can I Use Frozen Strawberries and Rhubarb Instead of Fresh Ones?
You’ll absolutely nail your pie using frozen strawberries and rhubarb.
Thaw them completely, then drain excess liquid aggressively—this moisture management step prevents a soggy crust.
Adjust your filling ratios by reducing added liquids by 25%. Since frozen fruit’s already broken down cellular structure releases more water during cooking, you’re working with a wetter base.
Compensate with cornstarch or tapioca starch at a 1:1 ratio substitution. Your pie’ll turn out perfectly if you respect these technical adjustments.
What Is the Best Ratio of Strawberries to Rhubarb for Flavor Balance?
You’ll achieve ideal flavor balance with a 2:1 strawberry-to-rhubarb ratio. This fruit proportion lets you maximize strawberries’ sweetness while rhubarb’s tartness cuts through without overwhelming.
Start taste testing at this baseline, then adjust according to your preferences—add more rhubarb if you want assertiveness, increase strawberries for sweetness. Your culinary expertise matters here; ingredient ratios aren’t absolute rules.
Trust your palate and experiment freely until you hit your ideal balance.
How Do I Know When My Pie Is Perfectly Baked and Cooked Through?
You’ll know your pie’s done when the crust color reaches deep golden-brown across all edges and the filling shows minimal jiggle at the center—a slight wobble’s acceptable, but it shouldn’t slosh.
Check at 45 minutes; if the crust browns too fast, tent it with foil.
Your filling’s set when a knife inserted off-center comes out clean.
This ratio guarantees proper pectin gel formation and structural integrity without overcooking your delicate berries.
Can I Make This Pie Without Added Sugar or Use Alternative Sweeteners?
You can absolutely substitute sugar with natural sweeteners like honey, maple syrup, or stevia.
Adjust your ratios carefully—honey’s 25% more potent than sugar, so reduce it accordingly.
Perform sweetness testing throughout your filling preparation to nail your desired flavor profile.
You’ve got the freedom to experiment with monk fruit or allulose too.
Remember, each sweetener behaves differently during baking, affecting your pie’s texture and caramelization.
Master these ingredient ratios, and you’ll craft the perfect pie your way.
Why Does My Rhubarb Taste so Sour and How Do I Fix It?
Your rhubarb’s sourness stems from soil acidity levels and premature harvest timing.
You’ll want to pick stalks when they’re fully mature—typically 10-12 inches long—as they’ve developed more natural sugars.
Test your soil’s pH; aim for 6.0-6.8 for ideal flavor development.
Earlier harvests yield higher oxalic acid content.
You’re also free to increase your strawberry ratio or boost sweetener amounts to counterbalance that tartness effectively.


Leave a Comment