Key Takeaways
- Graham cracker crust requires mixing crumbs, melted butter, and sugar, then pressing into a 9-inch pan and pre-baking at 350°F for 8 minutes.
- Filling combines four egg yolks, 14-ounce sweetened condensed milk, and ½ cup fresh key lime juice in a precise 1:4:0.5 ratio for proper emulsification.
- Bake at 350°F for 15–17 minutes until the center reaches 160°F, then cool gradually at room temperature for 30 minutes.
- Refrigerate the pie for a minimum of 3 hours; overnight chilling provides optimal flavor and texture development before serving.
- Serve chilled at 45–50°F and store refrigerated in an airtight container for 3–4 days, or freeze wrapped for up to 2 months.
Ingredients You’ll Need
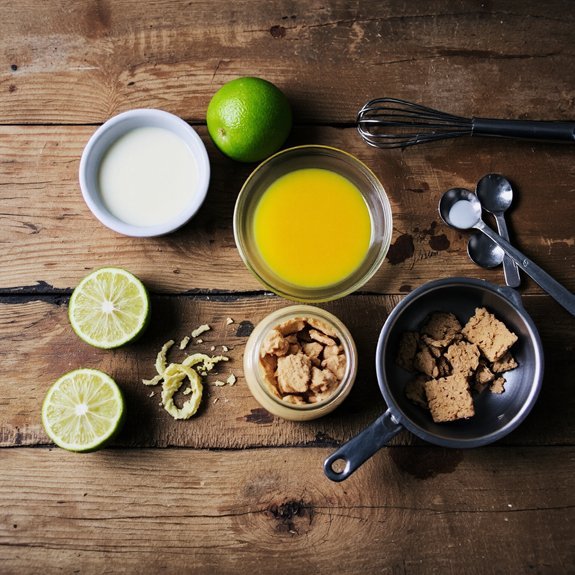
You’ll need 1¾ cups of graham cracker crumbs, 6 tablespoons of melted unsalted butter, 1 tablespoon of granulated sugar, 4 large egg yolks, 1 (14-ounce) can of sweetened condensed milk, ½ cup of fresh key lime juice, 1 teaspoon of key lime zest, and ¼ teaspoon of salt.
For flexibility in your preparation, you can substitute other citrus varieties like Persian limes or lemons if key limes aren’t accessible. If you’re seeking dietary modifications, dairy alternatives such as coconut milk or cashew cream can replace sweetened condensed milk while maintaining structural integrity.
Ensure you’re using freshly squeezed citrus juice rather than bottled varieties for ideal flavor complexity. You’ll achieve superior results by measuring ingredients precisely and assembling components at room temperature before combining. This methodical approach guarantees consistent texture and taste in your final product.
Preparing the Graham Cracker Crust
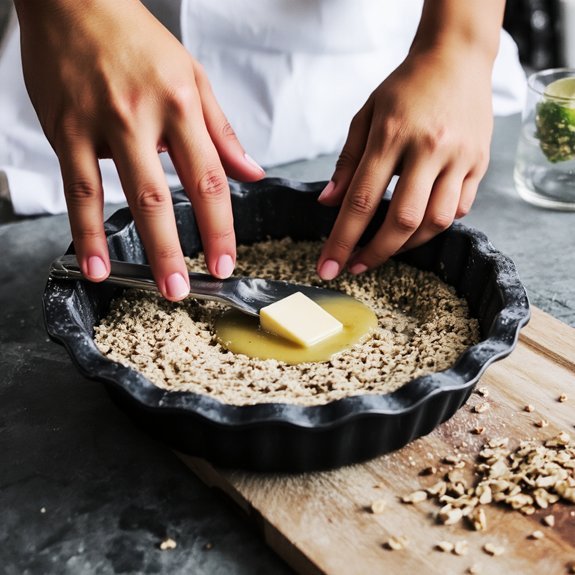
Combining your graham cracker crumbs with melted butter and sugar creates the foundation for a structurally sound crust.
Graham cracker crumbs mixed with melted butter and sugar form the structurally sound foundation for your pie crust.
You’ll want to achieve a uniform crumb texture that resembles wet sand before proceeding to your 9-inch pie pan.
Apply your mixture using this methodical press technique:
- Press the base layer firmly using the bottom of a measuring cup, ensuring even distribution across the pan bottom
- Work the mixture up the sides with consistent pressure, creating a quarter-inch thickness throughout
- Reinforce edges by pressing between your thumb and forefinger for maximum structural integrity
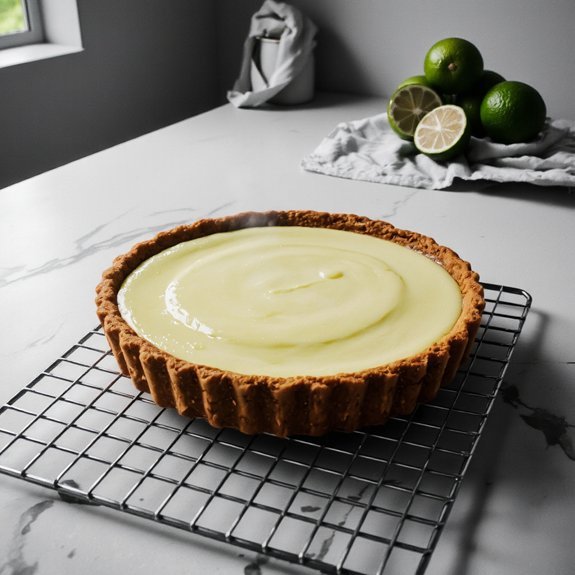
Bake your prepared crust at 350°F for 8 minutes until lightly golden.
This pre-baking step sets the crumb structure, preventing sogginess when you add your filling. Cool completely before proceeding with your key lime custard.
Making the Creamy Filling
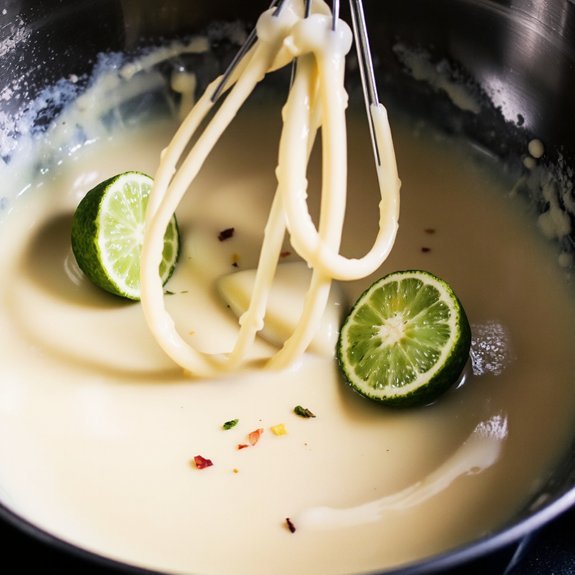
You’ll combine one 14-ounce can of sweetened condensed milk with four egg yolks to create the filling’s foundation.
Whisk the yolks thoroughly before incorporating them into the condensed milk, ensuring you achieve a homogeneous mixture without lumps.
This ratio and incorporation method will give you the characteristic creamy texture and rich flavor that defines an authentic key lime pie.
Sweetened Condensed Milk Ratio
The foundation of an authentic key lime pie filling relies on precise ratios of three essential ingredients.
These are one 14-ounce can of sweetened condensed milk, four egg yolks, and half a cup of fresh key lime juice.
You’ll achieve ideal emulsification by understanding ratio conversions for scaling recipes.
The 1:4:0.5 proportion visualizations guide your ingredient measurements accurately:
- Sweetened condensed milk: Creates creamy richness and structural stability
- Egg yolks: Provide binding agents and custard-like consistency
- Fresh key lime juice: Delivers authentic tartness and acidity balance
You must maintain these exact proportions to prevent separation or inadequate setting.
Deviating from this formula compromises texture and flavor integration.
Your freedom to experiment exists only after mastering these foundational measurements, ensuring you’ve mastered the classical technique first.
Egg Yolk Incorporation Method
Once you’ve gathered your four egg yolks, separate them carefully from the whites to guarantee no albumin contaminates your filling—even trace amounts’ll inhibit proper emulsification. Whisk your yolks vigorously for approximately two minutes until they achieve a pale, ribbon-like consistency. This mechanical action activates binding mechanisms essential for structural integrity.
| Temperature | Time | Result |
|---|---|---|
| 140°F | 3.5 minutes | Pasteurized yolks |
| 160°F | Instantaneous | Over-coagulation |
| Room temp | N/A | Raw state |
Gradually incorporate the yolk mixture into your sweetened condensed milk, whisking continuously at moderate speed. Yolk pasteurization occurs naturally when heated to precise temperatures—ensuring food safety without compromising texture. Pour your filling into the prepared crust immediately, maximizing structural stability before gelation commences during baking.
Baking and Cooling Your Pie
After preparing your filling, transfer the pie to a preheated 350°F (175°C) oven and bake for 15-17 minutes until the filling’s internal temperature reaches 160°F (71°C) when measured at the center with an instant-read thermometer.
You’ll achieve ideal results by positioning your rack in the lower-middle section of your oven.
This placement promotes even heat distribution while preventing excessive browning on the crust.
For crack prevention, allow your pie to cool gradually at room temperature for 30 minutes without disturbance.
Key cooling considerations include:
- Transferring to a wire rack to facilitate air circulation
- Refrigerating for minimum 3 hours to set the custard properly
- Chilling overnight for superior flavor development and texture
Your patience during cooling directly determines the pie’s final structure and taste profile.
Tips for Perfect Results Every Time
While cooling establishes your pie’s foundation, mastering several key techniques will elevate your results from good to exceptional.
You’ll achieve ideal flavor by using precision measurements for all ingredients—don’t estimate your condensed milk or lime juice ratios.
Fresh key lime juice yields superior results compared to bottled alternatives.
Practice citrus zesting to capture aromatic oils that intensify the filling’s complexity.
Control your oven temperature with an accurate thermometer; inconsistent heat causes uneven baking and cracked surfaces.
You’ll prevent over-browning by covering your crust edges with foil during the final minutes.
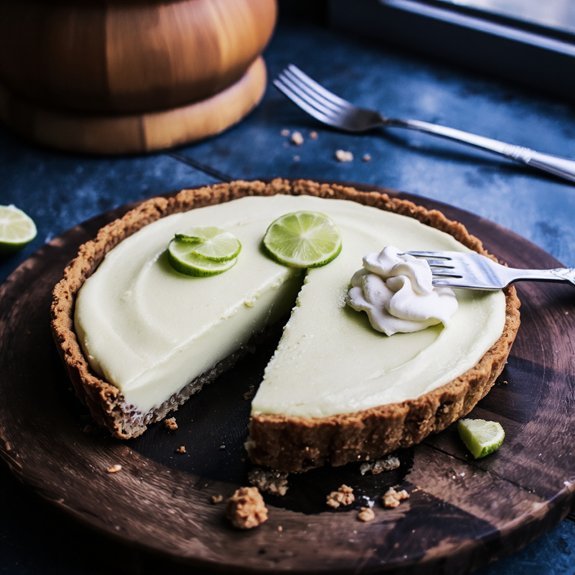
Chill your pie for at least three hours before serving—this solidifies the filling completely and sharpens the citrus notes.
You’re free to prepare this dessert one day ahead, allowing flavors to develop further.
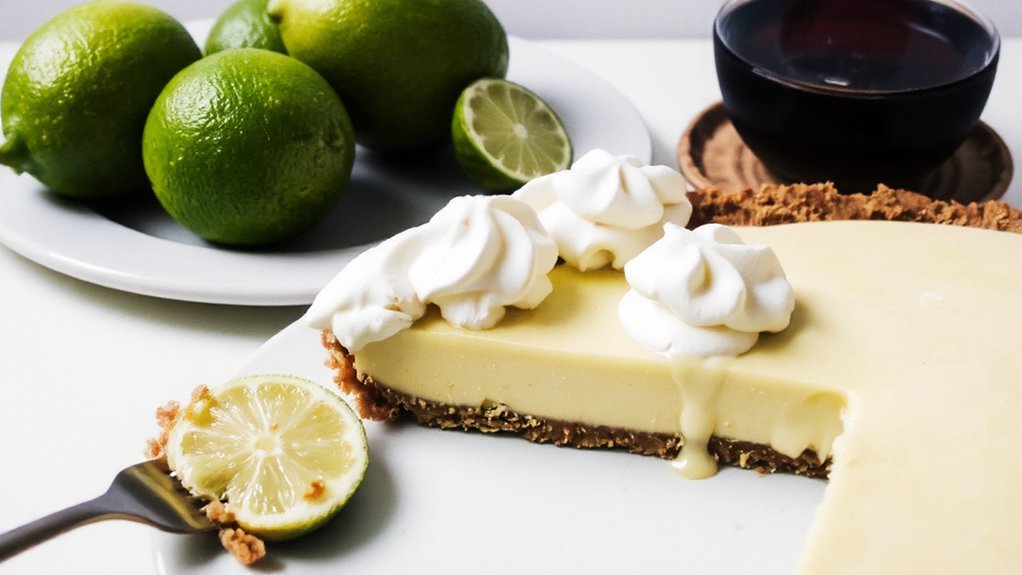
Serving and Storage Suggestions
You’ll want to refrigerate your key lime pie at 40°F or below in an airtight container to maintain ideal texture and prevent flavor absorption from other foods. The pie’s shelf life extends approximately 3-4 days when stored properly, though you can freeze it for up to 2 months by wrapping it securely in plastic wrap and aluminum foil.
Serve your pie chilled at 45-50°F directly from the refrigerator for the best flavor profile and creamy consistency.
Best Storage Methods
Proper storage’s essential for maintaining your key lime pie’s texture and flavor integrity.
You’ll preserve your dessert’s quality by implementing these proven techniques:
- Refrigeration method: Store your pie in an airtight container at 40°F or below for up to four days, using vacuum sealing for extended freshness and maximum odor protection against competing flavors
- Freezing protocol: Wrap individual slices in plastic wrap, then aluminum foil, and freeze at 0°F for up to three months; thaw overnight in refrigeration before serving
- Separation strategy: Keep your pie separate from pungent foods like fish or onions to prevent flavor contamination
Don’t leave your pie uncovered on countertops beyond two hours.
This approach maximizes shelf life while maintaining the creamy custard consistency and zesty lime notes you’ve worked to achieve.
Serving Temperature Tips
Beyond storage lies another critical factor in maximizing your key lime pie’s appeal: temperature management during service.
You’ll achieve ideal flavor perception by serving your pie between 45-50°F, allowing the tartness and sweetness to register fully on your palate.
This temperature range prevents the filling from becoming too firm while maintaining structural integrity during plating.
Consider implementing temperature contrast by pairing your chilled pie with warm accompaniments—perhaps 160°F fresh whipped cream or a heated caramel drizzle.
This deliberate contrast heightens sensory engagement and elevates the overall tasting experience.
Remove your pie from refrigeration 10-15 minutes before serving if you prefer a slightly softer texture.
You’ll notice enhanced graham cracker crust flexibility and more pronounced lime notes.
Avoid room-temperature service, as this compromises both texture and taste precision.
Proper temperature management transforms your dessert from merely acceptable to exceptional.
Shelf Life Guidelines
Once baked and cooled, your key lime pie maintains peak quality for 3-4 days when stored at 40°F or below in an airtight container.
You’ll want to monitor these spoilage indicators:
- Visible mold growth or discoloration on the filling surface
- Sour or fermented odors emanating from the container
- Curdled or separated custard texture throughout the pie
Follow regulatory guidelines by keeping your pie within the safe temperature zone.
Don’t exceed room temperature storage beyond two hours, as pathogenic bacteria proliferate rapidly above 40°F.
You’re responsible for evaluating freshness before consumption.
Freezing extends shelf life to 2-3 months when wrapped securely in plastic wrap and aluminum foil.
Thaw overnight in your refrigerator before serving.
This approach preserves both safety and flavor integrity while maintaining your autonomy over storage decisions.
Frequently Asked Questions
Can I Use Regular Limes Instead of Key Limes for This Recipe?
You can substitute regular limes, though you’ll notice differences in juice yield and flavor adjustment.
Regular limes produce approximately 30% less juice than key limes, requiring you to compensate with additional fruit.
The flavor profile shifts toward less sweetness and increased tartness, demanding precise acid-to-sweetener ratios in your filling.
You’ll need roughly 1.5 times more regular limes to achieve equivalent juice volume, then adjust sugar content accordingly to maintain ideal palatability and structural integrity of your final product.
How Long Does Key Lime Pie Last in the Refrigerator?
You’ll find your key lime pie maintains ideal quality for 3-4 days when refrigerated at 40°F or below. Monitor safety signs like off-odors, discoloration, or unusual texture changes indicating bacterial growth.
For extended storage duration, you can freeze it up to two months in an airtight container. You’ve got the freedom to enjoy your dessert longer by controlling temperature precisely and following proper food preservation protocols.
Can I Make This Pie Without a Food Processor?
You’ll absolutely make this pie without a food processor through hand mixing.
Crush graham crackers manually using a rolling pin or mallet, then combine with melted butter and sugar.
Mix thoroughly until you’ve achieved uniform crumb consistency.
For crust alternatives, consider using vanilla wafers, digestive biscuits, or crushed nuts blended identically.
Your hands provide complete control over texture and density, ensuring ideal binding without mechanical processing constraints.
What’s the Difference Between Key Lime and Persian Lime?
You’ll find key limes possess superior flavor intensity compared to Persian limes, delivering a distinctly tart, aromatic profile with higher acidity levels—approximately 1.5% citric acid versus Persian limes’ 0.5%.
Their botanical origin traces to Mexican heritage, while Persian limes derive from hybrid cultivars. Key limes measure smaller, roughly golf ball-sized, and yield more concentrated juice. You’re unrestricted in selecting either varietal, though key limes authenticate traditional formulations with their pronounced citrus complexity and nuanced botanical characteristics that Persian specimens can’t replicate.
Can I Freeze Key Lime Pie, and How Long Will It Keep?
Yes, you’ll freeze key lime pie successfully using best packaging methods like airtight containers or plastic wrap to prevent freezer burn. You’ll maintain ideal texture for approximately three months at 0°F.
You’ll notice slight texture changes upon thawing—the filling becomes marginally softer, though flavor remains intact.
You’ll achieve superior results by thawing overnight in your refrigerator rather than at room temperature, preserving the pie’s structural integrity and taste profile.


Leave a Comment