Key Takeaways
- Blind-bake a 9-inch pie crust at 375°F for 8–12 minutes until light golden to prevent sogginess.
- Cook lemon filling with cornstarch, sugar, water, and egg yolks until it reaches 160°F for safety.
- Whip three room-temperature egg whites to stiff glossy peaks, gradually adding 6 tablespoons sugar for meringue.
- Spread meringue immediately over hot filling, sealing edges completely to prevent separation and weeping during baking.
- Bake assembled pie at 350°F for 10–17 minutes until meringue browns, then cool completely before refrigerating.
Ingredients You’ll Need
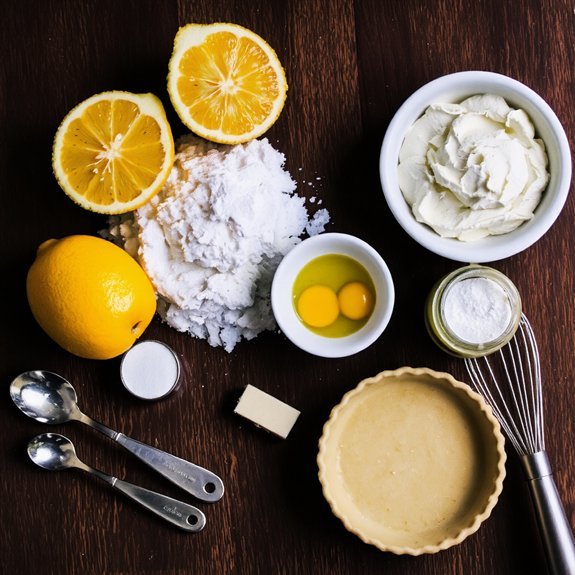
You’ll need one 9-inch unbaked pie crust, 1½ cups granulated sugar, ¼ cup cornstarch, ¼ teaspoon salt, and 1½ cups water.
One 9-inch unbaked pie crust, 1½ cups granulated sugar, ¼ cup cornstarch, ¼ teaspoon salt, and 1½ cups water form your filling foundation.
You’ll need 3 large egg yolks, 3 tablespoons butter, 3 tablespoons fresh lemon juice, and 1 tablespoon lemon zest.
You’ll need 3 large egg whites and 6 tablespoons granulated sugar for the meringue.
You can customize your filling by selecting lemon varieties like Eureka or Meyer lemons based on your flavor preference. For health-conscious preparation, you’ll consider sugar alternatives such as erythritol or stevia in equivalent measurements.
Organize your mise en place systematically. Separate your eggs carefully to avoid yolk contamination. Measure all dry ingredients precisely before combining. Zest your lemons before juicing to maximize aromatic compounds. This methodical approach guarantees you’ll achieve consistent, professional results while maintaining complete control over your ingredient selection and preparation standards.
Preparing the Pie Crust

You’ll begin by combining your dry ingredients—typically 1½ cups all-purpose flour, ½ teaspoon salt, and ½ teaspoon sugar—in a mixing bowl.
Next, you’ll roll out your dough to approximately ⅛-inch thickness on a floured surface, working systematically from the center outward to maintain even consistency.
Finally, you’ll transfer the rolled dough to your 9-inch pie pan, pressing it firmly into the bottom and sides before trimming the excess from the edges.
Preparing the Pie Crust
Combining 1¼ cups all-purpose flour, ¼ teaspoon salt, and 1 tablespoon granulated sugar creates your dry base. You’ll cut in 4 ounces cold unsalted butter until the mixture resembles coarse breadcrumbs. Add 3-4 tablespoons ice water gradually, mixing until the dough just holds together without becoming sticky.
| Ingredient | Measurement |
|---|---|
| All-purpose flour | 1¼ cups |
| Salt | ¼ teaspoon |
| Granulated sugar | 1 tablespoon |
| Cold butter | 4 ounces |
| Ice water | 3-4 tablespoons |
You’ll form the dough into a disk, wrap it in plastic, and refrigerate for 30 minutes minimum. For allergen substitutions, you can use gluten-free flour blends. Consider herb infusions like lemon zest for enhanced flavor complexity. Roll your chilled dough between parchment sheets to ⅛-inch thickness, then transfer to your 9-inch pie pan, crimping edges precisely.
Mixing Dry Ingredients
Before cutting in the butter, you’ll want to whisk together the dry ingredients to guarantee even distribution of salt and sugar throughout the flour.
Combine 1¼ cups all-purpose flour, ¼ teaspoon salt, and 1 tablespoon granulated sugar in a medium bowl.
Use measuring accuracy to confirm proper proportions—level your measurements with a knife for consistency.
Whisk vigorously for 30 seconds, breaking up any flour clumps.
This aerates the mixture and prevents dense crusts.
If you’re making allergen substitutions, use certified gluten-free flour blends with xanthan gum already incorporated, maintaining the same volume measurements.
Your dry mixture is now ready for the next stage.
Store it temporarily in your bowl while you prepare your cold butter.
Rolling Out Dough
Chilling your dough for at least 30 minutes—or up to 24 hours—ensures ideal workability and prevents shrinkage during baking.
Remove the dough from refrigeration and let it sit at room temperature for five minutes to soften slightly.
Dust your work surface and rolling pin with flour to prevent sticking.
Begin rolling from the center outward using even pressure, rotating the dough quarter-turns to maintain uniform shape.
Employ textured rolling techniques to distribute gluten evenly and avoid creating thin spots.
Use thickness guides—aim for one-eighth inch—to achieve consistent coverage.
Transfer your dough to the pie dish by loosely rolling it onto your pin, then unrolling it carefully into place.
Trim excess edges to one inch beyond the dish rim, then fold under and crimp edges for a finished appearance.
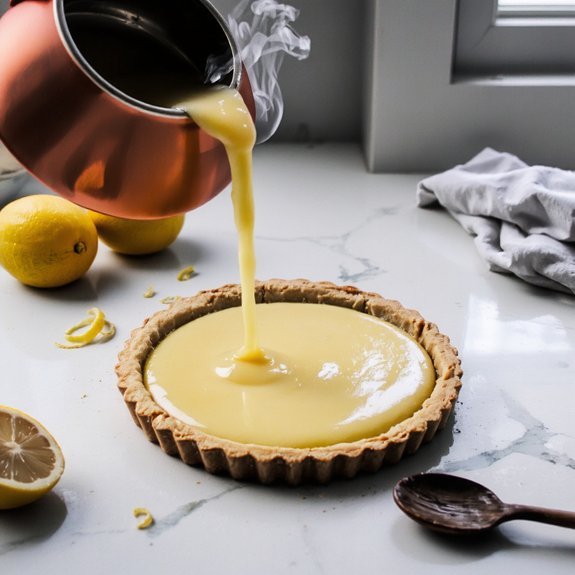
Making the Lemon Filling
To create the lemon filling’s foundation, you’ll need to whisk together 1 cup of granulated sugar, ¼ cup of cornstarch, and ¼ teaspoon of salt in a medium saucepan. Heat this mixture over medium heat while gradually adding 1½ cups of water, stirring constantly until thickened—approximately 2 minutes. Remove from heat and incorporate 4 egg yolks, ½ cup fresh lemon juice, and 2 tablespoons lemon zest. The zest intensity and acidity balance determine your filling’s complexity. Stir in 2 tablespoons butter until fully integrated.
| Component | Measurement | Function |
|---|---|---|
| Sugar | 1 cup | Sweetness |
| Cornstarch | ¼ cup | Thickening |
| Egg Yolks | 4 | Emulsification |
| Lemon Juice | ½ cup | Acidity |
| Lemon Zest | 2 tbsp | Flavor |
Cool slightly before pouring into your crust.
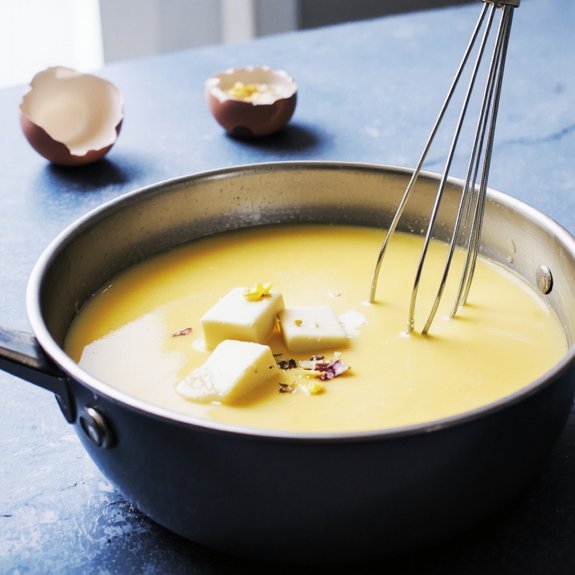
Cooking the Custard
Once you’ve combined the lemon filling ingredients, you’ll need to cook the custard to reach the proper consistency and temperature.
Heat your mixture over medium heat, stirring constantly to promote even cooking.
This process activates two critical transformations:
- Starch gelatinization thickens your filling as heat swells the starch granules, absorbing liquid and creating viscosity
- Protein coagulation occurs when egg proteins denature and bond, solidifying the custard structure
- Temperature control helps you reach 160°F (71°C) for food safety without overcooking
Continue stirring until the mixture coats the back of a spoon.
Don’t rush this stage—patience yields ideal texture.
Once you’ve achieved the desired consistency and temperature, remove from heat immediately.
Strain through fine mesh if desired for silky smoothness.
Pour into your prepared crust while hot, then proceed to the meringue topping.
Whipping the Perfect Meringue
While your custard filling sets, you’ll turn your attention to creating the meringue topping that’ll crown your pie with pillowy peaks.
While your custard filling sets, create a meringue topping with pillowy peaks to crown your pie.
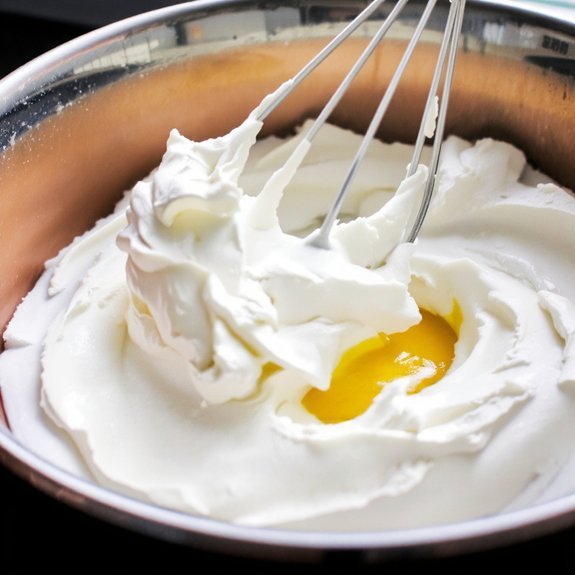
Separate three room-temperature egg whites into a pristine, grease-free bowl—any fat prevents proper protein denaturation.
Using an electric mixer, whip whites on medium speed until soft peaks form, approximately three minutes.
Gradually add six tablespoons of granulated sugar while continuing to beat.
Increase speed to medium-high and whip until stiff peaks form and the meringue becomes glossy, roughly five minutes total.
Ensure humidity control by working in a dry kitchen; moisture sabotages meringue stability.
The proteins fully denature when you achieve this glossy, stable state—your guarantee against weeping or shrinking during baking.
Assembling Your Pie
As your custard filling cools to room temperature and your meringue reaches its glossy peak, you’re ready to unite the components into a finished pie.
Follow this assembly sequence for ideal results:
- Pour the cooled lemon custard into your pre-baked crust, spreading evenly across the bottom
- Immediately top with meringue, working quickly to prevent weeping and guarantee proper adhesion
- Seal the meringue at the crust’s edge, creating a complete barrier that prevents shrinkage during baking
Use a spatula to spread meringue from center outward, guaranteeing complete edge sealing contact with the crust rim.
This critical step prevents filling from escaping and meringue from separating.
Bake at 350°F for 10-12 minutes until golden brown.
Cool completely before refrigerating.
Your precise execution throughout this assembly sequence determines your pie’s structural integrity and visual appeal.
Baking Instructions
You’ll prebake your crust at 375°F for 8-10 minutes until it’s light golden, then pour your lemon filling into the partially baked shell and bake at 350°F for 15-17 minutes until the filling sets with a slight jiggle in the center.
While your filling bakes, you’ll whip your egg whites with cream of tartar and sugar to stiff peaks, creating the meringue topping that’ll crown your pie.
Once the filling’s done, you’ll immediately spread the meringue over the hot filling, ensuring it touches the crust edges to prevent shrinkage, then bake at 325°F for 10-12 minutes until the peaks turn golden brown.
Preparing the Crust
Once you’ve combined your dry ingredients and cut in the butter until the mixture resembles coarse breadcrumbs, press the dough firmly into a 9-inch pie pan.
Ensure even distribution along the bottom and sides.
To achieve your desired crust texture preferences and incorporate optional flavor add-ins:
- Crimp the edges with your fingertips or a fork, creating a uniform ¼-inch rim that prevents shrinkage during baking
- Prick the bottom with a fork at ½-inch intervals to minimize air pockets and promote even baking
- Chill the prepared crust for 15 minutes at 32°F to prevent gluten relaxation and maintain structural integrity
Blind bake at 375°F for 10-12 minutes until the edges achieve light golden coloration.
This pre-baking technique prevents a soggy bottom crust when you add your lemon filling, giving you complete control over your final product’s consistency and taste profile.
Filling Bake Time
Pour your prepared lemon filling into the blind-baked crust and transfer the pie to a preheated 350°F oven for 10-15 minutes.
You’ll want to monitor the filling’s internal temperature, targeting 160°F at the center using a thermometer reading. This guarantees proper custard set without overcooking the delicate eggs.
Once you’ve reached the target temperature, remove the pie from the oven. Account for carryover cooking, which’ll continue raising the internal temperature by 5°F as it rests.
The filling should jiggle slightly when you gently shake the pie—this indicates proper consistency.
Let the pie cool to room temperature before refrigerating for at least two hours. This cooling period allows the filling to firm up completely, creating the ideal texture for slicing and serving with your meringue topping.
Meringue Topping Technique
With your lemon filling set and cooled, it’s time to crown the pie with a stable meringue topping that’ll brown beautifully in the oven.
For superior stability and shine, prepare Italian meringue by heating sugar to 240°F, then gradually whipping it into room-temperature egg whites.
This technique prevents weeping and shrinkage.
Apply your meringue topping using these steps:
- Spread meringue directly onto warm filling, ensuring it seals edges completely to prevent separation
- Create decorative peaks with the back of a spoon for visual appeal and ideal browning surface
- Bake at 350°F for 10-12 minutes until golden brown peaks form
For professional finishing, consider torch browning for controlled color development and caramelized peaks.
This method grants you complete autonomy over the final appearance while ensuring a crispy exterior and marshmallow-like interior.
Cooling and Setting Time
After you’ve transferred your lemon meringue pie to a wire rack, you’ll need to allow the filling and meringue to set properly before serving.
Room temperature cooling for 1-2 hours stabilizes the custard’s gelatin structure and prevents structural collapse.
Temperature impact directly affects meringue stability; cooler environments accelerate protein cross-linking, strengthening the foam matrix.
Humidity effects substantially influence final texture.
High humidity inhibits meringue moisture evaporation, potentially yielding a marshmallow-like consistency rather than desired crispness.
Conversely, low humidity promotes ideal browning and firmness.
Maintain 40-50% relative humidity for ideal results.
Refrigerate for 3-4 hours post-cooling to achieve maximum firmness and slice cleanly without meringue fracturing.
Don’t serve directly from the oven; premature consumption yields runny filling and compromised structural integrity.
Complete setting guarantees you’ll achieve that perfect balance of creamy filling, crisp meringue, and tart lemon flavor.
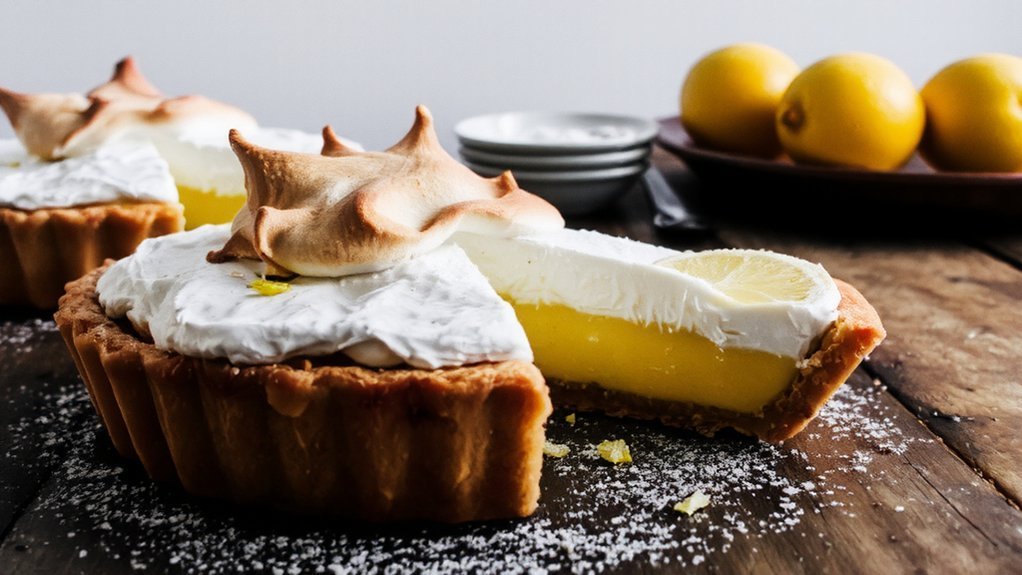
Serving Suggestions
Once your lemon meringue pie’s set properly, you’ll want to present it strategically to maximize both visual appeal and flavor complexity.
You’ve earned the freedom to customize your presentation by choosing from these garnish ideas:
- Candied lemon zest strips positioned atop meringue peaks for textural contrast
- Fresh mint sprigs placed asymmetrically to enhance aromatic dimensions
- Torched meringue surface details creating caramelized flavor notes
For beverage pairings, you’ll find that crisp white wines—Sauvignon Blanc or Riesling—complement the citric acidity without overwhelming your palate.
Alternatively, select sparkling water infused with fresh lemon to echo the pie’s flavor profile while maintaining clarity between bites.
Cold brew coffee provides robust contrast, cutting through richness effectively.
Serve slices at 65-70°F for ideal meringue stability and filling viscosity.
Storage and Make-Ahead Tips
To maximize your pie’s shelf life, you’ll need to understand that lemon meringue pie’s components have distinct storage requirements.
Store the filled pie in your refrigerator at 40°F or below, where it’ll maintain peak quality for two to three days maximum.
The meringue topping degrades rapidly due to moisture absorption, compromising texture and structural integrity.
For freezer guidelines, you can freeze the unbaked crust and filling separately for up to three months.
However, don’t freeze the meringue—prepare it fresh post-thawing.
Wrap components individually in plastic wrap and aluminum foil to prevent freezer burn and oxidation.
Shelf life estimates depend on storage method: refrigerated pies last three days; frozen components remain viable for twelve weeks.
Thaw frozen elements overnight in your refrigerator before assembly.
This approach grants you complete control over preparation timing while preserving quality.
Frequently Asked Questions
Can I Make Lemon Meringue Pie Without Eggs or With Egg Substitutes?
You can absolutely liberate your baking from traditional eggs. For the meringue, you’ll whip aquafaba meringue—the chickpea liquid creates stable peaks identical to egg whites when you incorporate 1/4 cup per egg.
For your custard layer, silken tofu custard delivers creamy richness: blend 14 oz silken tofu with 1/2 cup lemon juice, 1/3 cup cornstarch, and 3/4 cup sugar.
This systematic substitution maintains structural integrity while eliminating eggs entirely.
How Do I Prevent My Meringue From Shrinking or Weeping After Baking?
You’ll prevent meringue shrinkage and weeping by using stabilizing agents like cornstarch or cream of tartar—approximately ¼ teaspoon per egg white.
Bake at 325°F for 10-15 minutes until golden.
Control humidity by cooling gradually in the oven with the door cracked.
You’re eliminating moisture escape that causes weeping.
Store covered at room temperature, avoiding refrigeration that accelerates breakdown.
These systematic steps guarantee your meringue maintains structural integrity and visual appeal.
What’s the Difference Between Using Fresh Lemons Versus Bottled Lemon Juice?
You’ll find fresh lemons deliver superior flavor intensity with higher acid concentration—typically 5-6% citric acid versus bottled juice’s inconsistent levels. When you squeeze fresh lemons, you’re capturing volatile oils that bottled versions lose during processing and preservation.
You’re gaining control over your filling’s tartness and brightness. Technically, fresh juice’s pH variability requires you to adjust sugar ratios systematically, ensuring ideal taste without compromising your pie’s structural integrity or meringue stability.
Can I Freeze Lemon Meringue Pie, and How Long Does It Last?
You can freeze your lemon meringue pie up to three months. However, you’ll encounter texture changes—the meringue becomes rubbery and separates from the filling.
For best results, freeze only the custard filling separately. Thaw at 40°F refrigeration for 24 hours.
When reheating tips are applied, use 325°F for 10-15 minutes until the filling reaches 165°F internal temperature. This method preserves your dessert’s structural integrity and prevents degradation.
Why Does My Pie Crust Become Soggy, and How Do I Prevent It?
Your crust becomes soggy because moisture from the filling penetrates the pastry. You’ll prevent this by blind baking your crust at 375°F for 10-12 minutes until golden, creating a moisture barrier.
Control filling viscosity by using cornstarch or tapioca starch—approximately 3 tablespoons per cup of liquid. This thickening agent reduces water seepage.
Additionally, brush your pre-baked crust with egg white before adding filling. These systematic measures guarantee your crust maintains its structural integrity and crispy texture throughout.


Leave a Comment