Key Takeaways
- Select fresh Desirable, Pawnee, or Stuart pecans with firm texture and satisfying crunch for authentic Southern flavor.
- Blind bake the pie crust at 375°F for 10 minutes with pie weights to prevent sogginess.
- Whisk butter, brown sugar, and eggs; add corn syrup and fold in toasted pecans for filling.
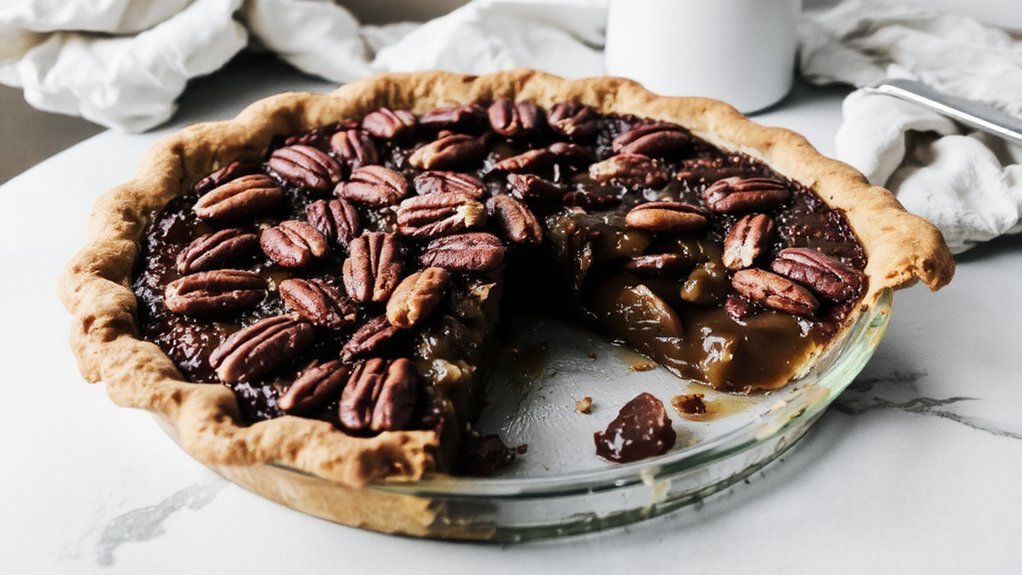
- Bake at 350°F until filling jiggles slightly and crust edges turn deep golden brown.
- Cool on counter for 2 hours, then refrigerate at least 4 hours before slicing for clean portions.
Ingredients You’ll Need
You’ll want to gather just a handful of essential ingredients to craft this classic dessert.
Gather just a handful of essential ingredients to craft this classic dessert with confidence and ease.
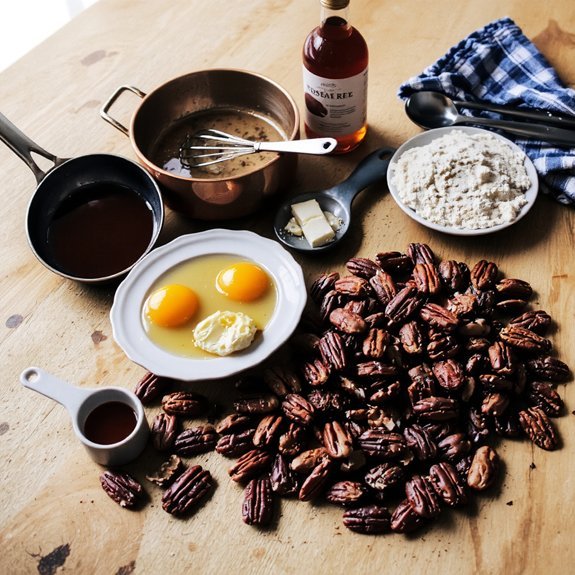
Start with a nine-inch unbaked pie shell—your foundation for success.
You’ll need one cup of pecans, preferably organic options if you’re seeking quality without compromise.
Three eggs bind everything together beautifully.
Mix in one cup of sugar and a half-cup of butter, melted and cooled slightly.
Add two tablespoons of all-purpose flour and one teaspoon of vanilla extract for depth.
For measurement conversions, remember that one stick equals half a cup of butter.
If you prefer organic options for all ingredients, they’ll enhance the pie’s rich, nutty flavor without sacrificing tradition.
The aroma alone—buttery, caramelized, nutty—signals you’re creating something extraordinary.
These simple components transform into golden, gooey perfection through your oven’s heat.
Selecting the Perfect Pecans
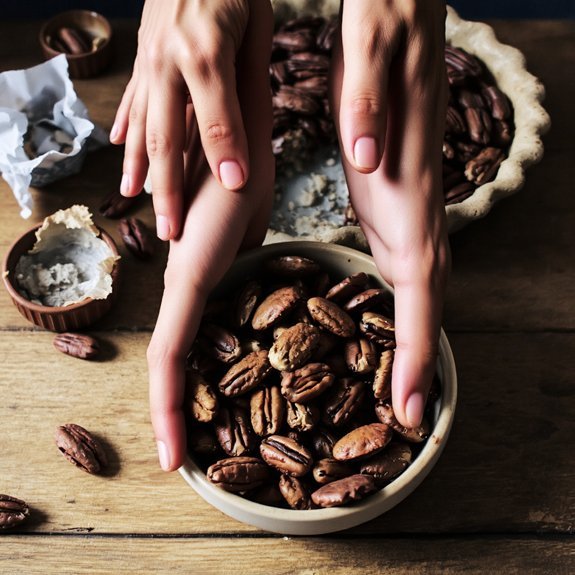
Why do some pecan pies taste richer and more complex than others? You’ll discover the answer lies in your pecan selection. The finest pies demand premium nuts—choose varieties like Desirable or Pawnee for their buttery depth and robust flavor. You’ll notice superior pecans possess a subtle sweetness that complements the caramel filling.
| Variety | Flavor Profile | Best Use |
|---|---|---|
| Desirable | Rich, buttery | Traditional pie |
| Pawnee | Mild, sweet | Delicate palates |
| Stuart | Bold, earthy | Deep flavor seekers |
When you’re shopping, select pecans harvested recently using modern techniques that preserve their natural oils. You’ll spot quality nuts by their uniform color and firm texture. Crack one open—you’re seeking that satisfying crunch and fresh aroma. Don’t settle for stale, discolored pecans; your pie deserves better.
Preparing Your Pie Crust

A flaky, buttery crust forms the foundation of every exceptional pecan pie, and it all begins with cold ingredients and minimal handling. You’ll want to keep your butter and water ice-cold, which prevents gluten control issues that make crusts tough and chewy.
Work quickly—your fingertips should barely graze the dough as you combine flour, salt, and butter into coarse crumbs. Chill your dough for at least thirty minutes before rolling.
When you’re ready, you’ll gently flatten the dough between parchment paper, creating an even thickness. Press it into your pie dish with deliberate care. If you’re feeling creative, try pattern stamping the edges with a fork’s tines, adding visual interest while securing the crust’s borders.
Dock the bottom with several fork pricks to prevent bubbling. You’ve now mastered the critical first step.
Making the Filling

With your crust nestled in the dish, it’s time to craft the rich, gooey filling that defines pecan pie.
Combine butter, brown sugar, and eggs in a bowl, whisking until smooth.
You’ll notice the mixture transforms into a luxurious base.
Add vanilla extract and a pinch of salt for depth.
Here’s what you’ll do next:
- Pour in corn syrup while monitoring viscosity—you want a flowing consistency that coats your whisk
- Fold in toasted pecans, ensuring they’re evenly distributed for ideal mouthfeel contrast
- Gently pour the filling into your prepared crust, leaving slight space at the rim
The resulting texture should feel velvety on your tongue,
with crunchy pecan pieces breaking through the silky custard. This balance creates the authentic pecan pie experience you’re after.
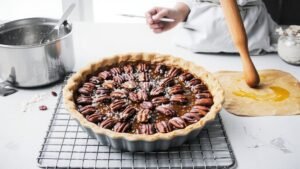
Assembling Your Pie
You’ll want to blind bake your crust until it’s golden and set, creating a sturdy foundation that won’t turn soggy when you pour in the rich filling.
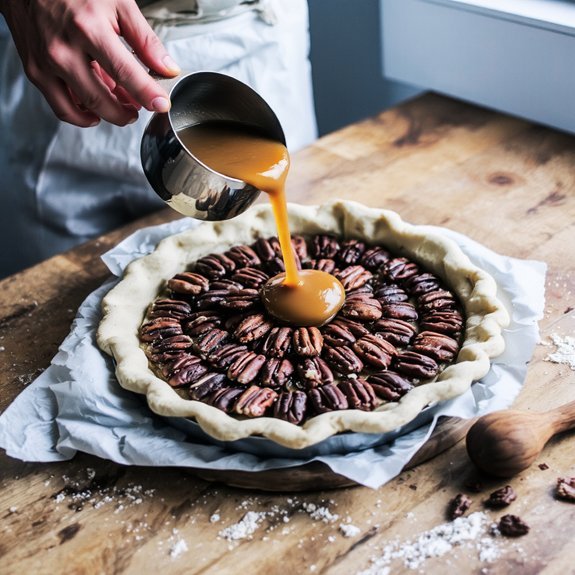
Pour your pecan mixture slowly and evenly across the crust, letting the nuts settle naturally into an attractive, uniform layer.
Position your pie in the center of a preheated baking pan on the middle oven rack, ensuring even heat distribution for a perfectly set filling.
Crust Preparation Essentials
Before filling meets pastry, you’ll want to make sure your crust is properly prepared and positioned.
Your pie shell’s foundation matters—it’s what separates a mediocre dessert from a masterpiece worthy of your table.
Start by ensuring your crust is completely thawed if frozen, then:
- Dock the bottom with a fork to prevent air pockets and bubbling during pre-baking
- Chill briefly in the freezer for 15 minutes to stabilize the dough structure
- Line with parchment and fill with pie weights for blind baking at 375°F for 10 minutes
Understanding regional variations and historical origins of pecan pie means respecting how your ancestors built this dessert.
A properly prepared crust honors that legacy. You’re not just baking; you’re preserving tradition while claiming your culinary independence.
Filling Distribution Technique
Layering your filling requires a deliberate approach that transforms individual components into a cohesive whole.
You’ll want to master viscosity mapping—understanding how your caramel-pecan mixture flows across the crust’s surface.
Begin by establishing your pouring cadence, a steady, controlled rhythm that distributes filling evenly without pooling in corners.
Pour slowly from the center outward, letting gravity do the work.
You’ll notice the pecans settling naturally, creating that coveted texture throughout.
Watch carefully as the filling spreads; adjust your pouring speed based on what you’re seeing.
The filling should reach the edges simultaneously, preventing gaps that’d compromise your final product.
This deliberate technique guarantees every slice delivers consistent flavor and texture—no shortcuts, no compromises.
You’re building something worth the effort.
Baking Pan Setup
Once your crust’s settled into the pan with its edges crimped just right, it’s time to prepare for the filling’s arrival.
You’ll want to take control of your baking pan setup to guarantee ideal results.
Start by positioning your pie pan on a sturdy baking sheet—this catches any drips and provides stability during the oven’s heat.
Consider these essential steps:
- Check your pan calibration to confirm it sits level and won’t tilt during baking
- Apply rim reinforcement by wrapping aluminum foil around the crust’s outer edge, preventing over-browning
- Place your prepared pan in the center oven rack position for even heat distribution
You’re now ready to pour that gorgeous pecan filling into your waiting crust.
The foundation you’ve built ensures your pie bakes evenly and beautifully.
Baking Tips for Success
You’ll want to make sure your oven’s been preheated to a steady 350°F before sliding that pie inside—temperature consistency is what separates a beautifully caramelized filling from a soupy disappointment.
Invest in an oven thermometer for accurate oven calibration; many home ovens run hot or cold.
If you’re baking at higher elevations, altitude adjustments matter—increase your oven temperature by 15-25°F and reduce baking time slightly.
Watch for visual cues: the filling should jiggle just slightly when you gently shake the rack.
The crust edges will turn deep golden brown while the center remains set but tender. You’ll smell that rich, nutty aroma when the pie’s nearly done—trust your senses.
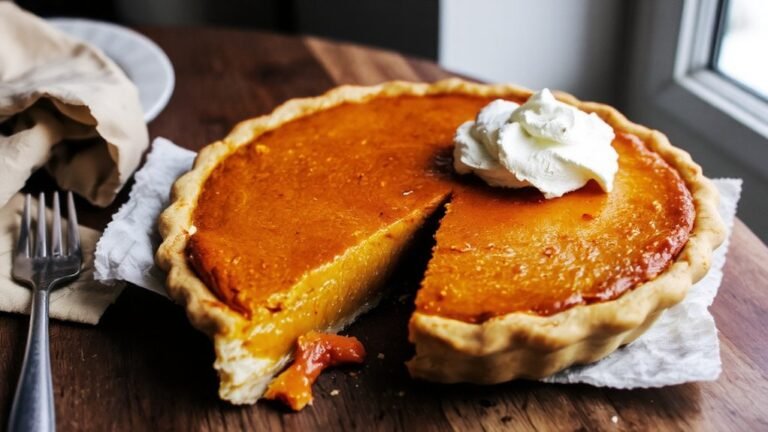
Let it cool completely before slicing for clean, impressive cuts.
Cooling and Setting Time
Patience becomes your greatest ally the moment that golden pie exits the oven.
You’ve earned the right to rest easy—don’t rush this final stage.
Your pecan pie needs ambient cooling to set properly, developing that perfect slice stability you’re after.
Your pecan pie needs ambient cooling to set properly, developing that perfect slice stability you’re after.
Here’s your cooling strategy:
- Let the pie cool on the counter for two hours, allowing the filling to firm without cracking
- Transfer it to the refrigerator for at least four hours, where the custard base truly solidifies
- Wait until it’s completely chilled before slicing, ensuring clean, beautiful portions
Resist the temptation to cut into warm pie. You’ll encounter a runny mess instead of those gorgeous, intact slices you deserve.
The filling firms as it cools, transforming from liquid luxury into substantial elegance.
Your reward? A slice that holds its shape and showcases your baking prowess.
Serving Suggestions
You’ll want to crown your slice with a dollop of whipped cream, letting its cool sweetness melt into the warm, gooey filling.
Consider pairing vanilla or bourbon-infused whipped cream to echo the pie’s rich spice notes, or opt for a contrasting flavor like cinnamon or maple. A scoop of butter pecan or salted caramel ice cream will deepen the nutty richness, while vanilla bean or brown butter ice cream offers a more subtle complement.
Serving Suggestions
Pecan pie shines brightest when served warm, its caramelized filling still soft enough to yield to your fork while the crust maintains that satisfying crunch.
You’ll find freedom in your presentation choices when you consider these approaches:
- Wine Pairings – Pair your slice with a tawny port or bourbon to complement the nutty, buttery notes without overwhelming your palate
- Plating Ideas – Serve on vintage china with a generous dollop of whipped cream or vanilla ice cream that melts into the warm filling
- Temperature Contrast – Present your pie slightly warm alongside cold cream, creating textural complexity that elevates each bite
You’re not bound by tradition here.
Drizzle caramel across white plates for visual drama, or embrace simplicity with straightforward plating that lets the pie command attention.
Whipped Cream Pairing Ideas
Whipped cream transforms a slice of pecan pie into something transcendent—the cool, airy sweetness cuts through the pie’s richness while its delicate texture contrasts beautifully with the dense, caramelized filling. You’ll discover that simple vanilla whipped cream serves as your foundation, but you’re not limited to basics.
| Topping Style | Flavor Profile | Best For |
|---|---|---|
| Bourbon-spiked | Warm, complex depth | Evening indulgence |
| Herbal flavoring with sage | Earthy sophistication | Modern palates |
| Liqueur infusions with brandy | Luxurious warmth | Special occasions |
| Cinnamon-dusted classic | Spiced comfort | Traditional appeal |
You can elevate your dessert experience by experimenting with liqueur infusions that complement pecans’ nutty character. Consider herbal flavoring options like vanilla bean or maple extract. Each pairing reveals new dimensions, inviting you to claim your perfect slice experience.
Ice Cream Flavor Combinations
While whipped cream offers cooling comfort, ice cream opens up another dimension of temperature contrast and flavor depth.
You’ll discover that bold spice pairings elevate your pecan pie experience dramatically. Consider these combinations:
- Vanilla bean ice cream with a hint of bourbon, letting the custard’s richness frame the pie’s nutty warmth
- Cinnamon-brown butter ice cream that echoes the pie’s spice profile while adding buttery complexity
- Salted caramel ice cream that bridges sweet and savory notes
Don’t overlook wine pairings either. A scoop of spiced rum ice cream alongside your slice creates a sophisticated dessert course.
The melting ice cream mingles with warm pie filling, releasing aromatic notes that make each bite memorable.
You’re not just serving dessert—you’re crafting an indulgent experience that celebrates flavor freedom.
Storage and Make-Ahead Options
You’ll find that this classic dessert actually improves when you’ve planned ahead.
Make your pecan pie up to two days before serving—the flavors deepen and meld beautifully as it sits.
Make your pecan pie up to two days ahead—the flavors deepen and meld beautifully as it sits.
Store it covered at room temperature, away from direct sunlight, where the pecans’ rich, buttery aroma will intensify.
For longer storage, refrigerate your pie and savor it within five days.
Want maximum flexibility?
Freeze your unbaked pie and bake it fresh when needed, capturing that warm, just-made quality.
Vacuum sealing your frozen pie protects it from freezer burn, preserving every nuance of caramel and pecan.
Don’t skip labeling dates on your container—you’ll appreciate knowing exactly when you prepared it.
This freedom to prepare ahead transforms pecan pie from last-minute stress into pure enjoyment.
Troubleshooting Common Issues
Even when you’ve followed every step carefully, pecan pie can sometimes throw you a curveball—a sunken center, a grainy filling, or a crust that’s turned soggy.
You’ve got solutions. Here’s what to tackle:
- Sunken center: Your oven temperature likely fluctuated during baking. Use an oven thermometer to verify accurate heat and avoid opening the door repeatedly.
- Grainy filling: Overbeating your filling incorporates excess air. Mix gently until ingredients just combine. A power outage mid-bake ruins everything—keep your kitchen’s electrical system reliable.
- Soggy crust: Blind bake your shell first, creating a protective barrier against moisture.
Utensil wear matters too.
Dull mixing bowls and worn beaters compromise your results. Invest in quality equipment that won’t fail you. Your pie deserves better.
Frequently Asked Questions
Can I Make Southern Pecan Pie Without Corn Syrup as a Substitute?
You’ll absolutely craft a stellar pie by swapping corn syrup for maple syrup or agave nectar.
Both options deliver that rich, gooey filling you’re craving. Maple syrup brings deep, molasses-like notes that’ll make your taste buds sing, while agave nectar offers lighter sweetness without overpowering your pecans.
You’re breaking free from conventional recipes here—your kitchen, your rules. Either substitute creates that caramelized, buttery texture that makes Southern pecan pie unforgettable.
How Do I Prevent My Pecans From Burning on Top During Baking?
You’ll want to shield your pecans with foil tenting about halfway through baking when they’re golden brown. This simple technique traps heat without smothering them completely.
Position your pie on a lower rack so it’s not sitting directly under your oven’s hottest zone—you’re giving yourself control over the final color. Watch closely during the last fifteen minutes; you’ll see the pecans darken beautifully without charring.
What Is the Best Bourbon or Whiskey to Add to Pecan Pie?
You’ll want a bourbon with warm, vanilla-forward flavor profiles—think Buffalo Trace or Maker’s Mark.
These spirits won’t overpower your pie’s buttery richness.
For whiskey, you’re looking at aging suggestions favoring 4-6 years; they’ll deliver smooth caramel notes without harsh alcohol burn.
The sweetness you’re seeking comes from proper barrel aging that develops those deep oak and honey undertones.
A quarter-cup stirred into your filling gives you authentic Southern character without compromising your pecans’ delicate toast.
Can I Freeze an Unbaked Pecan Pie Before Baking It?
You can absolutely freeze your unbaked pecan pie. Assemble it completely, wrap it tightly in plastic wrap, and you’ve got up to three months of storage time ahead.
When you’re ready to bake, skip thawing method complications—bake it straight from frozen, adding 10-15 minutes to your baking time. You’ll achieve that golden, buttery crust and perfectly set filling, delivering the rich, nutty indulgence you crave without sacrificing quality.
Why Did My Pecan Pie Filling Separate Into Layers After Baking?
Your pie’s layers separated because you’ve likely encountered syrup weeping—that pesky phenomenon where your filling can’t handle the heat.
Temperature shock during baking causes the custard and pecans to break apart. You probably pulled it from the oven too quickly or didn’t bake it low and slow enough. Next time, resist that urge to rush. Let your pie bake at a steady, moderate temperature, allowing everything to set harmoniously together.


Leave a Comment