Key Takeaways
- Combine flour, butter, and sugar for the shortbread crust, then blind bake at 350°F for 10–12 minutes until golden-brown edges form.
- Whisk eggs with condensed milk and fresh lemon juice, then fold in grated lemon zest to create the custard filling.
- Pour custard onto warm crust and bake at 350°F for 20–25 minutes until edges set and center jiggles slightly.
- Cool completely at room temperature for two hours, then refrigerate minimum four hours before cutting for cleaner edges and best texture.
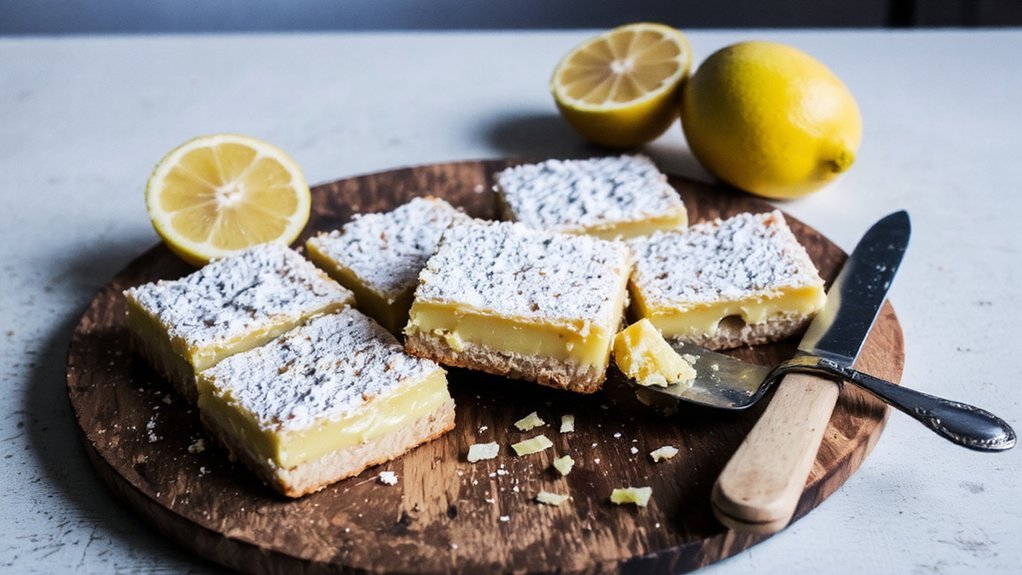
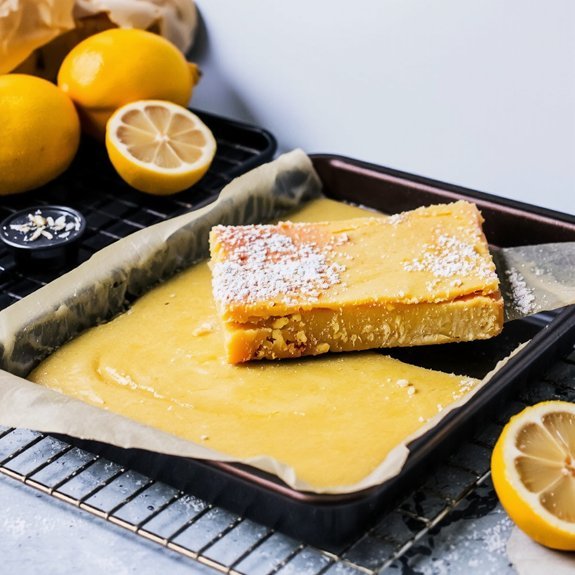
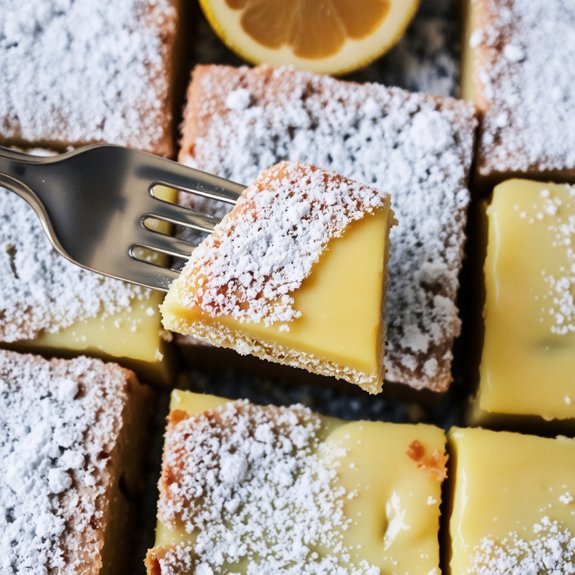
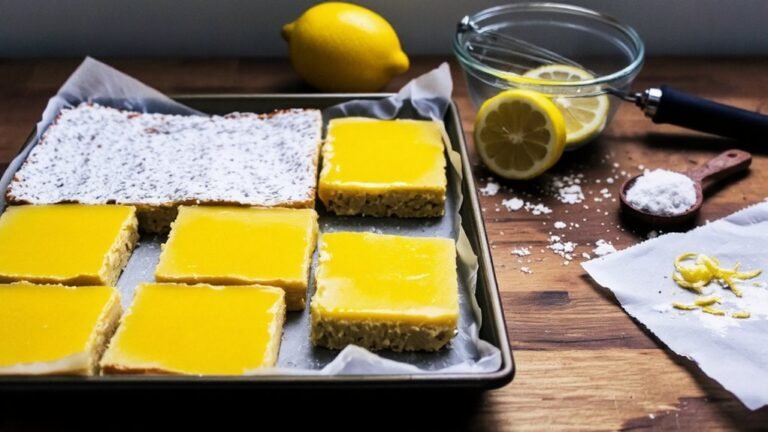
- Dust finished bars with powdered sugar and serve at room temperature or chilled; store refrigerated up to five days.
Ingredients You’ll Need
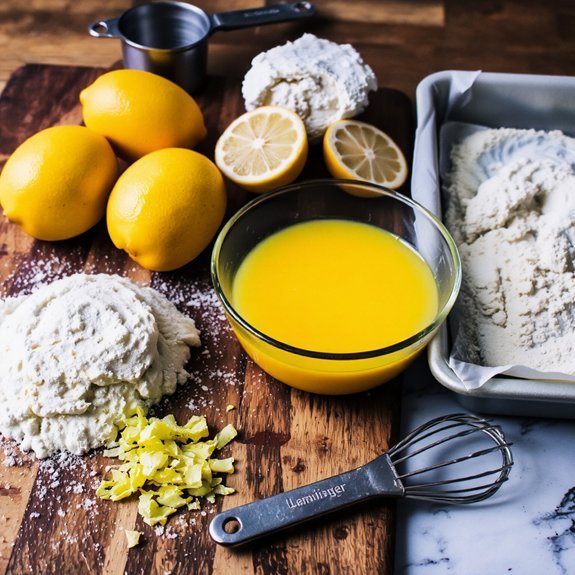
You’ll need just a handful of pantry staples to create these tangy-sweet bars. Start with two organic lemons—their bright zest and juice form the recipe’s bold foundation.
Gather all-purpose flour, sugar, eggs, and butter; these basics transform into a buttery crust and creamy filling. You’ll want baking powder for lift and salt to balance sweetness.
Consider bulk buying your dry ingredients to save money and reduce packaging waste. Stock cornstarch for the filling’s silky texture and powdered sugar for dusting.
Fresh organic lemons make all the difference; their vibrant flavor can’t be replicated by bottled juice. Having these essentials on hand means you’re ready to bake whenever inspiration strikes. Quality ingredients deliver superior results—no shortcuts here.
Preparing the Shortbread Crust
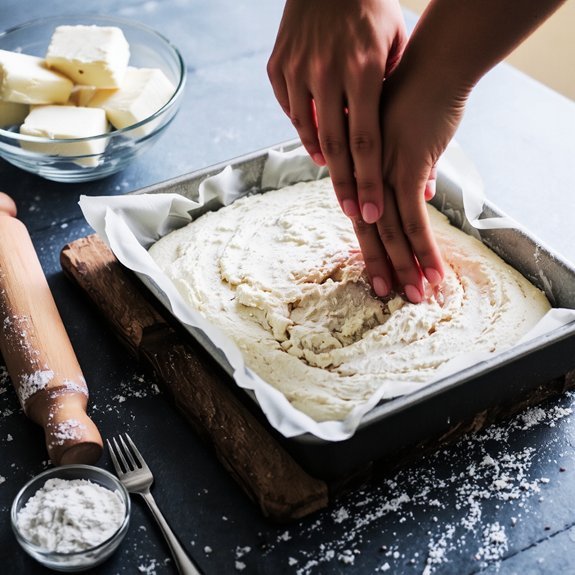
The foundation of any exceptional lemon bar starts with a buttery, crumbly shortbread crust that’ll anchor your tangy filling. You’ll combine flour, butter, and sugar—a trio perfected across centuries. This crust draws historical origins from Scottish baking traditions, though regional variations now flourish globally.
| Region | Crust Style | Key Ingredient | Texture |
|---|---|---|---|
| Scotland | Classic | Oats | Dense |
| American | Modern | Cornstarch | Crisp |
| European | Refined | Almond flour | Delicate |
| Contemporary | Fusion | Brown butter | Rich |
Press your mixture firmly into your prepared pan—you’re creating structure that resists your lemon layer’s moisture. Bake until golden at 350°F for twelve minutes. You’re building the base that lets your freedom to customize shine through with confidence.
Making the Lemon Custard Filling
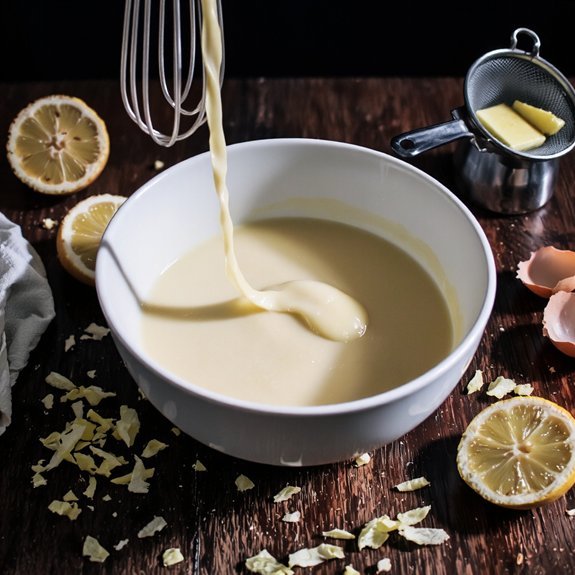
Whisking eggs with condensed milk and fresh lemon juice creates the vibrant, custardy filling that transforms your baked crust into something extraordinary.
Whisking eggs with condensed milk and lemon juice transforms a simple crust into something genuinely extraordinary.
You’ll want to master your whisk tempo—steady, deliberate strokes guarantee smooth integration without incorporating excess air.
Add the zest technique by folding in finely grated lemon zest at the end, preserving its aromatic oils and bright flavor notes.
Pour this golden mixture directly onto your warm shortbread base. The heat activates the custard’s transformation, setting it to silky perfection while the lemon’s tartness cuts through the sweetness.
You’re creating contrast here—that essential balance between rich condensed milk and assertive citrus.
This filling doesn’t demand perfection; it demands confidence. Trust your instincts, and you’ll achieve lemon bars with genuine depth and character.
Baking and Cooling Instructions
Slide your filled pan into a preheated 350°F oven and bake for 20-25 minutes until the filling’s edges set firm while its center still jiggles slightly when you gently shake the pan.
You’ll know you’ve achieved perfection when the surface develops a pale golden hue.
Remove the pan and place it on a cooling rack positioned away from drafts.
Your resting schedule is critical: allow the bars to cool completely at room temperature for at least two hours before refrigerating.
This patience pays dividends.
- Oven placement: Position your rack in the center for even heat distribution
- Golden indicator: Watch for subtle color development signaling doneness
- Refrigeration time: Chill for four hours minimum before cutting for cleaner edges
This deliberate cooling process guarantees you’ll achieve those signature dense, fudgy textures you’re after.
Tips for Perfect Lemon Bars
You’ll achieve the perfect lemon bar by mastering three essential techniques: creating a buttery, crumbly crust that holds its texture, balancing your filling’s consistency so it sets firmly without becoming rubbery, and baking your top layer until it turns a rich golden hue.
Each element demands your attention—a crust that’s underbaked turns soggy, while filling that’s over-mixed produces an undesirable dense crumb.
These refinements transform a good lemon bar into an exceptional one with crisp edges, silky filling, and a glossy, caramelized surface.
Achieve Perfect Crust Texture
The foundation of exceptional lemon bars hinges on a crust that’s both structurally sound and delightfully crisp.
You’ll master this through understanding texture science and sensory evaluation.
Here’s what you need to control:
- Butter temperature: Use cold butter cut into small pieces so it creates distinct pockets during baking, yielding that coveted crumbly texture
- Flour-to-fat ratio: Maintain precise measurements—too much flour creates a dense, tough crust; too little produces a greasy, crumbly mess
- Baking time: Watch for golden-brown edges while the center remains slightly pale, indicating proper moisture evaporation
Press your mixture firmly into the pan without overworking it.
You want the crust to hold together while maintaining its delicate crunch.
Blind baking for 10-12 minutes before adding the lemon filling guarantees your base stays crisp rather than becoming soggy.
This strategic approach gives you total control over your final product’s structural integrity and sensory appeal.
Master Filling Consistency Balance
Once your crust’s structural integrity’s locked in place, the filling demands equally meticulous attention—it’s here that lemon bars transform from merely competent to truly exceptional. You’ll balance tartness against sweetness, creating that signature puckering sensation that keeps consumers coming back. The consistency matters enormously; too thin and you’ll get a runny disaster, too thick and you’ll sacrifice that silky mouthfeel that justifies premium menu pricing.
| Consistency Level | Texture Result | Consumer Preference | Adjustment |
|---|---|---|---|
| Thin | Runny, soupy | Low | Add cornstarch |
| Medium | Creamy, custardy | High | Ideal ratio |
| Thick | Dense, fudgy | Moderate | Reduce liquid |
| Over-thick | Gelatinous | Low | Whisk thoroughly |
You’re crafting balance through precise ingredient ratios and cooking temperatures that set without becoming rubbery.
Get Golden Top Layer
While your filling sets to that ideal custardy consistency, achieving that coveted golden top layer requires strategic oven management and timing.
You’ll want to bake until the surface transforms into a beautiful amber hue—this is the Maillard reaction working its magic, creating complex flavors and visual appeal.
Monitor your bars closely during the final minutes.
Here’s what you need to know:
- Watch for a light golden shimmer across the entire top surface
- Use the torch technique for targeted browning if your oven runs cool
- Remove them the moment edges turn deep amber to prevent overbaking
You’ve earned the freedom to customize your browning level.
Some prefer pale champagne tones; others crave deeper caramelization.
Trust your instincts and your oven’s personality.
That perfectly bronzed top signals success.
Serving and Storage Suggestions
Because lemon bars are best enjoyed at their peak tartness and tender crumb, you’ll want to serve them within a few hours of baking or store them properly for later.
Cut your bars into generous squares and dust them with powdered sugar for an elegant presentation.
You can explore various serving variations—pair them with vanilla ice cream, whipped cream, or fresh berries for added indulgence.
For storage methods, keep cooled bars in an airtight container at room temperature for two days maximum.
Refrigeration extends their life to five days, preserving moisture and flavor.
Freeze individually wrapped bars for up to three months.
When you’re ready to enjoy frozen bars, thaw them at room temperature for thirty minutes.
This approach lets you savor these tangy treats whenever freedom—and craving—calls.
Frequently Asked Questions
Can I Make Lemon Bars Ahead of Time, and How Long Do They Stay Fresh?
You can absolutely make lemon bars ahead of time—they’re perfect for liberated bakers who value their freedom.
Store them in an airtight container at room temperature for up to three days, or refrigerate for five days of extended shelf life. You’ll preserve that tangy, buttery richness and zesty brightness.
For maximum longevity, freeze them up to three months. Simply thaw at room temperature before serving, and you’re rewarded with that irresistible, melt-in-your-mouth texture.
What Can I Substitute if I Don’t Have Fresh Lemons Available?
You can absolutely substitute bottled lemon juice when fresh lemons aren’t within reach—it’ll deliver that tangy punch you’re after. For an even bolder flavor, add lemon extract to amplify the citrus intensity.
While bottled juice won’t match fresh’s complexity, it won’t sabotage your bars either. You’re free to experiment with the ratio until you nail that sharp, zesty bite that makes lemon bars irresistibly crave-worthy.
Why Did My Lemon Bars Turn Out Too Thick or Too Thin?
Your lemon bars’ thickness problem stems from crust thickness and filling proportion imbalances.
If you’ve pressed your shortbread base too thin, you’ll end up with flimsy bars that feel inadequate.
Conversely, an overly thick crust dominates the dessert.
Control your filling proportion by measuring ingredients precisely—too much egg creates dense, rubbery results, while insufficient filling produces thin, wimpy bars.
Master these ratios, and you’ll achieve perfectly balanced, satisfying lemon bars every time.
Can I Freeze Lemon Bars, and What’s the Best Way to Do It?
You can absolutely freeze your lemon bars for up to three months in freezer storage. Cut them into individual squares, layer parchment between each piece, then seal them in an airtight container.
When you’re ready to indulge, thawing tips include leaving them at room temperature for two hours—they’ll regain that tangy, zingy brightness and tender crumb. No microwave needed; patience rewards you with perfectly refreshed bars.
How Do I Prevent My Lemon Bars From Cracking on Top While Baking?
You’ll prevent cracking by mastering your custard temperature—keep that filling at a gentle 160°F when you pour it.
Don’t rush the process.
Allow gentle cooling in the oven with the door slightly cracked for fifteen minutes after baking.
This gradual temperature shift gives you smooth, crack-free bars that showcase your baking independence.
You’ve earned that flawless golden surface.


Leave a Comment