Key Takeaways
- Combine 2¾ cups flour, 2¼ tsp instant yeast, 1½ tsp salt, 1 Tbsp sugar, 3 Tbsp butter, ¾ cup milk, ¼ cup water.
- Knead 8–10 minutes until smooth and elastic; let bulk ferment 60–90 minutes until doubled, adjusting time based on dough temperature.
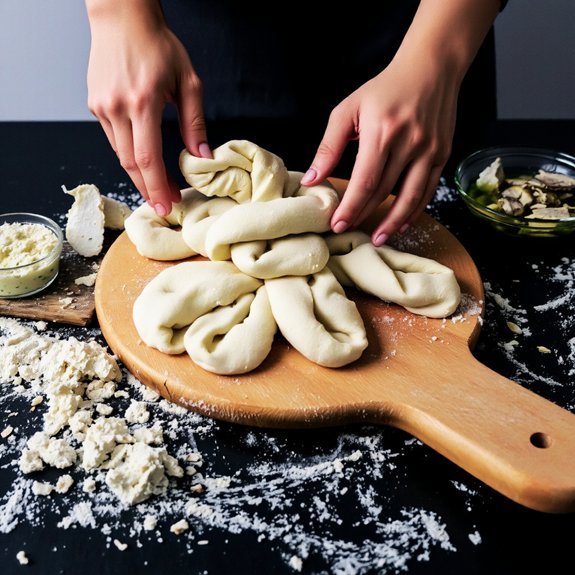
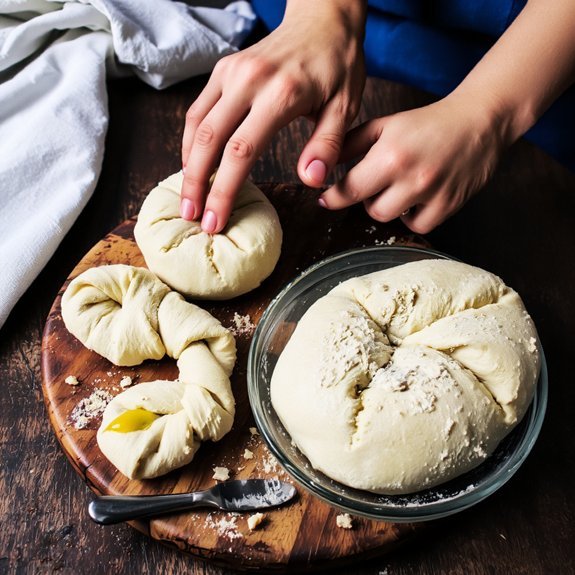
- Divide dough into eight portions, roll into 8–10 inch ropes, tie into knots, and proof 45–60 minutes until slow spring-back occurs.
- Bake at 375°F for 12–15 minutes until deep golden-brown, reaching 190–210°F internal temperature; rotate pan halfway for even browning.
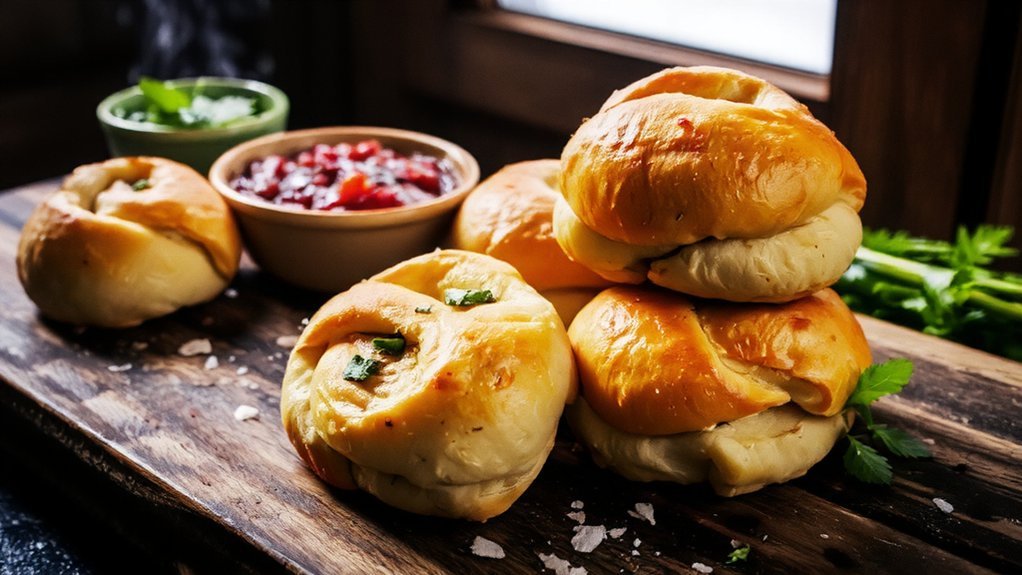
- Brush knots immediately after baking with melted butter mixed with minced garlic, kosher salt, and fresh parsley; store in airtight container.
Ingredients You’ll Need
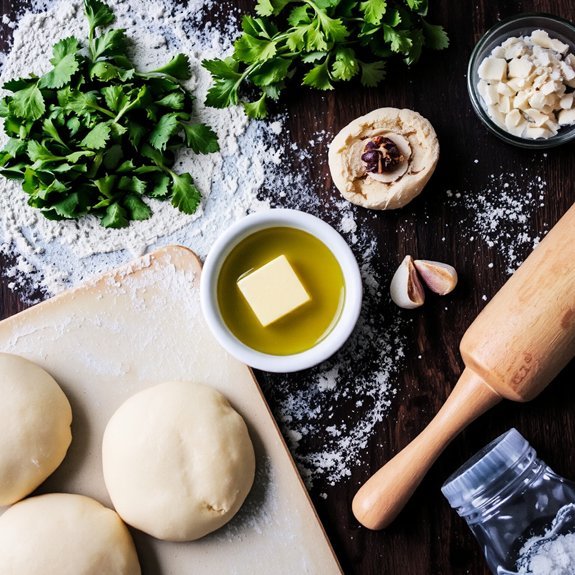
You’ll need just a handful of staple ingredients to craft these pillowy garlic knots: all-purpose flour (2¾ cups), instant yeast (2¼ teaspoons), kosher salt (1½ teaspoons), granulated sugar (1 tablespoon), whole milk (¾ cup), water (¼ cup), and unsalted butter (3 tablespoons) for the dough base.
Master pillowy garlic knots with essential staples: flour, yeast, salt, sugar, milk, water, and butter combined perfectly.
For the garlic coating, you’ll require minced garlic (4 cloves), melted butter (4 tablespoons), fresh parsley (2 tablespoons), and additional kosher salt to taste.
When sourcing ingredients, select unbleached all-purpose flour and active dry yeast for ideal fermentation. Check nutritional info on your milk to confirm proper protein content for gluten development.
Quality unsalted butter prevents excessive sodium. Each knot delivers approximately 120 calories, 3g protein, and 4g fat—making them a satisfying carbohydrate-forward option for those prioritizing dietary independence and informed consumption choices.
Preparing the Dough
Now that you’ve gathered your ingredients, it’s time to activate the yeast and build your dough’s foundation.
Select a large mixing bowl for ideal workspace setup, ensuring adequate room for kneading.
Dissolve your active dry yeast in warm water (110°F), letting it bloom for five minutes until foamy.
Add flour, salt, and olive oil to your yeast mixture, incorporating them thoroughly with a sturdy wooden spoon or dough hook attachment.
Choose your tool selection strategically—a stand mixer reduces physical labor, while hand-kneading offers complete control.
Knead the dough for eight to ten minutes until it achieves a smooth, elastic texture with proper gluten development.
The dough should pull away cleanly from bowl surfaces.
Cover your workspace with plastic wrap and allow the dough to rise for ninety minutes at room temperature until it doubles in volume.
You’ve successfully created your foundational base for garlic knots.
Kneading and Rising
You’ll knead your dough for 8-10 minutes using proper technique—folding it toward you, pushing with your palm, rotating a quarter turn, and repeating until you achieve a smooth, elastic texture.
Maintain your dough at 75-78°F (24-26°C) during bulk fermentation, as this temperature range promotes ideal yeast activity and gluten development over 1-2 hours.
You’ll recognize perfect dough when it’s doubled in size, springs back slowly when poked, and shows slight bubbling on the surface.
Proper Technique and Timing
Because proper gluten development directly impacts your garlic knots’ texture and rise, knead the dough for 8-10 minutes.
Use the windowpane test as your guide—the dough’s ready when a small piece stretches thin enough to see light through it without tearing.
Follow this structured methodology for ideal results:
- Motion economy: Use efficient circular motions, minimizing wasted movement to reduce fatigue during kneading
- First rise: Bulk ferment at 75-78°F for 60-90 minutes until doubled in volume
- Batch scheduling: Divide dough into portions immediately after bulk fermentation to maximize workflow efficiency
Monitor dough temperature throughout fermentation—cooler conditions extend rise time, while warmer environments accelerate development.
Proper timing prevents overproofing, which compromises structure and flavor.
You’ll achieve superior results by respecting these technical parameters and maintaining consistent environmental conditions.
Temperature for Optimal Rise
While maintaining consistent environmental conditions supports proper fermentation, precise temperature control during kneading and rising directly determines your dough’s development rate and final product quality.
You’ll achieve best results by monitoring dough temperature meticulously. Employ thermometer calibration before each session to guarantee accuracy. Position your sensor placement at the dough’s center for genuine readings.
| Temperature Range | Development Time |
|---|---|
| 75-78°F | 60-90 minutes |
| 78-82°F | 45-60 minutes |
| 82-85°F | 30-45 minutes |
| Below 75°F | Slowed fermentation |
You’ll control rise rate through precise temperature management. Warmer conditions accelerate yeast activity; cooler environments extend fermentation. This flexibility lets you work on your schedule while maintaining dough quality. Your final garlic knots depend on this technical precision—master temperature control and you’ve mastered the foundation of exceptional baking results.
Signs of Perfect Dough
Recognizing ideal dough development requires observing specific physical and tactile indicators that signal proper gluten formation and fermentation progression.
You’ll notice your dough has reached prime condition when it exhibits these characteristics:
- Smooth surface texture – Your dough’s exterior transforms from rough to silky, indicating complete gluten network development without stickiness.
- Increased volume – You’re targeting a 50-75% rise, achieved through controlled fermentation at your preferred temperature.
- Subtle aroma – You’ll detect gentle yeast fermentation notes, signaling active microbial activity without sour or off-putting odors.
The dough’s elasticity is essential.
You’re aiming for a supple consistency that springs back slowly when poked, demonstrating sufficient gluten strength.
This precise state guarantees your garlic knots’ll achieve ideal texture and rise during baking, delivering that perfect balance between chewiness and tender crumb structure you’re seeking.
Shaping Your Garlic Knots
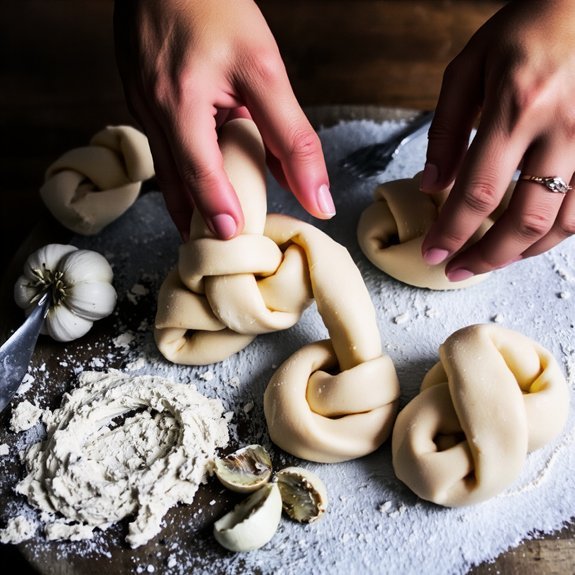
Divide your dough into eight equal portions, each weighing approximately 2 ounces, then roll each piece into a rope measuring 8-10 inches long and ¼ inch in diameter.
You’ll find that this standardized approach promotes uniform cooking and presentation.
Next, you’ll tie each rope into a simple knot, creating the distinctive shape that defines this classic form.
Tie each rope into a simple knot, creating the distinctive shape that defines this classic form.
The knot’s historical shapes reflect centuries of Mediterranean baking traditions, while its cultural symbolism represents community and celebration across various cuisines.
Press gently to secure the knot, making sure it won’t unravel during proofing or baking.
You’re now ready to arrange your shaped knots on your prepared baking sheet, spacing them 2 inches apart to allow proper rise and air circulation.
Precision in shaping guarantees consistent, professional results.
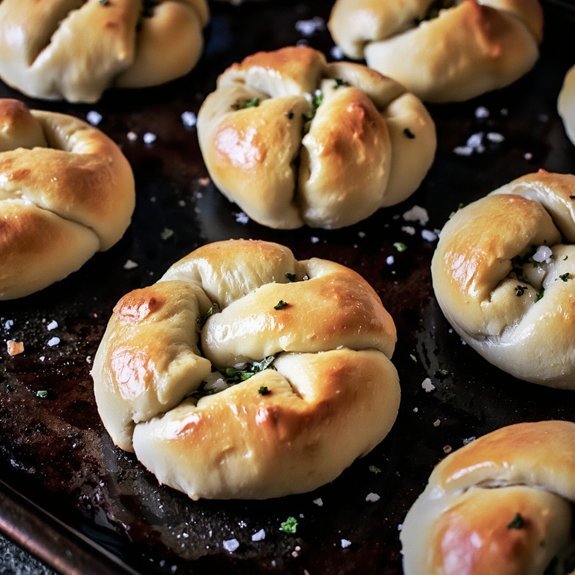
The Garlic-Butter Topping
Once your knots are shaped and arranged on the baking sheet, you’ll prepare the garlic-butter topping that defines this recipe’s signature flavor profile.
This component draws from Italian culinary history and reflects regional variations across New York’s pizzerias.
Combine these essential ingredients:
- Four tablespoons unsalted butter, melted to 180°F
- Six minced garlic cloves combined with one teaspoon kosher salt
- One tablespoon fresh parsley, finely chopped
Whisk the melted butter with your garlic-salt mixture until emulsified.
The precise temperature prevents burning while maximizing flavor extraction.
Apply this topping generously using a pastry brush immediately after the knots emerge from the oven, allowing the residual heat to activate the garlic’s aromatic compounds.
The parsley addition provides visual contrast and fresh herbaceous notes that distinguish authentic preparations from inferior renditions.
Baking to Perfection
You’ll need to preheat your oven to 375°F and maintain that temperature throughout the baking cycle to guarantee even heat distribution and proper crust development.
Allow your shaped knots a final proof of 20-30 minutes at room temperature until they’ve increased by roughly 50% in volume, which’ll give you the ideal rise without over-fermentation.
Monitor your knots closely during the 12-15 minute bake time, pulling them from the oven when they’ve achieved a deep golden-brown exterior with an internal temperature of 190-200°F.
Temperature Control Matters
Since garlic knots require precise heat to achieve their signature golden-brown exterior and pillowy interior, maintaining an oven temperature of 375°F (190°C) is critical.
This temperature must be maintained throughout the baking process.
You’ll achieve ideal results by implementing these essential temperature control techniques:
- Position your oven thermometer at mid-rack level for accurate sensor placement, ensuring you’re reading true internal temperatures rather than peripheral heat variations
- Make altitude adjustments if you’re above 3,000 feet, increasing temperature by 15-25°F to compensate for lower atmospheric pressure
- Rotate your baking sheet halfway through the 12-15 minute bake time to promote even heat distribution
You’ll want to verify your oven’s calibration monthly using an independent thermometer. This meticulous approach prevents underbaking or charring, guaranteeing consistent, restaurant-quality garlic knots every time you bake.
Timing Your Rise Correctly
Because garlic knots depend on proper fermentation for their characteristic tender crumb structure, you’ll need to monitor two distinct rising phases with precision timing. Your bulk fermentation demands 60-90 minutes at 75°F, adjustable for humidity effects and altitude adjustments. The second rise—after shaping—requires 45-60 minutes until dough springs back slowly when poked.
| Phase | Temperature | Duration | Indicator | Adjustment |
|---|---|---|---|---|
| Bulk Fermentation | 75°F | 60-90 min | 50% volume increase | +15 min per 5°F drop |
| Shaped Rise | 72-76°F | 45-60 min | Slow spring-back | Reduce 10 min above 3,000 ft elevation |
| Final Proof | Room temp | 15-20 min | Slight puff | Monitor humidity closely |
| Oven Spring | 425°F | 18-22 min | Golden brown | Reduce time in high-altitude zones |
| Cooling | 68°F | 10 min minimum | Set structure | Essential for proper texture |
Humidity effects dramatically influence your timeline—increase duration 15-20% in high-moisture environments.
Golden Brown Crust Secrets
Once your dough’s risen to the proper volume, achieving that signature golden-brown exterior hinges on mastering oven temperature, steam management, and bake-time calibration.
You’ll control two critical chemical processes during baking:
- Maillard reaction: Occurs at 300°F+, creating complex flavor compounds and browning through amino acid-sugar interactions
- Sugar caramelization: Happens at 320°F+, developing deeper color and subtle sweetness from lactose in your dough
- Steam injection: Maintain 90% humidity for the first 8-10 minutes to keep your crust flexible, then vent to allow final browning
You’ll preheat your oven to 425°F, introduce steam immediately upon loading, and monitor internal temperature reaching 205-210°F.
Rotate your knots halfway through the 12-15 minute bake for even color development.
This methodical approach guarantees consistent, restaurant-quality results you control completely.
Storage and Serving Tips
To maximize freshness, you’ll want to store your garlic knots in an airtight container at room temperature for up to two days, or refrigerate them at 40°F for up to five days.
For extended preservation, freezer instructions recommend wrapping individual knots in parchment paper, then placing them in freezer-safe bags for up to three months. Thaw frozen knots at room temperature for thirty minutes before reheating.
Serving suggestions include warming refrigerated knots in a 350°F oven for five minutes to restore ideal texture and aroma.
You can also reheat them in a microwave at fifty percent power for forty-five seconds per knot. Pair your garlic knots with marinara sauce, olive oil for dipping, or enjoy them standalone as an appetizer or side dish that satisfies your desire for authentic, homemade flavor.
Frequently Asked Questions
Can I Make Garlic Knots Ahead of Time and Freeze Them Before Baking?
You can absolutely freeze garlic knots before baking.
Shape your dough, then employ the parbake technique by briefly baking at 375°F for 8-10 minutes until partially set.
Cool completely, freeze on sheet trays, then transfer to freezer bags for up to three months.
For thawing methods, defrost overnight in your refrigerator or bake directly from frozen at 400°F for 12-15 minutes.
This approach gives you maximum flexibility and freshness.
What’s the Best Substitute if I Don’t Have Fresh Garlic Available?
You’ll want to use garlic powder at a 1:3 ratio—one teaspoon fresh equals one-third teaspoon powder.
Alternatively, roasted garlic delivers superior depth; substitute one clove fresh with half a teaspoon roasted garlic paste.
You’re not locked into conventional choices—experiment with both methods.
Garlic powder provides convenience and shelf stability, while roasted garlic offers complex flavor profiles.
Adjust quantities methodically based on your preferred intensity, ensuring consistent distribution throughout your dough mixture.
How Do I Prevent My Garlic Knots From Becoming Too Greasy?
You’ll prevent excess grease by controlling your butter alternatives—opt for clarified butter or oil spray instead of whole butter.
Apply your brushing technique sparingly, using a pastry brush with measured strokes rather than saturating the dough.
Bake at precise temperatures (425°F) for ideal results.
You’re free to experiment with lighter options like garlic-infused olive oil.
Monitor your knots closely; they’ll brown beautifully without becoming greasy when you follow this structured methodology consistently.
Can I Use Store-Bought Dough to Make Garlic Knots More Quickly?
You’ll absolutely save time using store-bought dough. Your dough selection dramatically impacts results—thawed puff pastry or pizza dough both work well.
Master your shaping techniques by rolling dough into uniform strips, approximately ¼-inch thick, then tie each into knots without overtightening. This precision prevents uneven cooking.
You’re free to skip fermentation entirely, brushing knots with your garlic-herb mixture before baking at 400°F for 12-15 minutes until golden. This shortcut delivers restaurant-quality results without the labor.
Why Did My Garlic Knots Turn Out Dense Instead of Fluffy?
You’ve likely underproofed your dough, preventing adequate yeast fermentation and CO₂ production.
Alternatively, you’ve overworked the gluten network during kneading, compressing gas pockets and creating a tight crumb structure.
Make sure your dough rises until doubled in volume—approximately 60-90 minutes at 75°F.
Handle the dough minimally after proofing; use gentle folding techniques rather than aggressive kneading. This methodology guarantees your garlic knots achieve the light, airy texture you’re after.
Leave a Comment