Key Takeaways
- Combine 3 cups flour, 2¼ teaspoons yeast, 1 cup milk heated to 110°F, butter, egg, salt, and sugar for dough.
- Knead for 8–10 minutes until smooth and elastic, passing the windowpane test for proper gluten development.
- First rise at 68–75°F for 1–2 hours until dough doubles; visual cues indicate readiness better than strict timing.
- Divide into 12 equal pieces, shape into balls, rest 5 minutes, then proof 60–90 minutes until nearly doubled.
- Bake at 375°F for 15–20 minutes until golden-brown; brush with egg wash before baking for enhanced browning.
Ingredients You’ll Need
You’ll need all-purpose flour, warm milk, active dry yeast, butter, eggs, salt, and sugar to create these pillowy rolls.
You can experiment with flour varieties like bread flour for added structure or whole wheat flour for deeper flavor.
For flexibility in your baking, consider butter alternatives such as coconut oil or olive oil, which produce equally tender results while accommodating dietary preferences.
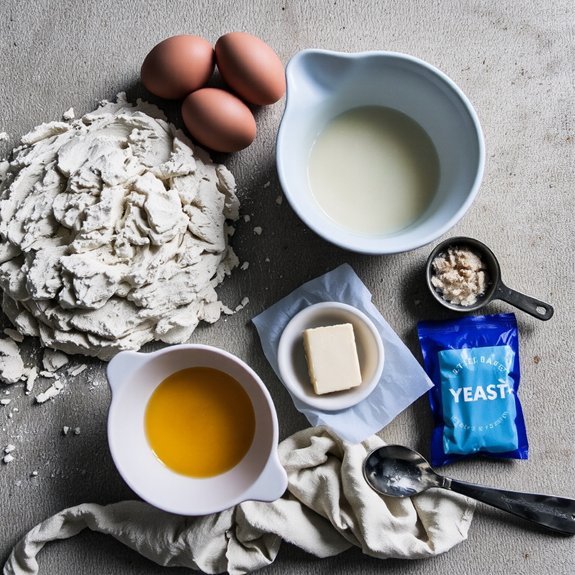
Gather your ingredients in precise measurements: 3 cups flour, 1 cup milk heated to 110°F, 2¼ teaspoons yeast, 4 tablespoons butter or alternative, 1 egg, 1½ teaspoons salt, and 3 tablespoons sugar.
Room-temperature ingredients blend more seamlessly, so remove your egg and milk from refrigeration beforehand. You’ll achieve ideal texture by maintaining exact temperatures—cold ingredients resist proper hydration, while overheated milk kills the yeast’s leavening power.
Equipment and Tools
With your ingredients measured and at the proper temperature, gathering the right equipment facilitates smooth dough development and consistent results.
Proper equipment and measured ingredients create the foundation for smooth dough development and consistently superior baking results.
You’ll want to invest in tools that give you complete control over your baking process.
Essential equipment includes:
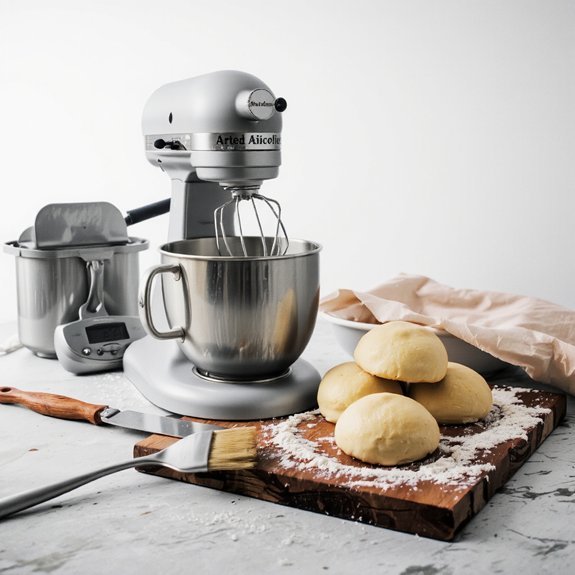
- Stand mixer with dough hook attachment for efficient kneading
- Digital scale for precise ingredient measurements
- Instant-read thermometer to monitor dough temperature
- Bench scraper with ergonomic handles for easy dough manipulation
- Proofing box or warm environment for ideal rising
Material comparison matters: stainless steel bowls resist rust and odors, while glass allows you to monitor dough visibly.
Choose equipment with ergonomic handles to reduce hand fatigue during extended prep work.
Quality tools enable you to produce consistently superior rolls while maintaining comfort throughout your baking freedom.
Preparing Your Dough
You’ll start by combining your flour, sugar, salt, and instant yeast in a large bowl, then create a well in the center where you’ll pour your warm milk, melted butter, and beaten eggs.
Mix these wet and dry ingredients together until you’ve formed a shaggy dough, then transfer it to a floured surface where you’ll knead it for 8-10 minutes until it becomes smooth, elastic, and springs back when you poke it.
This kneading develops the gluten structure that’ll give your rolls their characteristically soft, tender crumb.
Mixing Your Ingredients
Combine your flour, sugar, salt, and instant yeast in a large mixing bowl, whisking them together until they’re evenly distributed.
This dry mixture forms your foundation for perfect rolls.
Next, you’ll warm your milk and water to 110°F—the ideal temperature for activating yeast without killing it.
Pour this warm liquid into your dry ingredients along with melted butter and eggs. Mix vigorously until a shaggy dough forms.
Building Your Dough:
- Stir until no dry flour remains
- Let ingredients hydrate for two minutes
- Knead by hand or with a stand mixer for eight minutes
- Dough should feel smooth and slightly tacky
- Add flour only if excessively sticky
Put on your mixing playlist and embrace this tactile moment—many families pass down their yeast-baking traditions through this very step.
You’re now ready to let your dough rise and develop those signature soft textures that make homemade rolls irresistible.
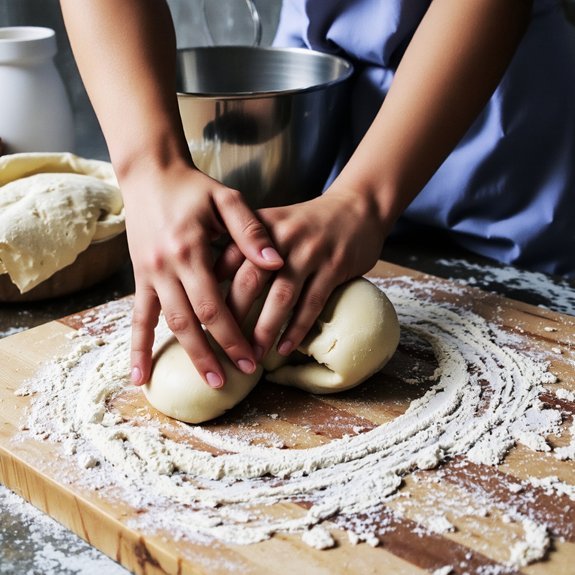
Kneading the Dough
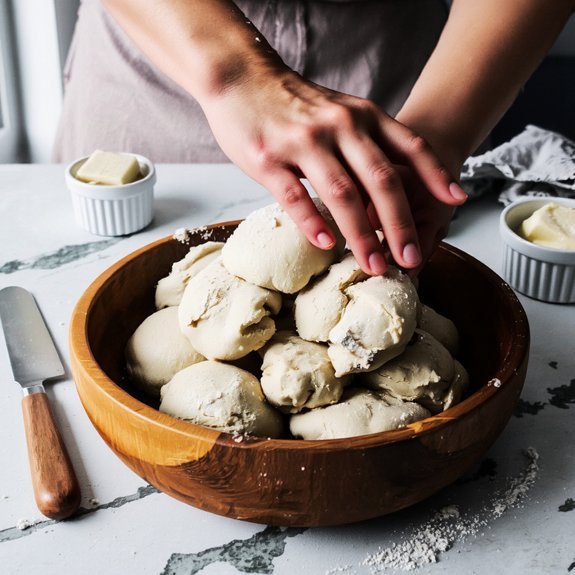
Now that your ingredients have come together into a shaggy mass, it’s time to transform this rough mixture into silky, elastic dough through kneading. Push the dough away from you with the heel of your hand, fold it back over itself, rotate it a quarter turn, and repeat for eight to ten minutes.
This rhythmic motion—a form of hand therapy and mindfulness practice—develops gluten strands that give your rolls their tender structure. You’ll know you’re done when the dough becomes smooth, elastic, and slightly tacky but not sticky.
It shouldn’t stick to your work surface or hands, though a light coating of flour prevents sticking. This meditative process liberates you from rigid rules; trust your instincts and feel the dough transform beneath your palms.
Mixing and Kneading Techniques
Once you’ve gathered your ingredients, proper mixing sets the foundation for tender, pillowy rolls.
You’ll want to combine your dry ingredients first, then gradually incorporate wet components to prevent lumps.
Kneading techniques have historical origins in various cultural methods across Europe and beyond.
Here’s your process:
- Mix on low speed for 2-3 minutes until a shaggy dough forms
- Knead for 8-10 minutes until smooth and elastic
- Check readiness with the windowpane test—stretch a small piece until translucent
- Watch for a slight shine indicating proper gluten development
- Stop before the dough becomes tacky or overly stiff
You’re building gluten networks that trap gas, creating that signature softness you’re after.
Don’t rush this phase.
Proper technique gives you rolls with structure and tenderness in every bite.
The First Rise: Bulk Fermentation
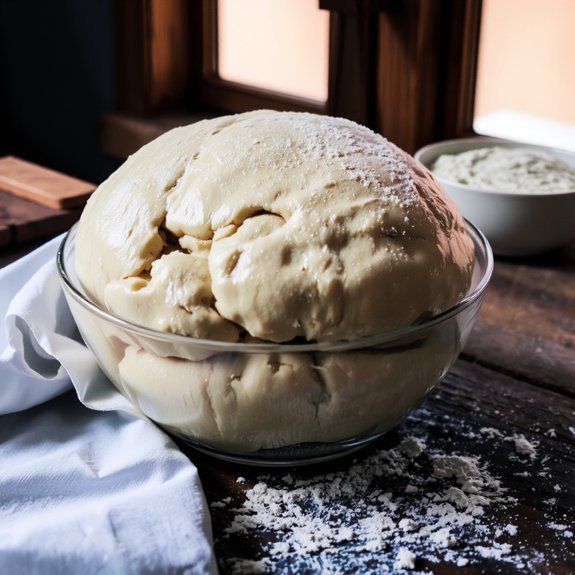
You’ll want to place your dough in a lightly oiled bowl and let it rise at room temperature (68–75°F) for 1–2 hours until it roughly doubles in size—this timing varies based on your kitchen’s warmth.
Watch for these key development signs: the dough should feel airy and pillowy, spring back slowly when you poke it, and show visible bubbles on the surface.
Getting the temperature and duration right prevents underfermentation, which yields dense rolls, or overfermentation, which compromises their tender crumb structure.
Time and Temperature Control
How long should dough ferment before shaping?
You’ll need 4–6 hours at room temperature, though ambient humidity and thermal gradients substantially impact timing.
Warmer environments accelerate fermentation; cooler spaces slow it down.
Monitor your dough’s progress by these indicators:
- Dough volume increases 50–75% visibly
- Surface develops slight dimpling from gas pockets
- Interior feels airy yet structured
- Poke test: indentation slowly springs back halfway
- Dough temperature reaches 75–78°F
You control fermentation speed through temperature management.
Place dough in a warm spot to speed things up, or use your refrigerator to slow fermentation overnight.
Don’t rely solely on time—visual cues and tactile feedback guide you toward perfectly proofed dough.
Trust your observations; they’ll determine your rolls’ final texture and rise.
Dough Development Signs
You’ll observe your dough’s transformation through distinct physical changes. The surface tension tightens as gluten networks develop, creating a smoother, more elastic exterior. You’ll notice aroma evolution—from neutral to pleasantly yeasty—signaling active fermentation. The dough should increase 50-75% in volume, feeling pillowy yet responsive when poked.
| Stage | Visual Cue | Tactile Feedback |
|---|---|---|
| 30 min | Slight rise begins | Firmer surface |
| 60 min | Visible expansion | Elastic resistance |
| 90 min | Significant volume gain | Soft, airy interior |
| 120 min | Dough almost doubles | Gentle spring-back |
| 150+ min | Full development | Over-proofed risk |
These signs grant you control over your fermentation process, freeing you from rigid timing constraints.
Shaping Your Rolls
Dividing your dough into equal portions guarantees even baking and a professional appearance.
You’ll want to work quickly so your dough doesn’t dry out.
Here’s your shaping roadmap:
- Divide dough into 12 equal pieces using a bench scraper
- Pre-shape each portion into a tight ball, sealing seams underneath
- Rest for 5 minutes to relax the gluten
- Final shape using braid variations or twist finishes for visual appeal
- Place seam-side down in greased pans, spacing them ½ inch apart
Roll each ball gently between your palms, creating surface tension that’ll give you that signature soft texture.
Whether you’re experimenting with braid variations or simple twist finishes, consistent technique produces superior results.
Your rolls’ll rise beautifully and bake evenly when shaped properly.
The Second Rise: Final Proofing
After shaping, your rolls enter their most pivotal stage—the final proofing where they’ll nearly double in size and develop their signature pillowy texture.
Cover your pan with plastic wrap or a clean towel, then place it in a warm, draft-free spot for 60-90 minutes.
You’ll know proofing’s complete when you observe auditory indicators: a gentle poke produces a slow spring-back.
The dough shouldn’t collapse entirely or spring back immediately.
Your proofing rituals determine everything.
If your kitchen runs cool, use your oven’s light as a warming chamber.
Watch for visible expansion rather than relying solely on time—environmental conditions vary.
When rolls reach the proper volume, they’re ready for the oven’s transformative heat.
Baking to Golden Perfection
Transforming your proofed rolls into golden, tender treasures requires precision timing and proper oven technique.
You’ll want to preheat your oven to 375°F and verify accuracy through oven calibration—this guarantees consistent results across batches.
Here’s what you need to control:
- Brush rolls with egg wash for enhanced browning
- Position racks to avoid uneven heat exposure
- Monitor internal temperature at 190-200°F for doneness
- Watch for Maillard reactions beginning around 12 minutes
- Rotate pans halfway through for uniform color
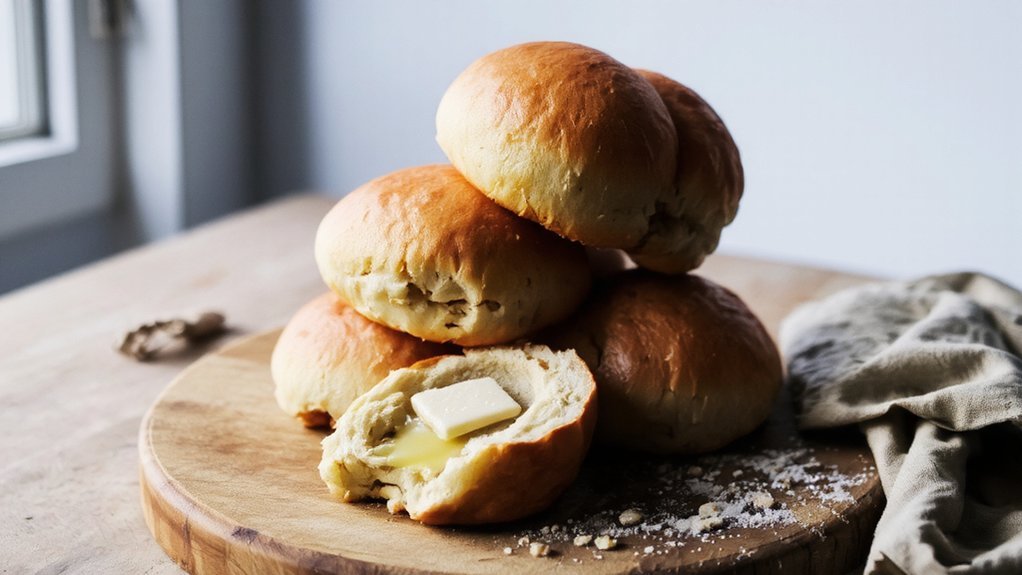
Bake for 15-20 minutes until deep golden-brown exteriors form.
The Maillard reactions create that desirable crust while interior crumbs stay soft.
Don’t overbake—your rolls should feel slightly yielding when pressed.
Remove them immediately when done, then cool on wire racks to prevent steam from making bottoms soggy.
Finishing Touches and Glazing
Once your rolls have cooled slightly on the wire racks, you’ll apply glazes and toppings that elevate both flavor and appearance. Choose your finishing approach strategically to maximize visual appeal and taste impact.
| Glaze Type | Application Method | Best Uses |
|---|---|---|
| Butter wash | Brush while warm | Classic shine |
| Egg wash | Apply before baking | Golden crust |
| Honey glaze | Brush after cooling | Sweet finish |
For herb garnishes, sprinkle fresh rosemary or thyme immediately after glazing. Seed toppings—sesame, poppy, or everything bagel blend—adhere best to wet surfaces. Press seeds gently to make sure they stick. This final step transforms your rolls from good to exceptional, delivering professional-quality results that satisfy your desire for freedom in the kitchen.
Storage and Reheating Tips
You’ll want to freeze your rolls in an airtight container for up to three months, preserving their soft texture and preventing freezer burn.
For shorter storage, refrigerate them in a sealed bag where they’ll stay fresh for three to four days without drying out.
When you’re ready to enjoy them, reheat frozen rolls wrapped in foil at 350°F for 15-20 minutes, or thaw room-temperature rolls and warm them briefly to restore their pillowy softness.
Freezing Fresh Dinner Rolls
Because dinner rolls are best enjoyed within a day or two of baking, freezing them extends their shelf life to up to three months while preserving their soft texture and subtle flavor.
Understanding freezer science helps you protect your rolls from ice crystals that compromise quality.
Here’s how you’ll freeze them effectively:
- Cool rolls completely before wrapping to prevent condensation
- Wrap individually in plastic wrap, then place in freezer bags
- Remove excess air to minimize ice crystal formation
- Label bags with the freezing date for easy tracking
- Store at 0°F or below for ideal preservation
When you’re ready to enjoy them, thaw rolls at room temperature for two hours, then warm in a 350°F oven for five minutes.
You’ll reclaim that fresh-baked softness and flavor you’ve preserved.
Refrigerator Storage Methods
While freezing extends your rolls’ lifespan considerably, refrigeration offers a convenient option when you’re planning to enjoy them within three to four days.
Place your cooled rolls in an airtight container to prevent condensation prevention issues that lead to sogginess.
If you don’t have a container, wrap them tightly in plastic wrap or aluminum foil.
For odor absorption, place a small open box of baking soda on your refrigerator shelf near the rolls.
This neutralizes competing food odors that might transfer to your bread.
When you’re ready to eat, simply remove the rolls and let them reach room temperature for fifteen minutes.
You can also microwave individual rolls for ten to fifteen seconds for ideal softness.
This straightforward method keeps your rolls fresh and ready whenever hunger strikes.
Best Reheating Techniques
Restoring your rolls to their original soft, pillowy texture requires choosing the right reheating method based on your time constraints and equipment available.
You’ve got several excellent options:
- Steam Revival: Place rolls in a steamer basket over boiling water for 2-3 minutes—this method locks in moisture without drying them out
- Oven Wrap Method: Wrap rolls in damp paper towels, then foil, and heat at 350°F for 5-7 minutes
- Skillet Crisping: Warm rolls in a cast-iron skillet over medium heat for gentle, even heating
- Microwave Quick Fix: Wrap individually and microwave for 15-20 seconds maximum to prevent toughness
- Broiler Toasting: Position rolls 4 inches from heat for 1-2 minutes for golden exteriors
Each technique preserves the tender crumb structure you’ve worked to achieve.
Choose based on your available time and desired texture outcome.
Frequently Asked Questions
Can I Make Soft Dinner Rolls Without Eggs, and What’s a Good Substitute?
You can absolutely make soft dinner rolls without eggs. Try aquafaba substitute—that’s the liquid from canned chickpeas—which creates tender, fluffy crumbs.
Alternatively, use a flaxseed egg: mix one tablespoon ground flaxseed with three tablespoons water, let it sit five minutes until gelatinous.
Both options bind your dough effectively while maintaining that pillowy texture you’re after. You’ll achieve golden-brown rolls with excellent rise and moisture retention.
How Do I Know if My Dough Has Risen Enough During Bulk Fermentation?
You’ll know your dough’s risen enough when you’ve got solid visual cues. It should’ve increased roughly 50-75% in volume, looking puffy and airy.
Try the poke test: gently press your finger into the dough. If the indent slowly springs back halfway, you’re golden. If it bounces back immediately, it needs more time. If it doesn’t spring back at all, you’ve overproofed it.
That’s your signal to shape and bake.
What’s the Difference Between Active Dry Yeast and Instant Yeast for Rolls?
You’ll find instant yeast granules are finer and smaller than active dry yeast’s larger particles. This difference means instant yeast hydrates faster, giving you quicker fermentation and subtly enhanced flavor development in your rolls.
Storage-wise, instant yeast stays fresher longer in airtight containers since its reduced surface area resists oxidation better.
You can substitute them one-to-one, though instant yeast acts slightly more aggressively, so you’ve got flexibility in your baking approach.
Can I Prepare the Dough the Night Before and Refrigerate Overnight?
You can absolutely prepare your dough the night before and refrigerate it overnight—this technique’s called overnight retardation. It’s your choice to do this, and you’ll actually benefit from it.
The cold fermentation dramatically enhances flavor development through extended enzymatic activity. Simply mix your dough, place it in a covered container, refrigerate it overnight, then shape and proof your rolls at room temperature before baking. This method gives you complete control over your baking schedule.
Why Are My Rolls Turning Out Dense Instead of Light and Fluffy?
You’re likely under-kneading or misjudging your hydration level. Knead until you’ve developed gluten strands—the dough should feel smooth and elastic, not dense.
If your hydration’s too low, your rolls won’t rise properly. Aim for slightly tacky dough that springs back when poked.
Don’t skip the second rise; let bulk fermentation happen fully. You’ve got the freedom to adjust water content until you nail that perfect, airy crumb structure.


Leave a Comment