
Key Takeaways
- Combine 500g whole wheat flour, 325mL water, 10g salt, 7g yeast, and 5g honey for basic dough.
- Knead 8–10 minutes by hand until smooth and elastic; dough should pass the windowpane test.
- Bulk ferment 4–6 hours at 68–72°F until dough increases 50–75% in volume, not fully doubled.
- Preheat oven to 450°F with Dutch oven; bake 35–40 minutes until internal temperature reaches 205–210°F.
- Cool completely on wire rack for 2–3 hours before slicing to allow proper moisture redistribution.
Why Choose Whole Wheat Bread

When you’re selecting bread varieties, whole wheat offers measurable nutritional advantages over refined white bread.
You’re getting three grams of fiber per slice versus less than one gram in white bread.
The bran and germ layers retain B vitamins, minerals, and antioxidants that processing removes.
You’ll experience sustained energy from whole wheat’s lower glycemic index, preventing blood sugar spikes.
You’re consuming selenium, manganese, and magnesium—nutrients your body requires for peak function.
The environmental impact matters too.
Whole wheat cultivation requires fewer synthetic inputs and supports soil health better than industrial grain production.
You’re choosing a product aligned with sustainable farming practices.
When you select whole wheat, you’re making an informed choice about your body’s fuel and the planet’s future.
Freedom means controlling what fuels you.
2. Essential Ingredients You’ll Need

You’ll need just five core ingredients to make whole wheat bread: 500 grams of whole wheat flour, 325 milliliters of water (65% hydration ratio), 10 grams of salt, 7 grams of instant yeast, and 5 grams of sugar or honey to activate fermentation.
| Ingredient | Function |
|---|---|
| Whole wheat flour | Provides fiber and minerals; enhances nutritional profile |
| Water | Develops gluten structure at precise hydration ratio |
| Salt | Controls fermentation rate and flavor development |
| Instant yeast | Powers rise through controlled fermentation |
| Sweetener options | Activates yeast; honey adds complexity |
You’ve got flexibility with sweetener options—both sugar and honey work effectively, though honey delivers superior nutritional profile and subtle depth. Measure ingredients by weight for accuracy. Your bread’s success depends on respecting these ratios and understanding each ingredient’s role in the process.
3. Equipment for Success

Proper equipment transforms whole wheat bread baking from guesswork into a reproducible, precision-driven process.
You’ll need a digital scale for accurate flour measurements—whole wheat’s density demands exact ratios.
Scale accuracy determines whether you’re hitting your target hydration levels or sabotaging your dough’s structure.
An oven thermometer is non-negotiable.
Your oven’s display lies; oven calibration guarantees consistent crust development and crumb structure.
You’re freed from relying on factory settings that vary wildly.
Invest in a Dutch oven or covered baker for steam retention during the critical first phase.
A dough scraper handles whole wheat’s stickier consistency.
A banneton proofing basket maintains shape during rise.
These tools give you control.
You’re not guessing anymore—you’re executing a defined system that yields reproducible results every single time.
4. Mixing Your Dough
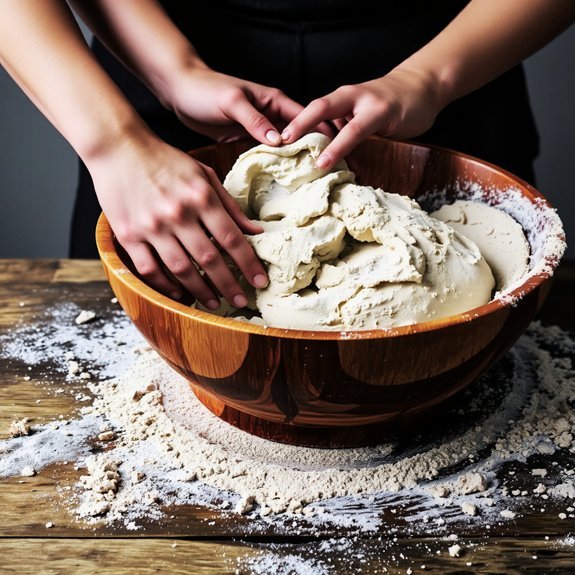
You’ll combine your dry ingredients—flour, salt, and yeast—before adding water at a 3:1 ratio to create your base mixture.
Knead your dough for 8-10 minutes using a stretch-and-fold technique until it reaches a smooth, elastic consistency with slight tackiness.
Your properly mixed dough should pass the windowpane test, stretching thin enough to see light without tearing.
Combining Ingredients Together
Once you’ve assembled your dry ingredients and activated your yeast, it’s time to combine everything into a cohesive dough.
Pour your yeast mixture into the dry blend and stir vigorously for 2-3 minutes until no flour remains visible. You’ll notice the color contrast between wet and dry zones disappearing as integration occurs.
The aroma blending of whole wheat and fermented yeast signals proper activation.
Your mixing process requires:
- Incorporating liquid at 95°F for ideal yeast activation
- Achieving a shaggy consistency before kneading begins
- Maintaining 70% hydration ratio for whole wheat bread
- Blending for complete flour hydration within 3 minutes
- Monitoring dough temperature between 75-78°F
The resulting mass should hold together without stickiness.
You’re now ready for the kneading phase, where gluten development strengthens your dough’s structure and elasticity for superior bread quality.
Kneading Technique and Timing
Kneading develops gluten strands that give your bread structure and chew, requiring 8-10 minutes of consistent hand-kneading or 5-6 minutes with a stand mixer on medium speed. Your hand posture matters—cup your fingers slightly and push the dough away with your palm heel, folding it back toward you rhythmically. Maintain steady knead pacing to build consistent gluten networks without overworking the dough.
| Kneading Method | Ideal Duration |
|---|---|
| Hand-kneading | 8-10 minutes |
| Stand mixer | 5-6 minutes |
| Temperature check | 75-78°F |
| Gluten development | Smooth, elastic texture |
| Rest period after | 10 minutes |
You’ll recognize proper kneading when your dough shifts from shaggy to smooth and springs back when poked. Don’t rush this critical phase—adequate gluten development directly determines your bread’s final texture and rise capability.
Achieving Proper Dough Consistency
Combining your dry and wet ingredients requires precise ratios to achieve the ideal dough consistency—aim for a hydration level between 60-65% (meaning if you’re using 500g flour, you’ll need roughly 300-325g water).
You’ll adjust these ratios based on your environment:
- Ambient humidity: High moisture requires less water; dry conditions demand more
- Altitude adjustments: Higher elevations need increased hydration due to faster evaporation
- Flour absorption rates: Whole wheat absorbs more liquid than white flour
- Temperature variables: Warmer kitchens affect dough development speed
- Visual cues: Your dough should feel tacky but manageable, not sticky or stiff
Mix until you’ve achieved a shaggy mass.
The dough’s texture tells you everything—you’re aiming for cohesion without excessive stickiness that’ll sabotage your process.
5. The First Rise: Bulk Fermentation

After mixing your dough, you’ll let it rest for 4-6 hours at room temperature (68-72°F), during which time yeast and bacteria ferment the flour and develop flavor compounds.
Let your dough rest 4-6 hours at room temperature as yeast and bacteria develop complex flavor compounds through fermentation.
This bulk fermentation stage transforms your dough through enzymatic activity and gluten development.
You’ll monitor your fermentation timeline carefully—warmer temperatures accelerate fermentation, while cooler conditions slow it.
Aim for 50-75% volume increase, not full doubling, which prevents overproofing.
Temperature control directly impacts fermentation speed and flavor development.
Whole wheat dough ferments faster than white flour variants due to higher enzyme activity.
Perform the windowpane test halfway through: stretch a small dough piece until translucent without tearing.
You’ve achieved proper gluten development when it holds without breaking.
This fermentation period builds complexity and digestibility in your final loaf.
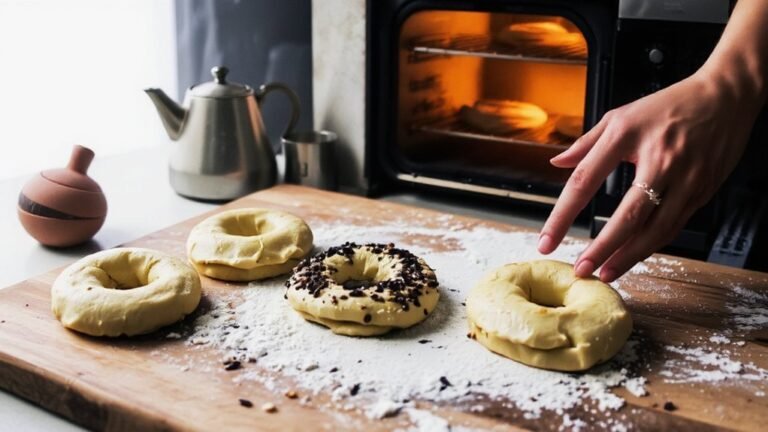
6. Shaping Your Loaf
You’ll pre-shape your dough by gently folding it into a round, resting it seam-side up for 20-30 minutes to relax the gluten network.
During final shaping, you’ll build surface tension by pulling the dough toward you in overlapping motions, creating the structure that supports vertical oven spring.
Once shaped, you’ll place your loaf seam-side down in a banneton or bowl lined with a floured towel, where it’ll undergo its final 2-4 hour proof before scoring and baking.
Pre-Shaping Techniques Matter
Before you shape your final loaf, pre-shaping creates surface tension that strengthens the dough’s structure and improves oven spring.
You’ll develop critical tactile and visual cues that determine your bread’s final quality.
Pre-shaping techniques you shouldn’t skip:
- Tension building: Use deliberate hand movements to create surface tightness
- Gluten alignment: Orient strands toward the loaf’s exterior for structural integrity
- Rest periods: Allow 20-30 minutes between pre-shape and final shaping
- Flour application: Dust strategically to prevent sticking without compromising hydration ratios
- Fold consistency: Execute identical folds each time for predictable results
You’ll recognize readiness through tactile feedback—the dough should feel firm yet responsive. Visual cues include a smooth, slightly domed surface with minimal cracks. These techniques give you direct control over your bread’s architecture, ensuring consistent, superior results every bake.
Building Surface Tension
The shaping-process itself determines whether your dough develops the surface tension necessary for an impressive oven spring and a sturdy crumb structure. You’ll create tension by stretching the outer gluten network deliberately and methodically.
| Technique | Effect |
|---|---|
| Bench scraper tension | Strengthens gluten bonds |
| Fold-and-roll method | Distributes capillary action evenly |
| Pre-shape resting | Allows gluten relaxation |
| Final shaping pressure | Locks in surface tautness |
You’re exploiting the Marangoni Effect—surface-active compounds redistributing across your dough’s exterior. This gradient-driven flow strengthens your crust’s structural integrity. Work deliberately: pull dough toward you, rotating ninety degrees between passes. Don’t rush this phase. Your whole wheat flour demands respect; its bran particles disrupt gluten networks, so you’ll compensate through aggressive tension-building.
Final Proofing Placement
Once your dough’s surface tension is locked in place, it’s time to transfer it into your proofing vessel—typically a banneton basket or bowl lined with a well-floured cloth.
Position your shaped loaf seam-side up.
You’ll now choose your proofing location based on ambient temperature:
- Warm environment (75-78°F): countertop corner away from direct heat
- Cool environment (68-72°F): window sill for gentle warmth
- Cold environment (below 65°F): inside your oven with light on
- Humidity control: cloth covering prevents surface drying
- Duration: 4-16 hours depending on temperature and fermentation stage
You’re controlling fermentation speed through placement strategy.
A warmer location accelerates gluten relaxation; cooler spots extend bulk fermentation for deeper flavor development.
Monitor your dough’s readiness—it’ll pass the poke test when your finger leaves a slow-rising indentation.
7. The Second Rise: Final Proofing
After you’ve shaped your dough, you’ll place it seam-side up in a banneton basket or bowl lined with a floured towel, then let it undergo its final proof at room temperature (68-72°F) for 2-4 hours, or in the refrigerator for 8-16 hours. You control the fermentation pace based on your schedule—cold proofing grants you flexibility without compromising flavor development.
| Proofing Method | Duration | Benefits |
|---|---|---|
| Room Temperature | 2-4 hours | Rapid fermentation, active yeast activity |
| Refrigerated | 8-16 hours | Extended flavor development, flexible timing |
Monitor timing indicators carefully: your dough should increase 50-75% in volume without overproofing. Perform the poke test—gently press the surface. If the indentation springs back slowly, you’ve achieved ideal readiness. Maintain humidity control by keeping your towel slightly damp, preventing surface crusting that’d restrict oven spring and compromise your final loaf’s structure.
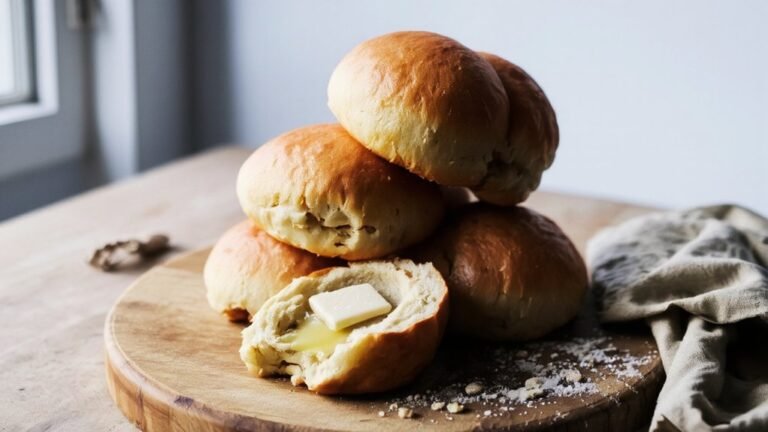
8. Baking to Golden Perfection
Your properly proofed dough now requires precise oven conditions to achieve that signature golden crust and ideal crumb structure.
Preheat your oven to 450°F (232°C).
You’ll create steam during the first 15 minutes—this keeps your crust flexible while the Maillard chemistry develops those complex flavors and rich browning.
Place a Dutch oven inside or use a steam pan on the lower rack.
Score your dough decisively with a sharp blade, allowing controlled expansion that enhances crust aesthetics.
Key baking variables:
- Oven temperature consistency throughout the 35-40 minute bake
- Steam injection timing for ideal crust development
- Internal crumb temperature reaching 205-210°F
- Crust color progression from pale to deep golden-brown
- Cooling period allowing structure to set completely
Remove when your crust achieves golden perfection and sounds hollow when tapped.
You’ve earned genuine artisan bread.
9. Cooling and Storage Tips
The moment you remove that hollow-sounding loaf from the oven marks the beginning of a critical phase that determines your bread’s final texture and shelf life. You’ll want to cool your loaf completely on a wire rack—typically 2-3 hours—before slicing. This cooling period allows internal moisture to redistribute, preventing a gummy crumb structure.
| Storage Method | Duration | Temperature |
|---|---|---|
| Countertop | 2-3 days | Room temperature |
| Refrigerator | 7-10 days | 40°F |
| Freezer | 3 months | 0°F or below |
For freezer slicing, you’ll cut your bread while fully cooled, then freeze individual slices on a baking sheet before transferring to freezer bags. This technique preserves crumb preservation by preventing condensation damage during thawing. You’re maintaining your bread’s structural integrity and maximizing its lifespan through intentional post-baking management.
Frequently Asked Questions
Can I Substitute Whole Wheat Flour With All-Purpose Flour in This Recipe?
You can substitute all-purpose flour for whole wheat, though you’ll need hydration adjustments since all-purpose absorbs less water.
Expect significant texture changes—you’ll get a lighter, less dense crumb with reduced nutty flavor complexity.
Reduce your liquid by 10-15% initially, then adjust based on dough consistency.
This swap gives you more control over your final product’s structure, letting you customize the outcome precisely to your preferences and baking style.
How Long Does Homemade Whole Wheat Bread Stay Fresh After Baking?
Your homemade whole wheat bread’ll stay fresh for 3-4 days at room temperature using proper storage methods.
You’ll maximize shelf life by keeping it in an airtight container or bread bag, which prevents moisture loss while controlling humidity levels.
For extended preservation, you’re free to freeze it up to 3 months.
The dense crumb structure of whole wheat naturally resists staleness longer than white varieties, giving you more control over your bread’s lifespan.
What’s the Difference Between Whole Wheat and Whole Grain Bread Flour?
You’ll find whole wheat flour comes from the entire kernel through a single milling process, while whole grain flour encompasses multiple grain varieties.
Your nutritional comparison reveals whole wheat offers consistent protein and fiber ratios, whereas whole grain blends vary based on grain composition.
You control your bread’s character by selecting either whole wheat’s predictable performance or whole grain’s versatile complexity.
The milling process determines your flour’s particle size and hydration requirements.
Can I Freeze Whole Wheat Bread Dough for Later Use?
You can absolutely freeze whole wheat dough.
Your freezing technique matters: wrap it tightly in plastic wrap, then place it in an airtight container.
Store at 0°F for up to three months.
For thawing tips, transfer your dough to the refrigerator overnight, allowing gradual temperature adjustment.
This preserves gluten structure and fermentation activity.
You’ll maintain ideal hydration ratios and achieve superior crumb development compared to unfrozen batches.
Why Does My Whole Wheat Bread Taste Bitter or Dense Sometimes?
You’re experiencing Bran Bitterness and Underproofing Problems.
High bran content oxidizes during fermentation, creating harsh flavors—control this by reducing whole wheat to 50% of your flour blend.
You’ll also get dense crumbs when you’re not giving dough sufficient rise time.
Extend your bulk fermentation to 4-5 hours, monitoring for proper volume increase.
Precise hydration ratios matter too; whole wheat absorbs more water, so increase your liquid by 3-5% for ideal structure and flavor development.


Leave a Comment